
How to create an app to monitor processes in real time.
When was the last time you wanted to know the status of a command, script or process when away from the computer? Wouldn't it be great to free yourself from the office chair even though you are supposed to monitor something? The key to making this happen lies in modern Web technology.
A Web application is just another term for an interactive Web page. Mojolicious provides an excellent platform to launch a Web application. Many smartphones are equipped with Web browsers capable of consuming Web applications. Linux provides the best medium to bring both together.
Mojolicious is a shiny new Perl Web framework adapted from the technology previously known as Catalyst. Mojolicious is an HTML5-compliant tool that contains all the bells and whistles you would expect in a modern Web framework. I love Perl, so naturally I was on it like a nerd on Star Trek paraphernalia (which I also probably would be on).
I won't go too far into the advantages of Mojolicious and Perl, but I will mention that Perl has been known as the “duct tape of the Internet”. It is hard to go wrong with the tremendous amount of modules, free code and support available.
I wanted something very basic to start this article. Luckily, Mojolicious comes with template tools and standalone Web servers. This allows for a very quick startup—no mucking around with Apache or anything like that, until you are ready to scale up, that is.
First, you need to have Perl installed on your system. It should be available in most repositories if it isn't installed by default.
Installing Mojolicious is as easy as typing the following:
curl -L cpanmin.us | perl - Mojolicious
This needs to be done as root. On Debian-based systems, like Ubuntu, you would type it as follows:
sudo -s 'curl -L cpanmin.us | perl - Mojolicious'
That's all you need. Let's get started.
Some nice template tools are available in Mojolicious. For the sake of this article, however, let's leave that for later. First, let's create the simplest Mojolicious application possible by typing the following into a file called gobble-first.pl:
#!/usr/bin/perl
use Mojolicious::Lite;

get '/' => {text => 'This is just the beginning!'};
app->start;
The first two lines source the Perl executable and Mojolicious module. The third line prints a simple message when a browser hits the root URL. The last line tells Mojolicious to start running.
Make the file executable by typing:
chmod 744 gobble-first.pl
Now, execute the file with:
./gobble-first daemon
The daemon option tells Mojolicious to start the lightweight HTTP server that comes packaged with the framework.
The command output that follows tells you Mojolicious is running on port 3000. Open a Web browser and point it to http://localhost:3000. Voilà! You now have a Web app running with four lines of code.
Now, let's create a simple app that exhibits the power of Mojo. You can use the built-in template tools to get started with as little typing as possible. Enter the following on the command line:
mojo generate lite_app gobble-light.pl
This creates the file gobble-light.pl, containing the following:
#!/usr/bin/env perl

use Mojolicious::Lite;

get '/welcome' => sub {
    my $self = shift;
    $self->render('index');
};

app->start;
__DATA__

@@ index.html.ep
% layout 'default';
% title 'Welcome';
Welcome to Mojolicious!

@@ layouts/default.html.ep
<!doctype html><html>
    <head>
        <title><%= title %></title>
        <%= base_tag %>
    </head>
    <body><%= content %></body>
</html>
There is some new stuff here. First is a get statement just before the app->start; line. It instructs the server to accept requests at the http://server-ip:3000/welcome URL. It also directs the users to a document called index. The index happens to be within the same file under the __DATA__ string. You can think of this section as containing embedded files. In this case, there is an index.html file and layout file called default.html. The .ep after each filename is just a Perl naming convention for templates.
The important thing to note is you can insert Perl code into your templates and layout with special strings like this:
% perl code
<% perl code %>
<%= perl code %>
If you were to execute this file and point your browser to http://localhost/welcome, you would see the “Welcome to Mojolicious!” message.
This seems a little boring. Let's spice it up with a couple changes.
First, change the line:
get '/welcome' => sub {
to:
get '/(.me)' => sub {
Then, add the following embedded Perl variable just after the “Welcome to Mojolicious” text in the index.html.ep template:
<%= $me %>
The full index template, just below the __DATA__ line, now should look like this:
@@ index.html.ep
% layout 'default';
% title 'Welcome';
Welcome to Mojolicious <%= $me %>!
Run the new app the same way as before:
./gobble-light.pl daemon
This time, point the browser on a phone to your Linux box. Add any text after the path:
http://server-ip:3000/jamie
http://server-ip:3000/foobar
http://server-ip:3000/blah
The brand-new dynamic page adjusts according to the URL.
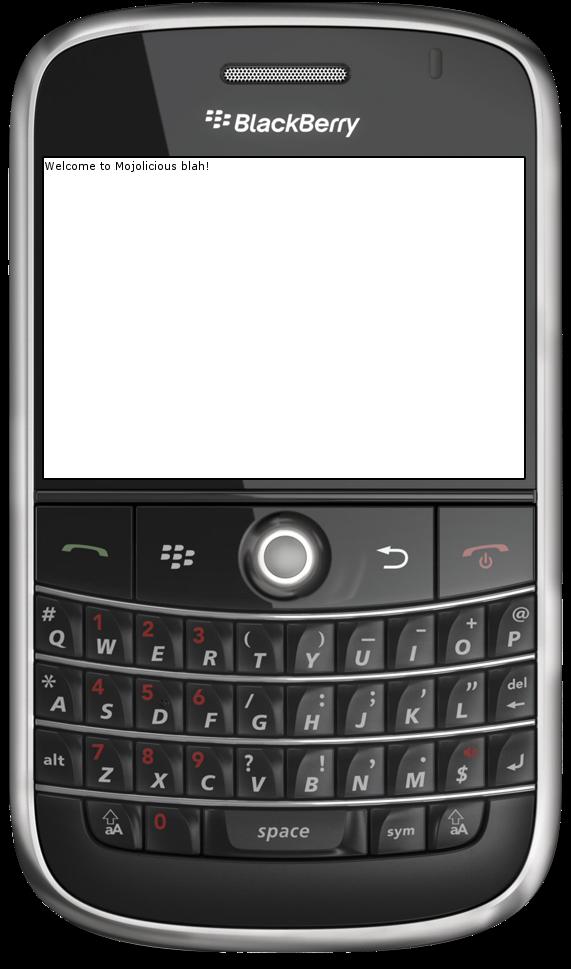
Figure 1. Pointing a BlackBerry Bold to My Server at http://192.168.1.106:3000/blah
Why is this important? You're about to use this functionality in a very useful way.
It is possible to have a full Web application in just one Perl script. I love this aspect of Mojolicious. I will keep expanding on the same original file for the remainder of this article.
For sending command output to the Web application, it is necessary to redirect all output to your Web service. This would be easy to do on its own. However, it makes most sense to see the output both on the originating terminal and your phone. The super-handy screen command is perfect for this.
Screen is a session management tool. The most useful feature, in regard to this application, is logging. A command can be run inside screen. All output to the terminal seems normal. Yet, you can send the output to a log file that can be accessed simultaneously by another application. The other application in this example will be a second thread of the script.
Screen writes to the log file every ten seconds by default. I changed this to every second. You can do that by adding the following line to the .screenrc file in your home directory:
logfile flush 1
I also added a line to customize the name of the log file:
logfile html_gobble.log
There also should be a control file in /etc/ if you don't or choose not to have one in your home directory.
Listing 1 shows all the code required to send command output to Mojolicious and display it as a Web application.
Executing the program shown in Listing 1 would look something like this:
./gobble-simple.pl here-i-am "sudo find / -mtime -66 -mtime +59"
Here I am searching the entire filesystem for files that were modified between 59 and 66 days ago. Notice that the daemon command-line option is no longer required, because it was added to the app->start() call. The output will go to: http://myserver-ip/here-i-am.
Here is what is happening. The script begins by accepting two arguments. The first is the URL to which the command will output. The second is the actual command, which should be wrapped in parentheses.
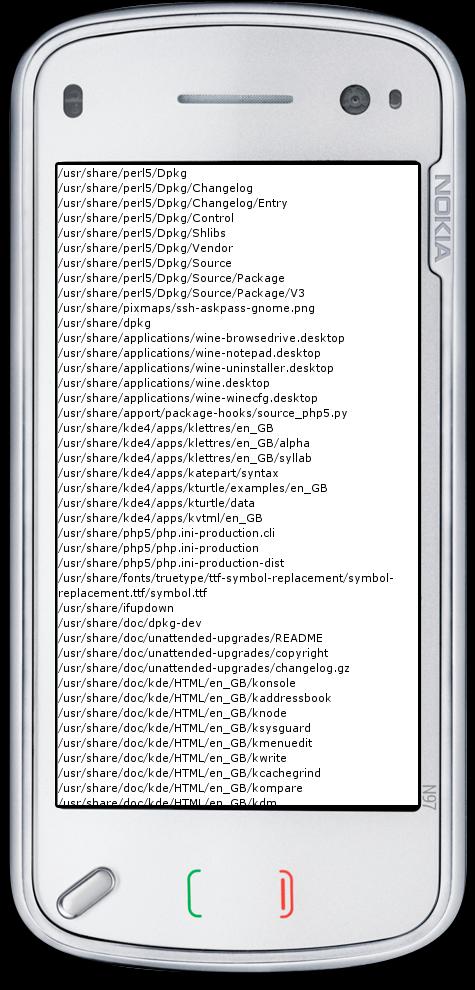
Figure 2. Output of a find Command on the Nokia N97
You need two threads, one for screen at your terminal and the other for Mojolicious and your Web app. When the command finishes, the first thread is essentially done. I could kill the Web app at this point; however, I like to browse the output afterward. So instead, I print a little message to the terminal so I remember to kill the process when I return.
The second thread opens the log file and formats each line into HTML. Then, it stuffs all lines into a variable, which is passed to the template below.
There are a couple things I don't like about this setup. First, you have to press the refresh button on your phone's browser each time you want to update the page. Second, each time the page refreshes, the window starts at the top of the page. This isn't ideal if you have lots of output to scroll through.
To get some nice behavior from this little app, you need to add some functionality on the client side. All updates here will go into the template section as JavaScript. The following was added inside the <head> tag, just below the title:
<style type="text/css">
  body {
    background-color: #000000;
    color: #00ff00;
    font-weight: bolder;
  }
</style>

<script type="text/javascript" src="https://ajax.googleapis.com/
↪ajax/libs/jquery/1.5.1/jquery.min.js"></script>

<script type="text/javascript">
  $(document).ready(function () {
    %# Scroll down to the bottom
    $('html, body').animate({scrollTop: $(document).height()},
    ↪'slow');

    %# Schedule the first update in five seconds
    setTimeout("updatePage()",5000);
  });

  %# This function will update the page
  function updatePage () {

    $('#command-content').load(window.location.href +
    ↪' #command-content>div');
    $('html, body').animate({scrollTop: $(document).height()},
    ↪'slow');

    %# Schedule the next update in five seconds
    setTimeout("updatePage()",5000);
  }

</script>
JavaScript is a language available in just about any browser. It is the essence of Internet client-side scripting. I chose to use a fairly popular helper library called jQuery to make things easier. The first script tag imports this from Google's handy repository.
The second script tag contains the behavior code. jQuery is utilized to scroll to the bottom of the page in a smooth, animated fashion. Next, I call a function updatePage to be executed in 5,000 milliseconds (five seconds). This function first performs an AJAX call on the Web application. It then replaces the current view with everything it found. If there is no new content, the page would seem unchanged. If there is new content, the page gets another nice animated scroll from the current position to the bottom. Then, the same function is called in five minutes. The browser keeps executing until it is closed or redirected.
I felt it also was prudent to improve how the interface looked. Just above the JavaScript code is some CSS styling rules that give things some flavor—lime green on black is much easier to look at.
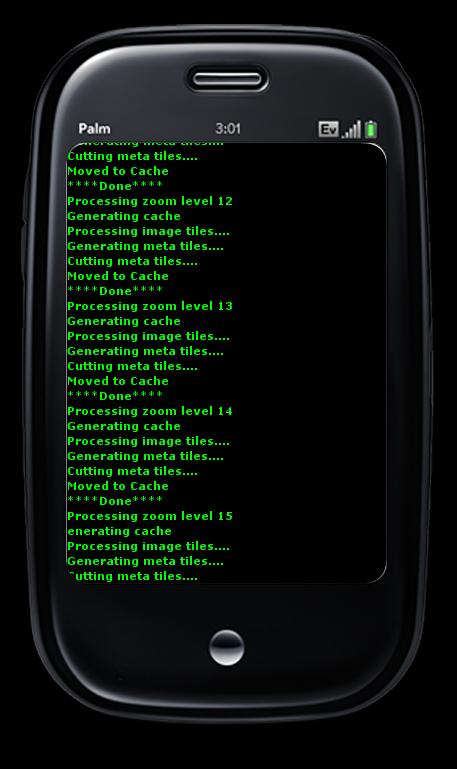
Figure 3. I often create large image caches for use with on-line maps. Here is the output on a Palm Pre getting updated automatically with AJAX.
At this point, the tool is pretty much behaving how I want it. I could, however, make a couple major improvements. You may have noticed that this is using a lot of unnecessary bandwidth. Every five seconds, it grabs the entire contents of the page. This can really add up—especially if you happen to forget the application running away in your pocket. My short-term memory isn't that good, and neither is my cell-phone plan.
The second flaw is the phone is doing most of the work. It really should be the other way around. The server should be keeping track of time and sending output without being requested. In fact, why should the entire document be sent if the phone needs only one or two lines?
Luckily, the modern Web has provided the fantastic new technology called WebSockets. There is an initial handshake between the client and server during connection, and then the connection stays open until one of the two decides to close. This allows the phone to sit there, listen and preserve battery power. New lines of content are sent when available. No traffic is sent when the process completes. Therefore, you don't need to worry about forgetting things in your pocket.
Start implementing this by setting up the WebSocket server. Add a Mojo looping object at the start of the script:
my $loop = Mojo::IOLoop->singleton;
Then, add the following right before the app->start('daemon') string:
# Set the socket to be the same url...
# but with a "-ws" at the end.
websocket $my_url . '-ws' => sub {
  my $self = shift;

  my $send_data;
  $send_data = sub {
    # Grab new lines from our function
    my $new_lines = updatePage();

    # If new lines are available, $new_lines will exist.
    if ($new_lines) {

      # Send content to the client
      $self->send_message($new_lines);

      # Do this all again in 1 second
      $loop->timer(1, $send_data);
    }
  };
  # We need this to start our loop for the first time
  $send_data->();
};
The app is so efficient now that I increased the update cycle to every second. This is absolutely fantastic to witness in person. You really get the feeling of monitoring output in real time.
The above code opens a WebSocket on the server. Next, an infinite loop is started that sends output from the function called updatePage(). The function looks for new lines in the log file then formats them for HTML. Here's what it looks like:
sub updatePage () {
  open(FILE, "html_gobble.log");

  my $iteration_count = 0; # zero the counter
  my $new_content = ''; # Initialize the new content variable

  while (<FILE>) {
    ++$iteration_count; # Increment
    # If there is a new line(s)
    if ($iteration_count > $line_count) {
      # We need to keep track of lines already added.
      ++$line_count;

      # Here we are adding the current line to the new
      # content variable with our html markup around it.
      $new_content = $new_content . "<div>" . $_ . "</div>";
    }
  }

  # Close the file handle.
  close (FILE);

  # Return new content
  return ($new_content);
}
On the client side, you no longer need the AJAX and looping logic. You do need WebSocket connection code though. The contents of the second <script> tag from the previous example is replaced with this:
<script type="text/javascript">
  $(document).ready(function () {
    %# Grab our current location
    var ws_host = window.location.href;

    %# We are requesting websocket data...
    %# So change the http: part to ws:
    ws_host = ws_host.replace(/http:/,"ws:") + "-ws";
    %# I also tacked on the "-ws" at the end

    %# Connect the remote socket
    var socket = new WebSocket(ws_host);

    %# When we receive data from the websocket do the following
    %# with "msg" as the content.
    socket.onmessage = function (msg) {
      %# Append the new content to the end of our page
      $('#command-content').append(msg.data);

      %# Scroll down to the bottom
      $('html, body').animate({scrollTop:
      ↪$(document).height()}, 'slow');
    }

    %# Scroll down to the bottom
    $('html, body').animate({scrollTop:
    ↪$(document).height()}, 'slow');
</script>
The WebSocket URL is formed when the document initially is loaded. A connection is made using the variable socket. New content is appended to the document when it is received, followed by an animated scroll.
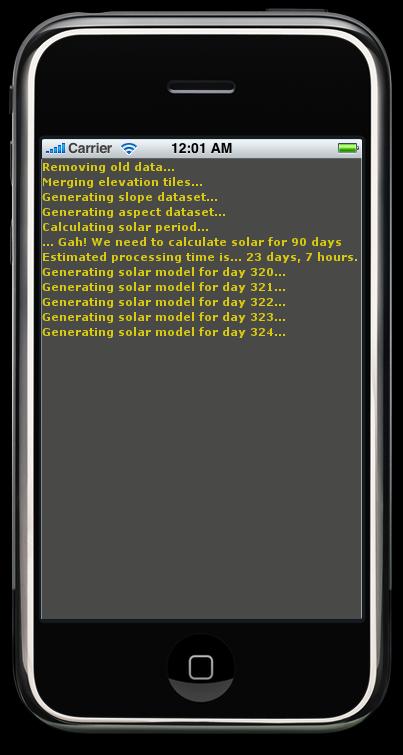
Figure 4. Watching a fairly lengthy process on the iPhone, and the page seamlessly communicates with the server through a WebSocket.
Only one thing is holding us back from sitting at a coffee shop with our phones and calling it work—the firewall. Most processes I run are fairly safe when it comes to output. I chose to follow a security-by-obscurity philosophy. When I have a process running, other people can view the output, assuming they know the port number and URL. When the process ends, the port is closed and there is nothing to see. The nice thing about this approach is I can share the URL with clients if the need arises.
There is no reason to have a specialty app on your phone to view output from your computer. With the help of a modern Web framework like Mojolicious, any smartphone can consume command-line output right in the Web browser. I hope this article inspires people to come up with their own unique approaches to this concept.
