
Live DJs chasing a simplistic but attractive application are going to love Giada. At the same time, Giada also covers something I've been wanting for a year now, which is a way to trigger individual samples from a computer keyboard simply in real time. According to the documentation:
Giada is a free, minimal, hard-core audio tool for DJs and live performers. Load up to 32 samples, choose to play them in single mode (drum machine) or loop mode (sequencer), and start the show with your computer keyboard as a controller. Giada aims to be a compact and portable virtual device for Linux and Windows for production use and live sets.

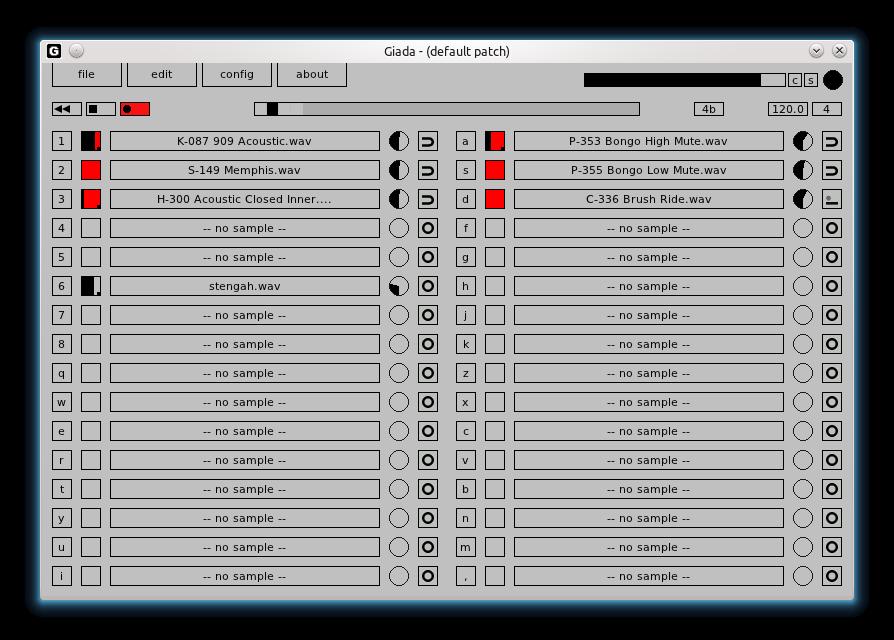
The Giada hard-core looping program for real-time DJ performances with a GUI that's sleekly minimal.
Giada in its full-flight recording mode lets you layer a live performance piece by piece.
Installation
Using Giada is pretty easy, but its ease of use comes at a price. It's a freeware binary. This is the first freeware program I've covered, but don't worry, I won't make a habit of it.
The project's Web site consists of a (well-designed) single page, with download links for both the Windows and Linux versions of Giada.
As far as library requirements go, the documentation states:
Giada is based upon RtAudio and FLTK (GUI). They are both statically linked, but the former needs libjack.so to provide JACK's features. In a modern Linux-based OS, you should be able to run Giada without any further installation or hack.
Regarding binaries, the manual also noted: “This software is compiled for x86 processors; we still don't know what happens if you run it under a 64-bit OS/environment; try it and tell us your experience.” Yes, I'm on 64-bit Linux, and it runs just fine.
Once you have the dependencies out of the way, download the latest tarball and extract it. Personally, I found I could just open the new folder, click on the binary, and it worked. For those wanting more control, open a terminal in the new folder, and enter the command:
$ ./giada_lin
Usage
Once you're inside, using Giada is actually pretty easy. Although I was rather confused at first glance, a quick bit of “RTFM” shows that its methodology is very basic, but you need to understand a few things from the outset.
First, this isn't for programming songs over some sort of grid, such as the way that programs like Fruity Loops operate. Giada is for playing live. All of your actions take place in real time, as you perform what is essentially a live DJ set (even if it's only in your bedroom to an audience of one). So trust me, you'll want to practice before using it in public.
Second, Giada is designed to be run by your keyboard, and by that I mean the thing on which you type, and not something that resembles a piano.
Before I explain the three modes of operation, let's first load some samples so we have something to play with. In terms of format, Giada likes only 44KHz .wav files. A good starting point is Hydrogen's drumkits. If you have Hydrogen installed (and if you don't, at least install the drumkits), look for .wavs under /usr/share/hydrogen/data/drumkits. Kicks, snares and a cymbal or two—hi-hats in particular—are the best starting point. With these, you can lay down a basic beat and then layer other samples over the top to make a song.
To load these samples, click on the long and wide buttons that say, “-- no sample --”, and choose your .wav file from the file browser. Now, if you look to the left of each sample, a keyboard character is shown; with this, you switch samples on and off. Try pressing it now, and nothing will play, but fear not. I discuss Giada's three running modes below, and it all will make sense.
Oneshot mode: this is the most basic way of operating Giada. Press a keyboard button, and that button's sample will play. However, first you must turn on this mode, as well as turn up this sample's volume. Starting with the volume, the empty circle to the immediate right is actually a volume knob. Clicking and dragging inside the circle turns up the volume. However, unless you've pressed the Play button, there still will be no sound; you have to enable Oneshot mode.
The next control to the right, with the small circle inside the square, is the key to operating Giada. Click the button, and you'll have a choice of looping modes, or Oneshot “basic”, “press” and “retrig”. Choose basic, press the key, and at last, a sound plays!
With this basic mode, you press a key and a sample plays until it's finished—pretty basic. But, you also can interrupt the sample by pressing the key again. With the “press” option, you have to hold down the key to play the sample, and as soon as you release it, the sample stops. The “retrig” option (and this is the functionality I've been chasing) plays a sample upon pressing a key, but pressing again restarts the sample whether or not the sample has finished. You even can keep thrashing away at the key for instant response, which is handy for playing hi-hat notes or ripping up a waveform.
Loop mode: this is the second mode, and perhaps the most conventional. When Giada is actually playing, choosing either “Loop . basic” or “Loop . once” plays a sample on the next bar along. In order to use this, press the Play button near the top-left corner, then press each sample's button to activate/deactivate it on the next bar. The “basic” option simply keeps the sample looping until you turn it off manually; the “once” option plays a sample until it's finished, and then starts it again at the beginning of the next bar.
Recording mode: this is the pièce de résistance. Basic loops can be turned on and off willy-nilly; however, the Oneshot samples start turning this into a real live performance. As the bar moves along each of its counts, every time you play a note, that note is repeated every bar that follows. Using this method, you genuinely can layer an entire song, creating new beats on the fly. Be wary, however. Every note you play is a commitment, and you'll be stuck with that note repeating for the rest of the song. Get it right, and you'll have people dancing. Get it wrong, and you'll look totally lame and ruin the party.
Nevertheless, some tools are available to help out the mere mortals among us. The beat bar will be immediately obvious, because it's the only moving thing on screen. Use this and its (default) four boxes to guide your counting. Over to the right, the box that's marked “off” is for quantizing your music. For the uninitiated, this aligns your notes to even places on a musical grid, removing the element of human error: “1b” is the most severe, making each note land on a whole count; “8b” is the least severe, allowing you to make much more intricate music.
If you look farther right, you'll see a tempo and beat number, set to a default BPM of 120 and a time signature of 4/4. You can turn these up or down, allowing for strange feels, such as 7/4 @ 72 BPM (less dance-friendly, but much more trippy).
Still, this early software does have its limitations. First, it's freeware. In this day and age? Why? Ech! Second, there weren't any panning controls as far as I could tell. Any stereo imaging you'll have to do beforehand, manually.
Nevertheless, this program is incredibly cool. It allows you to output to JACK, which makes it more powerful, and just look at it. It's a techno-minimalist's wet dream! Giada has an amazing economy of space and features in its design that's quite deceptive. I actually thought this was going to be a very short review when I started. Giada is a must-have for any electronic musician.
Broken links are a serious pain in the backside for Webmasters, and keeping track of every individual link becomes so laborious, most Webmasters simply give up on the idea. Thankfully, there's a way to automate the process with LinkChecker. According to its Freshmeat entry:
With LinkChecker, you can check HTML documents and Web sites for broken links. It features recursion, robots.txt exclusion protocol support, HTTP proxy support, i18n support, multithreading, regular-expression filtering rules for links and user/password checking for authorized pages. Output can be colored or normal text, HTML, SQL, CSV or a sitemap graph in DOT, GML or XML format. Supported link types are HTTP/1.1 and 1.0, HTTPS, FTP, mailto:, news:, nntp:, Telnet and local files.
LinkChecker makes Web site maintenance that much easier by scanning your Web site for broken links.
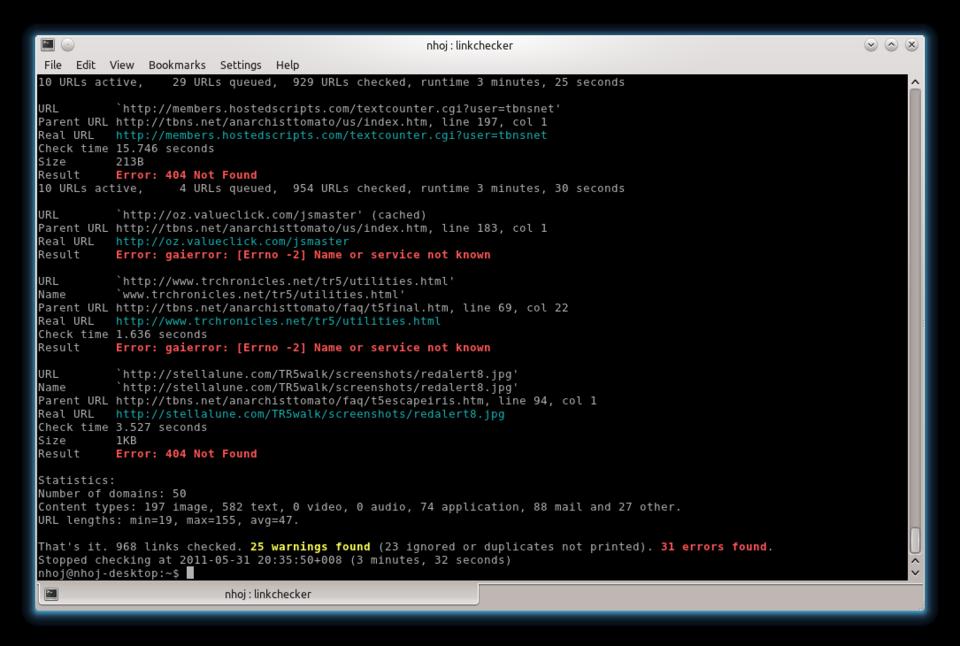
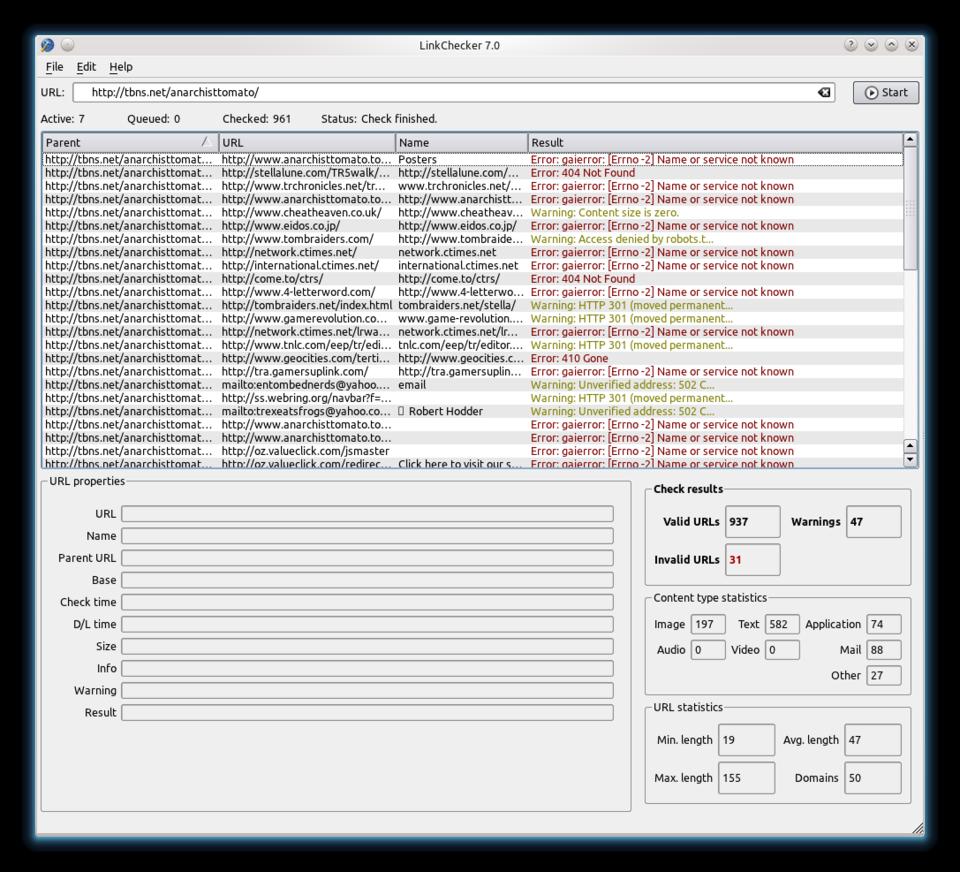
The effect of ten years' neglect on a Web site: here I'm running the console version against my old Tomb Raider page.
Installation
The Web site has packages for Windows, OS X and Debian (yes, it actually specifies Debian), and the obligatory source. The Debian packages are available for just about every architecture on the planet, and they worked immediately with my Kubuntu installation. Installing the .deb package is much easier, so you may want to run with that; however, unless I missed something, you get only the command-line version.
For those who don't have a Debian-based system or want to use the GUI version, here's a very compressed version of the instructions.
In terms of dependencies, you'll obviously need gcc, as well as Python >= 2.6, including its -dev package, as well as the Qt development tools, which are named qt4-dev-tools on my system. There also are a bunch of optional library dependencies for extended functionality, such as bash completion, syntax checks and so on; see the manual for more information on these.
Once you have the dependencies out of the way, grab the latest tarball from the Web site, extract it, and open a terminal in the new folder. Enter the following commands:
$ make -C doc/html
(The above generates the Qt help files.)
Then:
$ python setup.py sdist --manifest-only
$ python setup.py build
If your distro uses sudo:
$ sudo python setup.py install
If your distro uses root:
$ su
# python setup.py install
To run the command-line version:
$ linkchecker
To run the GUI version:
$ linkchecker-gui
Usage
Actually using LinkChecker is a simple affair. If you're running the command-line version, enter:
$ linkchecker http://{website url}
Of course, LinkChecker also can scan local files, but unless the page starts with www, remember to put the preceding http:// before on-line pages, or it automatically scans local files instead.
Once inside, enter the URL in the bar at the top and press Enter.
Whether in the GUI or console version, LinkChecker gradually makes its way through all the pages of a given Web site, outputting any broken links or warnings in the process. Depending on the Web page, the output can be pretty verbose, so console users might consider piping the output for larger pages.
Once the scan has finished, a readout is provided with the number of valid and invalid URLs, as well as various statistics having to do with URLs and content.
In the end, LinkChecker is a very simple project that serves its purpose beautifully. Its ease of use and multiplatform nature also make everyday usage much more likely. Any serious Webmaster should check out this project.
