By Dann S. Washko
Internet audio comes in many forms, from ordinary sound clip links to podcasts magically delivered with RSS-based push technology. Many listeners, however, will settle for nothing less than live content in real time.
Internet radio broadcasts arrive at your home PC courtesy of a streaming server. You'll find streaming servers on the Internet that can transmit live audio or video, pre-recorded playlists, or on-demand media. Most streaming servers provide source buffers and offer compression to reduce bandwidth costs.
A number of commercial and open-source streaming servers are available for Linux systems. Apple's Quicktime Streaming server, a commercial product designed to run on OS X servers, is built on Apple's Darwin Streaming Server. The Darwin Streaming Server [1] is an open project that runs equally well on Linux/BSD, OS X, and Windows. Apple's commercial version offers slick integration with the OS X server utilities and support from Apple. The Darwin Streaming Server lacks official support, but Darwin has a growing community accessible via IRC, mailing lists, and forums.
Similarly, RealNetworks offers a commercial streaming solution called Helix Server [2], built upon the Helix DNA Server, for which the source code is released under both the RealNetworks Community Source and RealNetworks Public Source. Although the commercial version includes support for most media formats, the open offerings are limited to MP3, RealAudio, and RealVideo.
One stable and readily available streaming server for Linux users is Icecast2 [3]. Icecast is an open source project supported by Xiph.org, an organization dedicated to "...protecting the foundations of the Internet multimedia from control by private interests." [4] You can download the source code for Icecast from [3], but the chances are your Linux distro already has an Icecast package ready for installation. As of this writing, the current version of Icecast2 is 2.3.1.
A streaming server such as Icecast listens for incoming connection requests from Internet clients and connects the client to a multimedia content stream. The Icecast server can transmit data in ogg vorbis, ogg theora, and mp3 unicast streams over HTTP.
In a typical streaming scenario the listener makes a connection to the streaming server using an ordinary browser, and the stream becomes sound on the listener's computer through a media player such as AmaroK or XMMS.
Of course, the audio stream Icecast beams to the client must originate from somewhere. Icecast is capable of playing audio files from a playlist. But it is perhaps more common to see Icecast receiving the audio feed from an external application known as a stream source or source client. The source client transmits the streaming data to Icecast, and Icecast then makes the stream available to the world through Internet-based client connections. In the case of a live broadcast, the source client might be an application that interacts directly with the audio interface to which the microphones are attached. In the case of pre-recorded audio, the source client may simply be acting as a music player transmitting and audio stream to Icecast.
In this article, I'll describe how to install and configure Icecast, and I'll show you how to set up a source client to stream content to the Icecast server. Several source clients are available, including IceS, which is produced by the Icecast team. I'll tell you more about IceS, and I'll also show you how to set up a stream using the MuSE source client.
If you are going to compile from source, Icecast requires that you have the developmental libraries for libxml, libxslt, libogg and libvorbis. By default Icecast requires curl, but you can opt to compile without curl using the -without-curl switch. Without curl, Icecast cannot perform any Directory Server interaction; that is, you will not be able to advertise your stream on the public Icecast YP lists.
Theora libraries are required for theora video streaming (check out ezstream [5] for a theora source client). For mp3 streams, you should have Lame installed [6]. Most likely, the optional features will be detected by the configure script, so you may not have to provide the enabling switches.
After downloading and extracting the source, install Icecast with the simple three step process:
./configure
make
make install
Icecast installs in /usr/local by default. Installing Icecast using your package manager should be pretty straightforward. Debian users take note that, by default, Icecast is disabled in /etc/default/icecast2. Prior to enabling Icecast and starting the service, it is imperative that you edit the Icecast configuration file and, at the very least, change the password for source and relay clients and the administrative account.
Arch Linux users should be aware that the log file subdirectories are not created. You will need to manually create the directory, which by default is /var/log/icecast.
The default configuration file, icecast.xml is located in /usr/local/etc if you install from source. Most package managers will likely install this configuration either in /etc or a subdirectory of /etc. The actual location of the file does not necessarily matter, as you must specify the path to the configuration file when starting Icecast.
Listing 1 illustrates a simple icecast.xml file. When editing the icecast.xml file, make sure all xml elements are closed, xml tags are spelled correctly, only allowed xml tags are used, and all nested elements are properly closed.
The most important values to set in icecast.xml are in the Authentication section. Make sure you set your own source, relay, and admin passwords, as well as the admin-user and admin-password values, which are used for administrative functions accessible through HTTP. Icecast has its own administrative webpages that are much easier to use than the administrative syntax. For more information regarding the administrative syntax, consult the Icecast documentation. The relay password is necessary for relay servers . (See the box titled "Icecast Relays.")
The Authentication section settings are the only values that must be set in order to begin streaming. The remaining settings can be left at the defaults, but inserting your own values is recommended. See the box titled "Icecast Settings" for more on Icecast configuration parameters.
Should you wish to serve up static files using your Icecast server, the fileserver value must be set to 1. Setting this value to 0 prevents static files from being streamed. These media files must be placed in the webroot directory and specificied in the url path of the client as a relative path from the webroot directory. Ogg-vorbis, ogg-theora, and mp3 files can be served this way. Additionally, you can create a playlist containing a mixture of supported media types. A playlist would contain a list of mount-points and usually has an .m3u extension. An example playlist might look like:
http://mystream.org:8000/intro.ogg
http://mystream.org:8000/song1.ogg
http://mystream.org:8000/song2.mp3
You can mix media types in a playlist. This playlist requires that the three files all be located in the webroot directory.
The remaining configuration sections have to do with paths and logging. Most likely, you will not need to change these values, but do take note of them, particularly if you installed from source or are using Arch Linux. The log path may not exist, requiring you to manually create the directory structure. Setting the loglevel may be helpful in debugging problems with the server, source streams, or relays. The value set in the example only reports errors. If you are having problems, raise the value to 4 for debugging.
| Listing 1: Sample icecast.xml configuration file |
01 <icecast> 02 <limits> 03 <clients>5</clients> 04 <sources>2</sources> 05 <threadpool>5</threadpool> 06 <queue-size>524288</queue-size> 07 <client-timeout>30</client-timeout> 08 <header-timeout>15</header-timeout> 09 <source-timeout>10</source-timeout> 10 <burst-on-connect>1</burst-on-connect> 11 <burst-size>65535</burst-size> 12 </limits> 13 14 <authentication> 15 <source-password>sourcepassword</source-password> 16 <relay-password>relaypassword</relay-password> 17 <admin-user>admin</admin-user> 18 <admin-password>changeme</admin-password> 19 </authentication> 20 21 <hostname>myhost.org</hostname> 22 23 <listen-socket> 24 <port>8000</port> 25 </listen-socket> 26 27 <mount> 28 <mount-name>/myshow</mount-name> 29 </mount> 30 31 <fileserve>1</fileserve> 32 33 <paths> 34 <basedir>/usr/local/share/icecast</basedir> 35 <logdir>/usr/local/var/log/icecast</logdir> 36 <webroot>/usr/local/share/icecast/web</webroot> 37 <adminroot>/usr/local/share/icecast/admin</adminroot> 38 <alias source="/" dest="/status.xsl"/> 39 </paths> 40 41 <logging> 42 <accesslog>access.log</accesslog> 43 <errorlog>error.log</errorlog> 44 <loglevel>1</loglevel> 45 <logsize>10000</logsize> 46 </logging> 47 48 <security> 49 <chroot>0</chroot> 50 </security> 51 </icecast> |
| Icecast Settings |
|
The first section of the icecast.xml sets some restrictions for the server. Your bandwidth will determine the number of clients allowed to connect simultaneously. Be aware that your source streams will also consume bandwidth. You risk interrupting the source stream or causing problems with client connections if these values are set too high. Threadpool indicates how many separate threads the server should start to handle client connections. The default value is five, but you may need to raise this value to account for high traffic streams. Be careful not to set this value too high and risk running out of resources on your server. Queue-size is the maximum value in bytes to allocate for each client queue. The queue accounts for lags that may occur due to bandwidth issues or network interruptions. The Icecast server maintains a separate queue for each user. Should the amount of data in the queue exceed the maximum queue-size value, the client will be disconnected from the stream. The three timeout values: Client-timeout, header-timeout, and source-timeout should be left at their default values. According to the Icecast documentation, client-timeout is not used. Header-timeout refers to the interval between the client's initial connection and the request for content. The source-timeout indicates how long to wait when the source connection is terminated before dropping the source connection and that mount-point. These values are all in seconds. Burst-on-connectwill send a burst of audio data to the client upon connection, This helps reduce the delay time clients may experience should their media player maintain a buffer. While the overall time from connection to the user experiencing the content is reduced, implementing Burst-on-connect will introduce a short lag in the client's stream. Burst-on-connect accepts a 1 for on and a 0 for off. Burst-size is a size of the data burst in bytes. The default value is 65535 bytes (64kb), which should be sufficient. Hostname is pretty evident; enter the hostname or IP address of your server. Icecast uses this value to create the url for playlists and for listing under YP directories. YP stands for yellow pages. Remember that Icecast must be compiled with curl support in order to make use of YP posting. Xiph.org hosts a YP directory for Icecast streams. To get your stream listed under the Icecast YP directories, consult the Icecast documentation or the comments in the default configuration file supplied by the Icecast sources. The listen-socket sets the port from which the Icecast server will accept both source and client connections. Although you can use any port number above 1024, most Icecast servers typically run on ports between 8000 and 8010. Unless you absolutely have to change this, leave the value at 8000. Clients will require the port number when attempting to connect to your server. |
| Icecast Relays |
|
If your stream become so popular that you begin to run up against bandwidth limitations, you may want to add a relay server. Icecast offers two kinds of relays: Master-Slave and Single-Broadcast. A Master-Slave relay mirrors all the configured mount points on the master server to the slave server. Setting a mount point is critical if you plan on having any relays, particularly if you have an Icecast slave mirroring all mount points. The mount settings in Listing 1 show a simple mount point with no further parameters. The mount uses the default values and those values specified in the other sections of the configuration file. Mounts can accept a number of parameters, including specific source passwords, a fallback source (should the original source be unavailable), limits, intro audio files, and more. |
Once the icecast.xml file has been properly configured, it is time to start the Icecast server. Do not run the server as root. If you have installed Icecast from your package manager, chances are an icecast user and group were created. If that is the case, simply issuing the start script (debian users: /etc/init.d/icecast start) should initialize the server. If you have installed from source, you have a few choices.
First, make sure you have created the log sub directories under the as per logdir element in the configuration file. Second, decide what user account you will be using to run the icecast server (create a new account and group if necessary). You will need to set the owner and owning group of the icecast log directory to the user and group you will be running the Icecast server as, and ensure that this user and group have write permissions to the log directory and the files under the log directory. Then as root:
su [user] -c '[path_to_icecast_binary]/icecast -c [path_to_configuration]/icecast.xml &'

su iceuser -c '/usr/local/bin/icecast -c /usr/local/etc/icecast.xml'
Alternately, if you are logged in as the account that you want to run Icecast, simply run it under your current account:
[path_to_icecast_binary]/icecast -c [path_to_configuration]/icecast.xml &

/usr/local/bin/icecast -c /usr/local/etc/icecast.xml
If you have set the fileserve element to 1, you can quickly test your server by copying an .ogg file to the webroot directory and connecting to your Icecast server with a media player running on a separate system. For instance, using xmms, simply choose a play location and enter the following URL:
http://[url or ip of server]:8000/yourfile.ogg

http://myhost.org:8000/hellow.ogg
The Icecast documentation recommends including the .ogg extension for any ogg stream mount-point or .ogg files. Some media players may not properly process the stream as an .ogg file unless the extension is specified.
Now that the Icecast server is running, it is time to connect some external sources. A number of source client programs can send a source stream to an Icecast server. The Icecast team offers Ices. Ices is a command line utility that is configured using an XML file. The Ices source documentation contains example configuration files. (If you are installing Ices from a package, you should be able to find these files in the package's doc or share directory.) Copy the desired configuration file to your home directory, and make the necessary edits. It is especially important to input module and server details. When you have made the necessary changes to the configuration file, you can ices:
ices configfile.xml
The configuration of Ices is pretty detailed; be sure to read the documentation carefully.
If you want to get up and running quickly with a graphical source client, check out MuSE from Dyne.org [7]. MuSE is a multiple streaming engine that is part of Dyne's live multimedia Linux distribution called Dynebolic [8]. The easiest way to get up and running with MuSE is to download and boot Dynebolic. Incidentally, Dynebolic includes an Icecast server and the capability of easily editing the configuration file. If you choose to try out Dynebolic for the server and source client, you must use two separate systems. You cannot attach MuSE to an Icecast server running on the same system.
The MuSE source code is available from the Dyne.org website, along with packages for Slackware, Debian, Redhat, and OS X.. To compile MuSE from source with a graphical client, you will need GTK+, along with the libxml and glib developmental libraries. MuSE has an ncurses frontend (which requires that you install ncurses [9]) and can also be run as a command line application. Installing Lame is recommended for mp3 streaming support. MuSE can also stream ogg-vorbis if the ogg and vorbis libraries are installed. Additionally, support for uncompressed sound files requires that libsndfile be present.
Be careful not to confuse Dyne.org's MuSE application with the MusE MIDI/Audio sequencer project.(http://www.muse-sequencer.org). Make sure you do not have MusE installed or you know that installing MuSE will not overwrite any of the MusE files. Given that possibility, if you have the MusE MIDI/Audio sequencer, you may want to configure MuSE to install into it's own directory structure:
./configure -prefix=/opt/MuSE
Once installed, simply start MuSE with the command: muse. The main MuSE window (Figure 1) will appear with six buttons across the top, a control bar, and a channel window. You can cue up media files in the channel by right-clicking in the window. You can add more channels by pressing the second button at the top. To remove channels, click the X icon in the lower left corner. Figure 1 displays one channel in MuSE with two media files queued. To the left of the channel window is a volume slider that makes it easy to reduce the volume of a media file, allowing you to voice over. Below the channel window is the option to single play the files in the channel, to loop a specific file repeatedly, or to play the list continuously. If you were performing live and wanted background music, you would queue up the audio file and select the loop option, then adjust the volume accordingly.
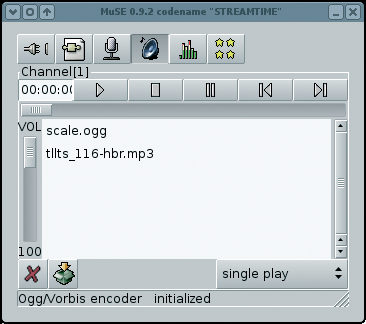
In addition to files, you can queue up other streams. The order of the queued media can be adjusted by drag-and-drop in the list, and queued files can be deleted by highlighting and choosing delete from the right-click menu.
The microphone (third) and speaker (fourth) buttons toggle the audio input source. Both buttons can be active at the same time. By default, only the speaker button is active, which means only the media playing in the queue will be streamed to the server. Pressing the microphone will stream audio from the line-in on your audio card. The fifth button, vumeter, provides a graphical volume meter so you can keep an eye on your levels.
Once you are set up with what you want to stream, the first button, "Let's Stream," will take you to the streaming server configuration window (Figure 2). Muse can send out mp3 and/or ogg-vorbis streams. You can add additional servers to each session by clicking the "Add Server" option at the top of the window and choosing either a Lame (mp3) or ogg stream.
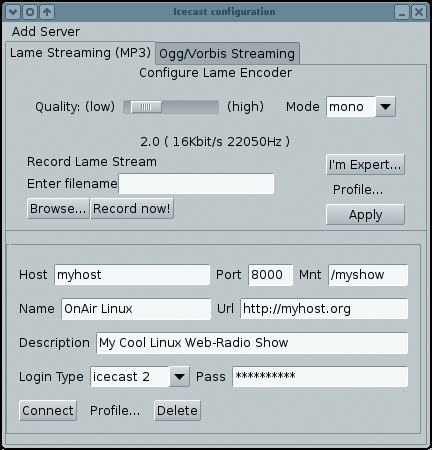
Before you can send the stream to the server, you must fill in the server information in the bottom-third of the window. For Host, enter in the url (without the http://) or the IP address of the streaming server and verify that the port is correct. If there is no specific mount point defined for you on the server, you can put any mount point in and it will automatically be created. The Name, URL, and Description are optional. Depending on how the server is set up, this information may not appear to the clients. Finally, select Icecast2 for Login Type and enter the source password from the server. Click the connect button and you should be streaming.
MuSE offers additional audio options in the "Let's Stream" window. You can adjust the quality of the audio, bitrate, and frequency among other settings. Chances are, for voice, the defaults will be adequate. Be aware that raising any of these values will consume more bandwidth per client.
You can also record what you are streaming for archival purposes. Simply browse to the directory you want to save the stream to, enter a file name. and hit OK. When you are ready to begin your session, press the record button. Should you have an existing file of the same name in that directory, the new file will have a # appended to it, where # is the next incremental value.
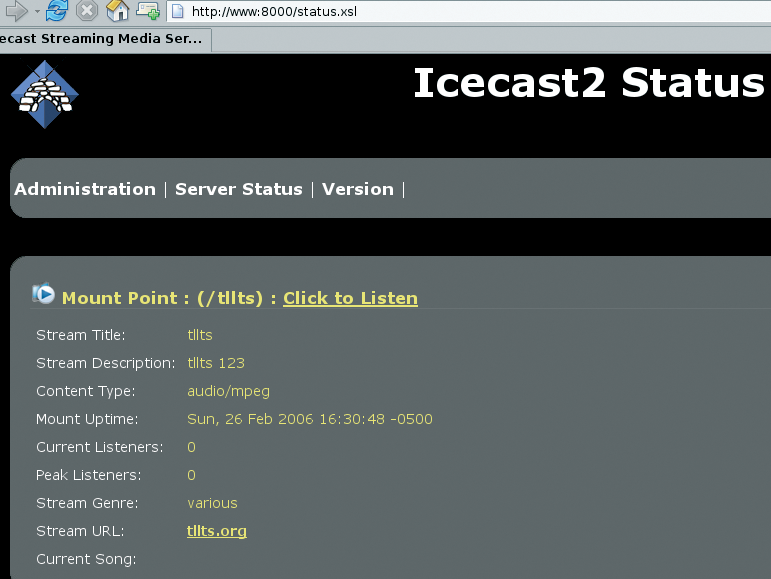
Once Icecast server is up and streaming, you can visit the information and admin pages of the server through your chosen web browser. Enter the url or IP address of the streaming server, followed by the port the Icecast server is streaming on, to reach the Icecast Status page (Figure 3). All the mount points currently served by Icecast will be accessible via this page, along with some basic statistics. Clients can click on the link to listen in their preferred media player.
Access to the Adminstrative web pages is also available. Clicking on this link will require authentication using the streaming server admin username and password. One can also access the administrative pages by typing in the direct URL (e.g.; http://myhost.org:8000/admin).
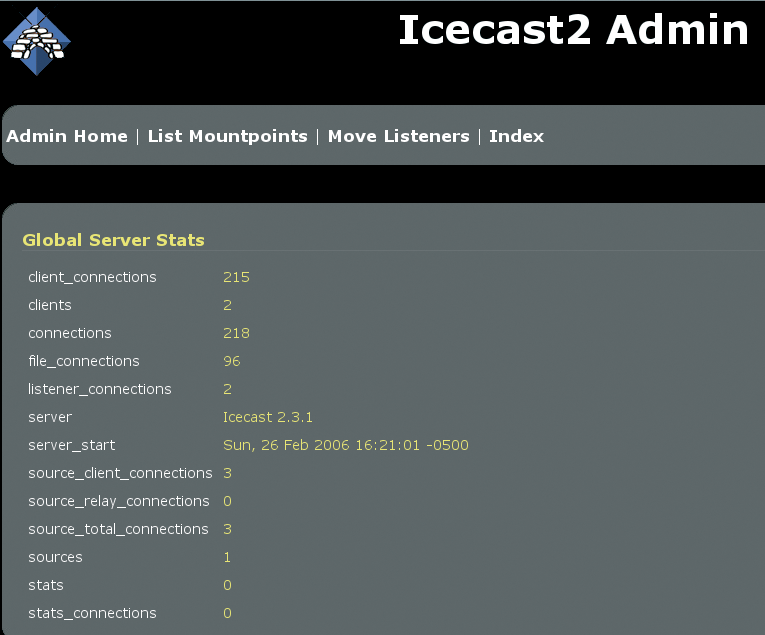
The administrative interface will allow you to perform such tasks as listing the clients connected to a source, moving clients to a different mount point, or even killing a source. You can also view pertinent Icecast server statistics (see Figure 4).
Within a few minutes of installing and configuring the Icecast open source streaming server, you will be on your way to creating your own web radio station. Before you really take off, though, make sure you consult your ISP's terms of service or your campus network agreement. Operating a streaming server may violate your contract and jeopardize your service.
Running your own web radio server can be tremendously entertaining and educational. Be sure, however, that you are aware of any applicable copyright laws for your locality.
The exact rules for what you can and can't stream may depend on the laws of your country. Should you wish to stream music, you might want to look for audio released under a creative commons license that permits re-streaming for non-commercial use.
Check out music services like Magnatune [10] for streamable media, and make sure you always credit the original artist. If, at any time, you have doubts about whether you have permission to stream any content, err on the side of caution.
Most of all, have fun!
| INFO |
|
[1] Darwin server: http://developer.apple.com/darwin
[2] Helix server: http://helix-server.helixcommunity.org/ [3] Icecast: http://www.icecast.org [4] Xiph.org: http://www.xiph.org/ [5] Ezstream - Client that will stream Theora videos: http://www.ezstream.com/ [6] Lame: http://lame.sourceforge.net/index.html [7] MuSE - Multiple Streaming Engine: http://muse.dyne.org [8] Dynebolic Live Multimedia Distribution: http://www.dynebolic.org [9] ncurses: http://www.gnu.org/software/ncurses/ncurses.html [10] Magnatune --free, music store: http://www.magnatune.com [11] Ogg Vorbis: http://www.vorbis.com/ [12] Theora.org: http://www.theora.org/ [13] Wikipedia on streaming media: http://en.wikipedia.org/wiki/Streaming_media |
| THE AUTHOR |
|
Dann Washko has been running Slackware systems for the past eight years and has recently begun experiencing the joys of Debian and Arch Linux. He is a Co-Founder of the Lehigh Valley Linux Users Group and a co-host of The Linux Link Tech Show, a weekly live web radio show and podcast. For more Linux related podcasts and web radio shows please visit http://www.thelinuxlink.net. Have a Linux related show that is not listed? Send an email to dann@thelinuxlink.net. |