
By Marcel Gagné
Cloud computing brings the promise of manageable, quickly deployed virtual machines in large networks. The idea is to take advantage of your existing hardware infrastructure (or someone else's) and deploy additional systems without deploying additional hardware. All in all, it seems like a gift from tech heaven. Of course, cloud computing carries a lot of hype, too, including people sparring about whether it is inherently safe, unsafe, reliable, unreliable, oversold, or just plain evil. Hearing business people talk about cloud computing, however, makes you realize that whatever your perception of what is at the core - a technological issue based on virtualization - cloud computing is here to stay. Your job, as a systems administrator, is to find ways to deliver and work with the technology.
Whenever the subject comes up, I enjoy dispensing with the mystique behind cloud computing as a matter of course, so here goes. A cloud is just a fancy word for somebody else's network or network resources. Those resources generally refer to all the servers (or hardware) that an organization owns - that is, processors, memory, and so on. Of particular importance, if you're going to deploy virtual machines, is disk space. Your network might not be on par with Google or Amazon, but many organizations have plenty of extra hardware and spare CPU cycles. That's why you'll hear a lot of talk about private clouds as well.
Several virtualization frameworks and services are out there. When I use the term "framework," I am talking about the software that makes virtualization possible - KVM, Xen, VirtualBox, and others. By "services," I mean the business end - the companies that provide cloud resources.
The best-known cloud computing service out there is probably Amazon's EC2 (Elastic Cloud Services). Although this isn't a free service, Amazon has made it frightfully easy to use and relatively inexpensive if you want to deploy a machine quickly for testing purposes [1]. If you need an Internet-accessible machine to test something, and you need it fast, it's a service worth checking out. To begin, I'll show you how it's done the Amazon way, then I'll show you a couple of ways to do it in your own private cloud, on your own hardware.
Probably the easiest way to launch a virtual machine in the cloud is by getting yourself an account with Amazon Web Services (AWS). Essentially, that means you need a credit card so you can be billed for the time and resources you use. The price per hour for a small instance (the default machine) is 8.5 cents per hour. If you run your test machine for a hundred hours, it will cost you $8.50 (larger deployments cost more, obviously). Take that over the course of a month, and you're paying as much for a small system as you would renting physical hardware from a hosting provider. One important difference here is speed. Whereas you might have to wait a day or two for a machine from your hosting provider, creating an EC2 virtual machine is blindingly fast in comparison. Deploying a new machine here takes only a few minutes on average.
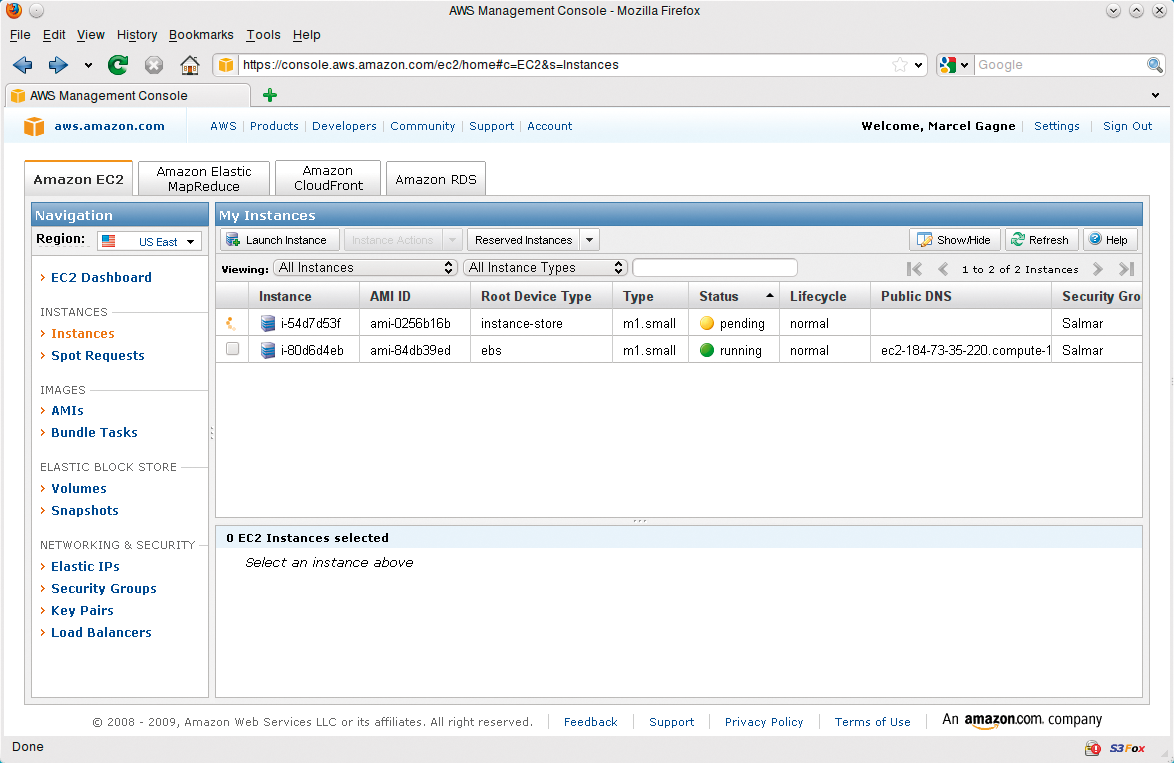
Everything takes place from the Amazon EC2 management console (see Figure 1). The dashboard view shows current instances (what Amazon calls your virtual machines), what type they are, and their status, IP address, and so on. The dashboard also lets you sort on a variety of criteria, including the region in which your machine is deployed (you can have machines in Virginia, California, Ireland, or Singapore). It also provides access to your volumes (storage devices), snapshots, security profiles, SSH key pairs, and pretty much anything having to do with running a virtual machine in Amazon's cloud.
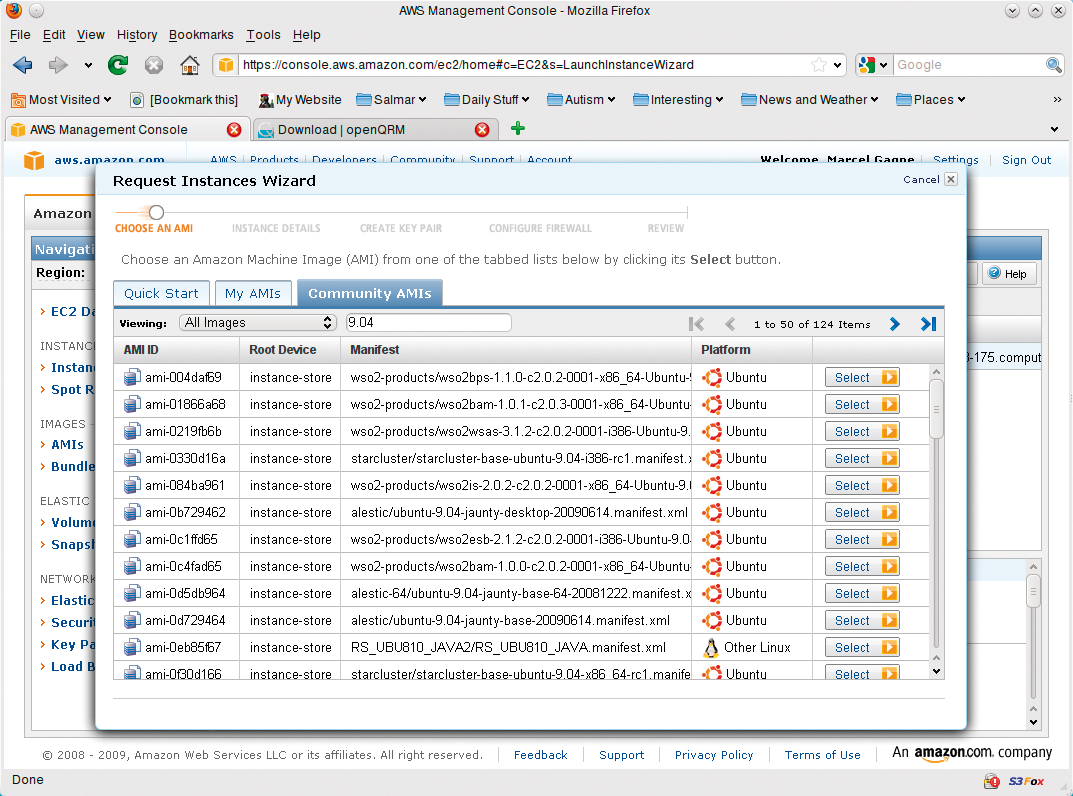
To get started, click Launch Instance. Amazon provides a small handful of supported Amazon Machine Images (AMIs), but these tend to be a little behind the times. Your best bet, if you don't want to create your own, is to look under the Community AMIs section (see Figure 2), where you'll find distributions galore at a variety of release levels. To narrow your search, enter the text you want to filter by (e.g., Ubuntu) in the search box, just below the AMI tabs. Just pick something that works for you as a base and go from there.
When you see something that looks like what you need, click the Select button. Once you do this, another window will appear that allows you to choose a ramdisk or kernel option. Unless you know what you are doing and you are familiar with the images provided, leave this alone. Another option enables Amazon's Cloudwatch feature, but I'll leave that one off for now. If you so desire, you can enter a comment in the box provided. To continue, click Continue to go to the key pair creation/selection screen.
Each new instance of a virtual machine is accessed initially via SSH. To connect to your new instance, you'll need a key pair. If this is your first time with AWS and EC2, click the Create Key Pair button and enter your details (you might also select an existing key pair if you've already been through this process), then click Continue.
The next step is to select or create a security group, in which you create your firewall rules (see Figure 3). By default, you simply don't have access to the machine, so it's important to decide just what services (ports) you want to make available. Start with SSH and add whatever else you'll need (e.g., HTTP, SMTP, etc.).

To get to the final review screen, click Continue. Here, you have the option of changing any and all of the choices you have made up to this point. If you're happy, click Launch. Keep in mind that you can keep a machine running for as long as you want or for as little time as you want.
If you don't like the result, terminate it, and you'll have spent very little. A few minutes later (most of my machines take no more than five minutes), your new machine will be ready for access, which you can see listed as running in your management console. To connect, right-click on the instance you want, and select Connect. A pop-up window will give you instructions and the IP address you'll need to use to connect to your virtual machine (VM) (see Figure 4).
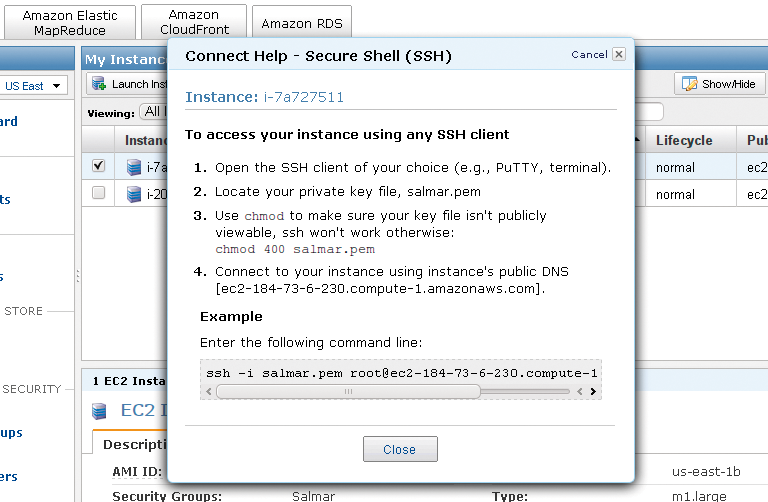
The command generally looks like this:
ssh -i salmar.pem root@ec2-184-73-6-230.compute-1.amazonaws.com
That's it; you're connected and ready to work with the virtual machine as you would any machine. Install packages, load your data, create users, run a web server, and anything else you might do with a physical server. The VM exists until you terminate it, and this is done from the same pop-up menu as the one you used to get the connect information.
Amazon's EC2 service is popular because it's fast and easy.
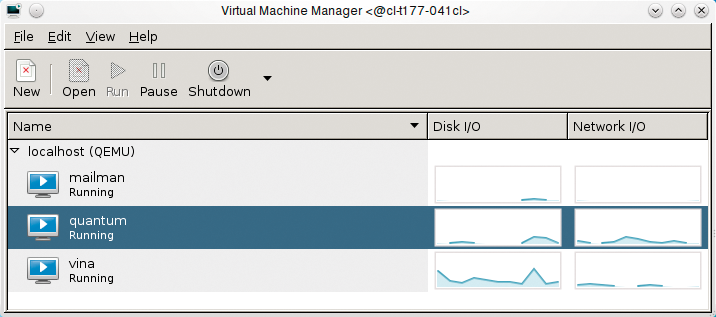
In your own private cloud, you have a number of ways to work with virtual machines. Amazon's cloud uses Xen for its virtualization infrastructure, but in your own cloud, you are free to use Xen or KVM or VirtualBox or whatever else you want. Lacking an EC2 console, administering and working with VMs in your cloud will require you to choose your own admin tools. Although you always have the command line, you can launch a KVM or Xen machine without a GUI, but I'm rather fond of a nice graphical program called virt-manager; literally the "Virtual Machine Manager" (see Figure 5) [2]. With this tool, you get a bird's eye view of running virtual machines, including live performance graphs for network, CPU, and disk usage. The Virtual Machine Manager also makes it easy to communicate with other hosts running virtual machines; that would be your private cloud. It gets better; virt-manager works with both KVM and Xen, two common virtualization frameworks.
The virt-manager application displays information about each machine, its run state, number of processors (VCPUs), memory usage, and CPU usage. It also lets you adjust the resources for a given virtual machine, adding processors, memory, or even extra storage. Tools are available for cloning VMs, creating new VMs, and communicating with VMs via a full graphical console - point and click. The latter is done with the use of a built-in VNC client.
Most distributions have virt-manager in their repositories, but they sometimes tend to run well behind the version available directly from the website itself. Although I don't find myself suggesting this often in 2010, I highly recommend that you get the source and compile the latest version yourself. Because it's all Python code, perhaps compile isn't quite the right word, but while you are there, make sure you also download the latest virtinst code and prep that as well because virt-manager relies on it.
When you run virt-manager for the first time (see Figure 6), you'll find yourself looking at a rather sparse window, especially if you have no VMs currently running on the host system.
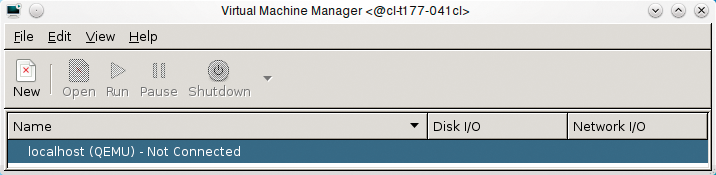
When virt-manager starts, it will look to the host system, the "real" hardware on which the virtual machines are running. Depending on the setup, the machine could be disconnected, at which point you will right-click on the localhost machine, and select Connect. Once this is done, you should then see all the virtual machines running on the system, as shown in Figure 5).
Click to highlight a machine (in any state), then click the Details button to get more detailed information on the machine. The details window has two tabs, one labeled Overview and one labeled Hardware. The overview window includes basic machine information, including a detailed graph of the CPU usage and memory use over time, as well as some basic configuration details, such as the disk UUID and the machine's name.
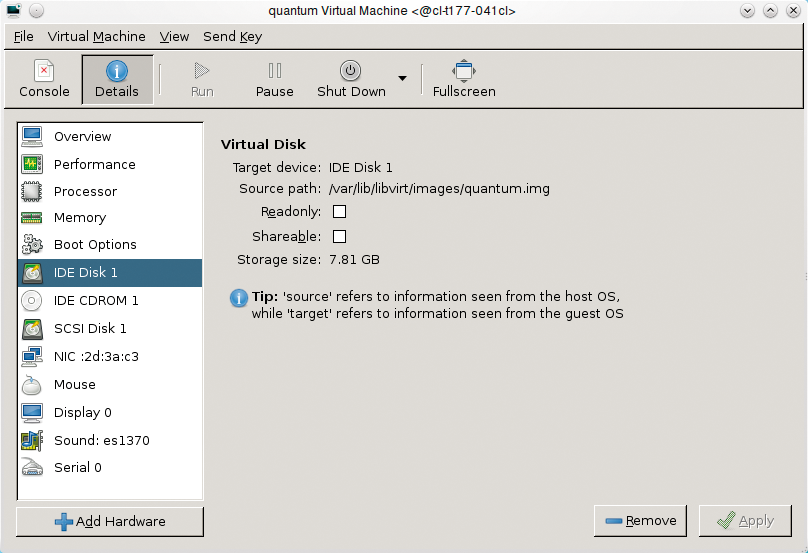
To find out about your virtual iron, including configured network cards, disks, CPUs, configured memory, and so on click the Hardware tab (see Figure 7). Some of the settings - memory, for instance - can be changed, but the machine must be in a stopped state for these changes to be made. Also, you can add additional virtual hardware to the machines by clicking the Add Hardware button below the left-hand sidebar. For instance, if you needed to add disk storage after the fact, you could create and add a disk image file and attach to that.
Of the two ways to create a new virtual machine (with virt-manager, that is ... there are always other ways), one involves creating the machine from scratch via the virt-manager interface and the other involves cloning. In effect, you create a clone of a running virtual machine.
From the Virtual Machine Manager, make sure you are connected, then left-click the main host instance (localhost). The button labeled New should have switched from its grayed-out state to indicate that it is now available. For the following example, I'll take you through an Ubuntu Linux installation. To begin, click New to start the VM creation process. Now you'll see a window that asks you to specify a name for your new VM and requests an installation method (see Figure 8).

Step 2 asks for the location of your installation medium, whether it be an attached CD or DVD or an ISO image (see Figure 9). Allow me a momentary backtrack to step 1 before I continue. The ISO install is the method I chose, but notice the others as well.
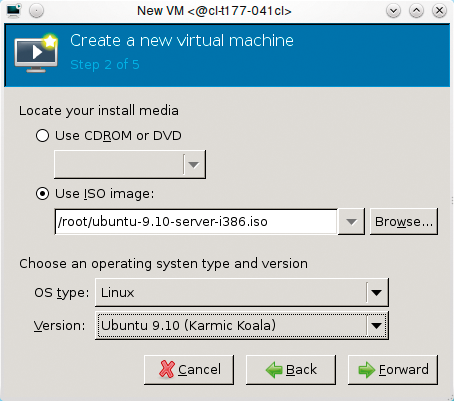
For instance, you could import an existing image and install from that (in a fashion similar to the Amazon AMIs), boot using the local network (PXE), or boot from a network install directly from a distribution's repository. For example, a 64-bit CentOS system could be installed in this way by specifying http://centos.mirror.iweb.ca/5.5/os/x86_64. Here, I'll use a Karmic server image I downloaded to my /root directory.
A little further down in step 2, choose the OS type (Linux) and the version you are installing; you could also choose to install Solaris, other Unix flavors, or Windows. Each OS type has multiple versions defined, so make sure you use the one that matches the system you are trying to install. Click Forward to continue. Next, you are asked to define the amount of memory (RAM) assigned to the machine and the number of processors (see Figure 10).
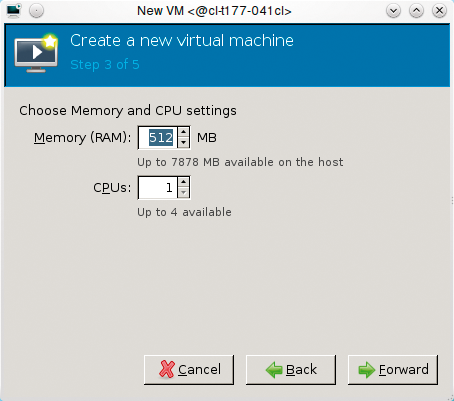
Now click Forward to define the storage space to allocate to this VM (Figure 11). When you define a disk here, virt-manager will create the file for you. If a storage file already exists, or you pre-created it in some fashion, you may specify that as well.
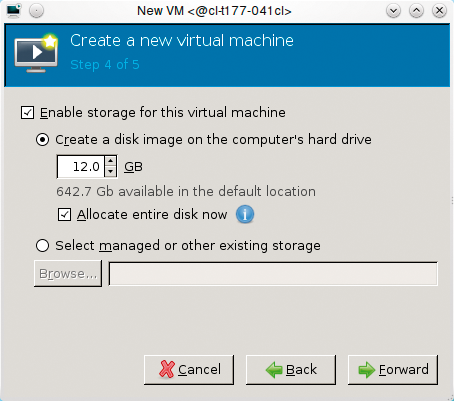
If you choose the checkbox next to Allocate entire disk now, it takes a little longer as the disk file is prepared, but the installation is quicker. If you leave it off, the disk will grow to the defined maximum space as it is needed. After you click Forward, you have one last chance to review your VM, including assigning networking, before launching the process (see Figure 12).
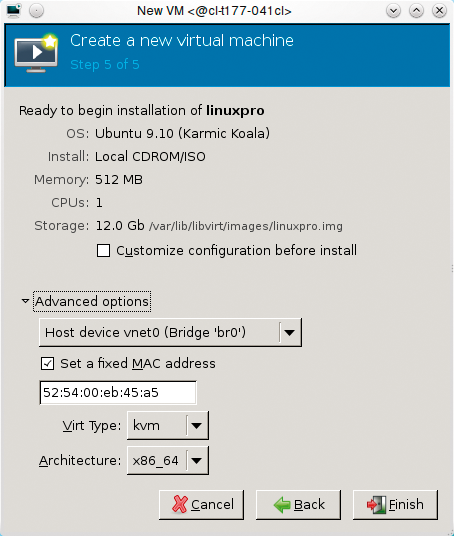
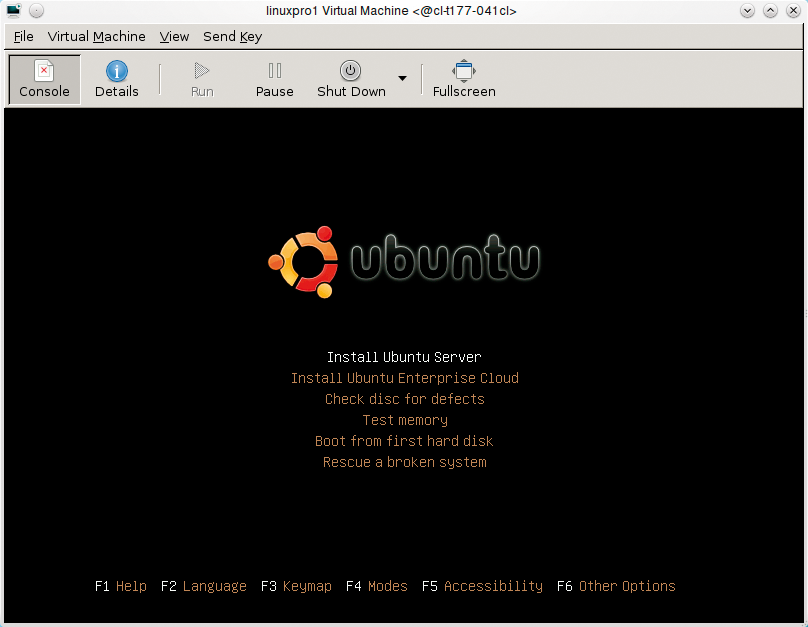
Finally, click Finish, and the installer will create the disk file. Depending on the size of the file, this step can take a few minutes. Once done, you'll find yourself back at the virt-manager screen with your virtual machine in a running state. Stats on disk and CPU usage should start appearing in seconds. On a fresh install, you'll want to interact with the machine. To do so, either double-click its entry, or right-click and select Open. By default, the VM's control panel (seen in Figure 7) will open with the Console button checked. This is done with a VNC viewer attached to the server process on the VM. In effect, you are connected to a graphical console from which you can continue with the installation. Figure 13 should look like a pretty familiar installation.
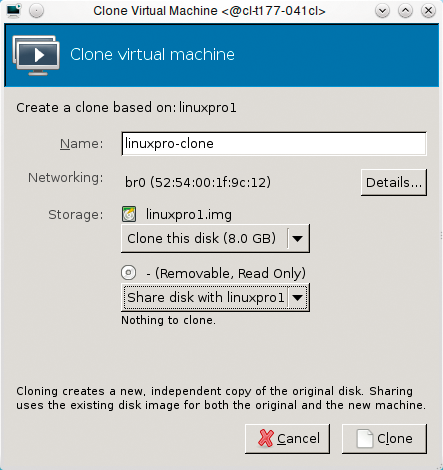
Now that you have gone through the trouble of creating a machine with essentially everything you need, including all the packages, configurations, and so on, rather than reinventing the same thing over and over again, you can clone an existing virtual machine. Simply right-click on a machine and select Clone. A window will appear asking for a name (it defaults to the old name appended with -clone), showing the networking options, and offering possible changes in storage (see Figure 14).
One last note on creating machines: When you started virt-manager, you connected to the main server (localhost) on which virt-manager was running. That said, it is possible to connect from one virt-manager to any number of servers running libvirtd, the process that monitors and keeps track of running VMs. This brings me to the Migrate option, which lets you effectively move a virtual machine from one host to another, thereby allowing you to better manage the resources in your private cloud.
I'll wrap up today's discussion of cloud control by showing another approach to dealing with your private cloud - a web-based application called openQRM [3], from which you can control and monitor any number of hosts, virtual machines, and pretty much anything in your private cloud. openQRM does this by treating everything you own as part of a single virtual data center that consists of every piece of hardware, every server (physical or virtual), application, ... you name it, and it's all done with modules that can be turned on or off as needed or desired (Figure 15).

Installation of openQRM is easy. Just visit the site, download the latest package, and install it. Packages are available for CentOS, Ubuntu, and Debian, but source code means you can build it for pretty much any distribution.
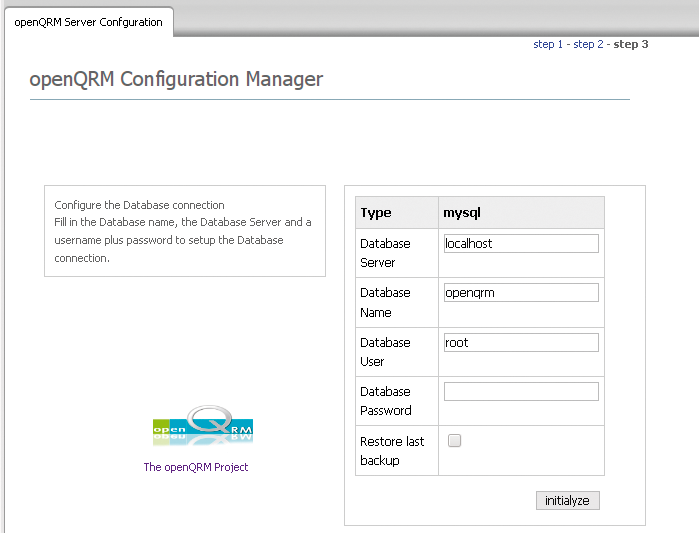
Once installed, connect to the web interface (http://yourdomain.dom/openqrm) with the default username openqrm and with the password openqrm. The first time you connect, there's a short, three-step configuration process. In the first step, aside from being told the process is three steps, you are asked to select your default network interface. Just click the appropriate radio button (which is easy if you only have one interface) then click Next.
In the second step, you are asked to select the database type that you'll be using to store openQRM data. Supported database types are MySQL, PostgreSQL, Oracle, and DB2. After making your choice, click select, then fill in the blanks for the third and final screen (see Figure 16). The information here is the database username and password. When you're ready, click the initialyze [sic] button.
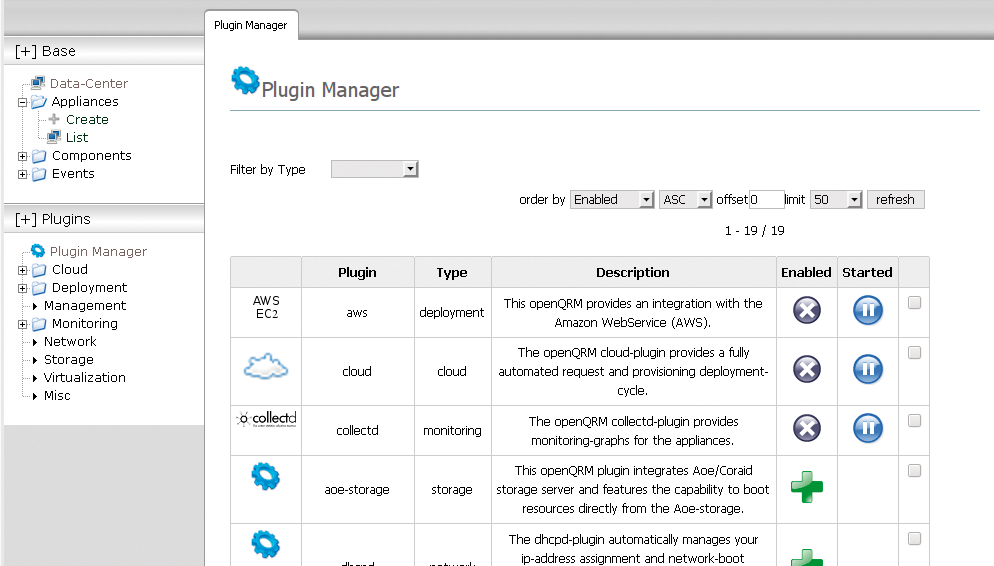
As I already mentioned, the various tools used to manage your data center and private cloud are all plugin based. Before you dig too deeply into openQRM, you want to enable the plugins you'll be needing. To do so, click the Plugin Manager link in the left-hand menu to open the interface. Now you can select any or all the plugins you want; scroll down and click Enable then click the blue pause icon to start the enabled plugin.
Alternatively, you can click on the big green plus icon next to each description and enable them one by one (see Figure 17).
Of particular interest - in that it is how I began the article - is a module that lets you interact with Amazon's AWS EC2 service. Also, you can use the virtualization plugins that are included to manage KVM and Xen hosts, which, of course, brings me back to the middle part of this article (it is all coming together now).
Add to that openQRM's plugins for Nagios, remote storage management, event monitoring, and ambitious centralized management system, and you have a robust system for dealing with your entire data center, whether in your cloud, or in someone else's.
| INFO |
|
[1] Amazon EC2 Pricing: http://aws.amazon.com/ec2/#pricing
[2] Virtual Machine Manager: http://virt-manager.et.redhat.com/ [3] openQRM: http://openqrm.com/ |
| THE AUTHOR |
|
Marcel is an award-winning columnist, book author, public speaker, and radio and television personality and a well-known voice in the Linux and open source universe. He's also a published science fiction author and editor, a private pilot, and was once a Top 40 disc jockey. |