
A tutorial for beginners is presented on writing PostScript files to display data.
The Alparon research group at Delft University of Technology aims to improve automated speech processing systems for information retrieval and information storing dialogues. The current focus is on dialogue management for a research project of Openbaar Vervoer Reisinformatie. The company provides information about Dutch public transport systems, ranging from local bus services to long -distance trains. They are capable of giving up-to-date travel advice from any address to any other address in the Netherlands. Last year they received over 12 million calls for information.
Since we use a corpus-based approach, we analyze tons of data. Due to the size of our data we do just about everything the Unix way: We use only stdin and stdout, and we run our scripts just as sed does (Those who can't program, write C/C++ programs; those who can, try to stick with scripts as long as possible. See also the White Paper in the References). Basically, we torture our data with Perl (and its little friends like awk, sed, tr, grep, find, et al.) until it is in a simple form, e.g., on each line you have an x and a y value.
Although we could import this in some fancy presentation program, we found that the generated PostScript files by these programs are often huge. That might be okay if you have just a couple of figures, but if you have a lot of them, you start to wonder if there is a better way. Of course there is; you can write the PostScript yourself, as I often do. In a Perl script I transform the x-y table into PostScript. Since LATeX requires a bounding box, I always make the PostScript level-1 compliant.
In this article I will give you a crash course in how to write level-1-compliant PostScript—enough instruction so that you can make your own simple figures. I will begin with the basic operators and then we can start drawing lines, filling shapes and drawing text. After that I will present a description of compliant PostScript and an example. I will show you how to draw a histogram, because a histogram has all facets: lines, shapes and text.
Normally, when you wish to learn PostScript, you read the Blue Book (see References). If you just wish to know sufficient PostScript for most of your needs, keep on reading. PostScript is a Turing complete stack language. The Turing complete part (well, I am theoretical computer scientist) means that it is as powerful as any other programming language. The stack part means that all computations are carried out on a stack.
For instance, run Ghostscript (not Ghostview) by typing gs. The command pstack, the basic debugging tool, will show you the current stack. Enter 1 2 3 4 pstack at the prompt and a new stack is displayed.
When you type the stack operator pop, 4 is popped off the stack. Next, type exch, and 2 and 3 will swap places. Another handy stack operator is dup, which duplicates the top element. The last important stack operator is roll which takes two arguments, say n and j. The command n j roll (with n and j replaced by numbers, of course) rotates the top n elements of the stack j times. So if the stack shows 1 3 2 2, the command 4 1 roll outputs 2 1 3 2.
PostScript also has all the normal arithmetical operators, but since it is a stack language, you do your arithmetic in reverse Polish notation; i.e., the operators always follow the arguments. The standard arithmatical operators are add, sub, mul, div, idiv (integer division), and mod. PostScript also has geometric, logarithmic and exponential functions.
PostScript works best if you do everything on the stack, but in some cases this isn't particularly convenient. PostScript also has variables, but they are a bit slower than the stack. When you start writing your own PostScript programs, you will often try to do everything with variables—this is considered a Bad Thing. With some practice you will use fewer and fewer variables. To give a variable a value you type:
/PointsPerInch 72 def
which assigns 72 to the variable named PointsPerInch. If you use PointsPerInch, PostScript will replace it with 72.
In PostScript you can also define subroutines. Basically this is the same as assigning a variable, only in this case the value is a code chunk enclosed in curly braces. For example:
/Inch { PointsPerInch mul } def
PostScript also has flow control commands which are beyond the scope of this primer.
Time to do something more interesting. To draw a line, enter:
newpath 100
400 moveto 300 200 lineto
        500 300 lineto stroke
This instruction starts a new path by moving to point (100, 400), drawing a line to point (300, 200), then to (500, 300) and, finally, painting the current path. Without the stroke you wouldn't see a thing. Instead of absolute positions you can also use relative movements with rmoveto and rlineto. The thickness of the lines can be controlled by the setlinewidth option, e.g., to draw a hair line:
0.01 setlinewidthFilling shapes is also easy. Replace stroke by closepath fill; the command closepath connects the last point with the first point to form the shape and fill fills the shape with the current color or grayscale. In this case we get a black triangle. If you do 0.9 setgray, the fill color will be a light gray (0 is black and 1 is white). You can also select colors with sethsbcolor or setrgbcolor, but these options are a bit more complicated. (For further information, see the Red Book in the References.)
Placing text takes some initial preparation: First select the proper font:
/Times-Roman findfont 10 scalefont setfont
selects a 10-point Times-Roman font. Other well-known fonts are Helvetica and Courier. Placing text is easy; you move to the position where you want the text, add parentheses to enclose the text and add the command show. In the case where the text contains parentheses or a backslash you must “escape” them by inserting a backslash before the character to be escaped. Sounds familiar, right? So the line:
400 400 moveto (Hello World) showprints a greeting you have seen many times before.
There is one final command that is crucial if you want to see anything rolling out of the printer: showpage. This command transfers the picture, made by the PostScript interpreter of your printer, to paper and clears the memory afterwards so that you can start a new page. The command run can be used to load your file:(file.ps) run executes the file named file.ps.
Compliant PostScript is nothing more than PostScript with some special comments and layout instructions for your PostScript program, so that other programs can read your PostScript program and perform certain operations on it. There are numerous examples of available operations: reversing the pages, scaling the pages, rotating the pages, placing two or four pages on one page, etc. Even the program Ghostview uses compliant PostScript, the title and page numbers that you see are retrieved from the PostScript comments.
Since this is all done through comments, it does not matter to your printer if the PostScript is compliantor not—the printer skips all comments. However, in a Unix environment it is common to use the output of one program as the input for another. Thus, it is quite natural not to consider a PostScript file as an end station. In a Unix environment compliant PostScript files are a must; otherwise, the print filters will not be able to process the files.
In a Microsoft environment with Microsoft's well-known word processor, PostScript is an end station. The generated output suggests that it is level-2 compliant PostScript, but, alas, it is not. There are so few rules to make your document level-1 compliant (see Red Book) or even level- 2 compliant (see DSC in the References), that you might wonder how it ever wouldn't be.
I will stick to level-1 compliant (it is a bit easier as level-2 has more overhead). In the Red Book, level-1 compliant PostScript is described in just eight pages; so if you want to know all the ins and outs, it is the right source.
There are three types of comments:
Header comments go before any PostScript code.
Body comments primarily serve to mark the boundaries of pages.
Trailer comments follow all PostScript code and are normally used to describe certain features that were not yet known from the header comments, so they were deferred (e.g., number of pages, fonts to be used and bounding box).
Normally, a comment in PostScript starts with a % (percent symbol), but these structuring comments start with %% (or %! if it is the very first line). A %% comment is directly followed by a keyword denoting its type of structuring comment, and if arguments are needed, they follow a :(colon) and are separated by spaces. As an example, let's look at the following template (the number in front of each line is just for reference):
1  %!PS-Adobe-1.0
2  %%DocumentFonts:
3  %%Title:
4  %%Creator:
5  %%CreationDate:
6  %%For:
7  %%Pages:
8  %%BoundingBox:
9  %%EndComments
The first line suggests that these files are going to be level-1 compliant. One common misunderstanding is that people think the 1 in 1.0 denotes the compliance level, but that is not the case. Only level-1 and level-2 compliancy exist, so even if you see %!PS-Adobe-3.2 , it is not level- 3 compliant (it should be level-2 compliant).
The second line contains the fonts to be used in this file. Some programs find it handy to know in the beginning which fonts they should load. However, when you create a program that generates PostScript, you often do not know this at this time. This header comment can be deferred to the trailer comments. In that case you will have to replace the font1 font2... part of the line in the header with (atend).
The third line is easy; text indicates the title of the document. Often this is the file name, but it does not have to be. Spaces in text are no problem. The fourth line is equally easy; here text should be replaced by the author or the application that created this file.
In the fifth line text should be a date and time humans can interpret. Line 6 is optional, and text should be replaced by the intended recipient. If absent, the intended recipient is Creator.
In line 7 number should reflect the number of pages in the document. Since this number is often not known beforehand, it is frequently deferred to the trailer comments. Again, substitute (atend) in this case.
Line 8 contains four arguments: the x and y coordinates for the lower left corner and the upper right corner. In the case of multiple pages you should use the bounding box, so that all pages lie in the bounding box. To fill in the right values, you will find Ghostview very handy. The bounding box can also be deferred to the end; again you would specify (atend).
Finally, line 9 ends the header section. Besides line 1 and 9 the order of the other lines can be chosen as you see fit.
After the header you normally see some PostScript definitions of variables and subroutines. These variables are intended to remain constant throughout the rest of the PostScript program.
Next, it is time for the body comments. The first body comment is %%EndProlog, which ends the “invariant” section of the program. Most print filters leave everything up to this line intact.
Each page is preceded by (again line numbers are only for reference purposes):
1  %%Page:
2  %%PageFonts:
elm
The first line contains label and ordinal. label should be replaced by a string, containing no white space, that indicates which page it is. Sounds a bit weird, but this means that Roman numerals are okay, and if you have two pages on one, then 1,2 or 3,4 is a valid page number as well. In our case, it is just a plain number. The ordinal part indicates the value of the page number. Having two types of page numbers is just for your convenience.
The second line is optional and describes which fonts are to be used in the output. If absent, the fonts specified for DocumentFonts in the header are used.
Although it is not necessary, if you want to create just a single page, the next PostScript command is save, which makes a copy of the environment you have built so far. At the end of the page you will find the line:
restore showpage
This command retrieves the original situation and prints the page. It means that anything you do between save and restore is fair game, i.e., you can't screw up other pages if a filter reorders the pages.
After the final page you have %%Trailer. Most filters leave this line and everything that follows it intact. In some PostScript programs some cleaning up occurs here, but in most PostScript programs the trailer comments follow directly (again, line numbers are for reference purposes):
1  %%DocumentFonts:
2  %%Pages:
3  %%BoundingBox:
Of these three lines, only those that were deferred in the header comments should be included here in the trailer.
If you want to make your PostScript level-2 compliant, you need to read the DSC (see references).
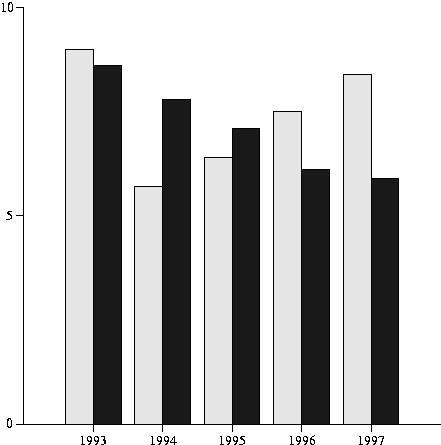
The first step is to torture your raw data until you get a simple table. In practice you use Perl and friends for this step. For the sake of demonstration I will use a tiny table:
1993 9.0 8.6
1994 5.7 7.8
1995 6.4 7.1
1996 7.5 6.1
1997 8.4 5.9
This table has an x, a y and a z. What I wish to draw is a light gray histogram for x and y and a dark gray one for x and z. Normally, you know the minimum and maximum values in your table, or you just use an awk one-liner to determine those values.
Next step is get started using a template of the Perl script, histogram.pl, that will generate the PostScript file. This template is shown in Listing 1.
One remark about the last bounding box line. This is the size of A4 (European standard page size); for letter size you need 0 0 612 792. In a later stage we will change this line, so that the bounding box fits more tightly.
Run the script and save the output in histogram.ps. Start up Ghostview to view this file. Not much to see, right? Time to edit histogram.ps. It is easier to do a little experimentation with this file rather than making changes directly to the Perl file (especially in a later stage when you are actually processing your data). We are going to experiment with the axes; our changes are shown in Listing 2.
When you are pleased with the result, copy it into histogram.pl just after the save command and add the line 1 setlinewidth to restore the original line width. Now it is time to do the hard work: defining two subroutines Histo-y and Histo-z. Again, this normally requires some experimentation, so create the PostScript file and edit it. We will assume that each subroutine gets x,y and x,z respectively on the stack. We will give both histograms a border line. It often helps to put a couple of your data points on the stack as an experiment.
You can copy your subroutines just in front of the EndPrologue line of your Perl script as shown in Listing 3.
Just a few words: I warned you to avoid using variables, and I did not practice what I preached. Well, only in the case of huge tables do you do everything on the stack. Doing so is much harder and often not worth the effort—my time is more expensive than what I gain in speed. Furthermore, I do some of the computations in PostScript; usually, it does pay off to do this in your Perl script. Finally, you normally do not want to recompute the path; you save it. I just wanted to keep the example simple.
Now it is time to complete your Perl script and process your data by adding the lines:
while (<>) {
           chomp;
           ($x, $y, $z) = split;
           print "$x $y Histo-y $x $z Histo-z\n";
   }
Now you can run your script with the data as stdin to create a new histogram.ps. The final step is to determine a better bounding box. This is where Ghostview comes into play. Go to the leftmost and rightmost pixel of your picture and write down the x coordinates. Now do the same for the top and bottom of your picture, writing the y values. With these coordinates you can determine the bounding box (it does not have to be pixel fit) 83 85 400 405, and you can change it in your PostScript file. (Or in your Perl script; however, if you have a huge data file to process, recreating the PostScript file can take a while.)
Now you have a fully level-1 compliant PostScript file less than 2KB is size that you can actually understand. I have seen PostScript files generated by applications under MS-DOS that need 2MB for the same picture. The complete Perl script and output PostScript are included in the gzipped tar file on the ftp site as Listings 4 and 5. The output histogram is shown in Figure 1.
Epilogue
So from now on we do everything in PostScript, right? Wrong. If it goes faster using another application and the generated PostScript file is not too large, use that application. For many pictures I still use xfig or something similar. Use PostScript directly if your data set is big and importing your data into the application already requires a lot of work. If you are relatively new to PostScript, concentrate on x-y graphics and histograms. If you have gained some experience, read the Blue and Red Books. Most importantly, have fun.
