
Decreasing the vulnerability of your DNS server is largely a matter of staying current and private.
In the SANS Institute's recent consensus document “How to Eliminate the Ten Most Critical Internet Security Threats” (www.sans.org/topten.htm), the number-one category of vulnerabilities reported by survey participants was BIND weaknesses. BIND, of course, is the open-source software package that powers the majority of Internet DNS servers. In fact, again according to SANS, over 50% of BIND installations are vulnerable to well-known (and in many cases, old) exploits.
The good news is that armed with the simple concepts and techniques I'm about to describe, you can quickly and easily enhance BIND's security on your Linux (or other UNIX) DNS server. Since our focus here will be security, if you're an absolute BIND beginner you may wish to first start reading the BIND online documentation (see Conclusions, at end) or the first chapter or two of Albitz and Liu's book DNS and BIND.
Having said that, let's begin with a brief look at how the Domain Name Service and BIND work. Suppose someone (myhost.someisp.com in Figure 1) is surfing the Web, and wishes to view the site http://www.wiremonkeys.org/. Suppose, also, that person's machine is configured to use the name server “ns.isp.com” for DNS lookups. Since the name www.wiremonkeys.org has no meaning to the routers through which the web query and its responses will pass, the user's web browser needs to learn www.wiremonkeys.org's IP address before attempting the query.
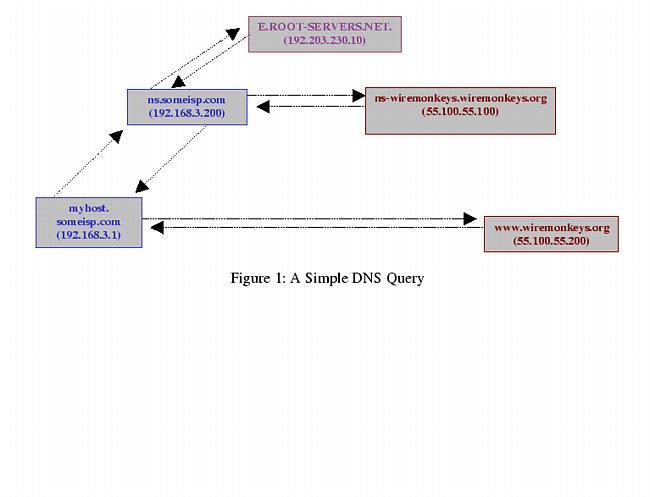
Figure 1. myhost.someisp.com
First, “myhost” asks “ns” whether it knows the IP address. Since ns.someisp.com isn't authoritative for wiremonkeys.org and hasn't recently communicated for any host that is, it begins a query of its own on the user's behalf. The process of making one or more queries in order to answer other queries is called recursion.
ns.someisp.com begins its recursive query by asking a “root name server” for the IP address of some host that's authoritative for the zone wiremonkeys.org. (All Internet DNS servers use a static “hints” file to identify the thirteen or so official root name servers. This list is maintained at ftp.rs.internic.net/domain and is called named.root.) In our example, ns asks E.ROOT-SERVERS.NET (an actual root server, with a current IP address of 192.203.230.10), who replies that DNS for wiremonkeys.org is handled by “ns-wiremonkeys.wiremonkeys.org”, with an IP address of 55.100.55.100.
ns then asks ns-wiremonkeys for the IP address of www.wiremonkeys.org. ns-wiremonkeys returns the answer (55.100.55.200), which ns forwards back to myhost.someisp.com. Finally, myhost contacts 55.100.55.200 directly via HTTP and performs the web query.
This is the most common type of name lookup. It and other single-host type lookups are simply called “queries”; DNS queries are handled on UDP port 53.
Not all DNS transactions involve single-host lookups, however. Sometimes it is necessary to transfer entire name-domain (zone) databases: this is called a zone transfer, and it happens when you issue an ls command from the nslookup utility, or run dig. The main purpose of zone transfers, however, is for name servers that are authoritative for the same domain to stay in sync with each other (e.g., for “master to slave” updates). Zone transfers are handled on TCP port 53.
The last general DNS concept we'll touch on here is caching. Name servers cache all local zone files (i.e., their hints file plus all zone information for which they are authoritative), plus the results of all recursive queries they've performed since their last startup. That is, almost all: each resource record (RRs) has (or inherits their zone-file's default) time-to-live settings. These settings determine how long each RR can be cached before being refreshed.
This, of course, is only a fraction of what one needs to learn in order to fully understand and use BIND. I haven't even mentioned forwarders or reverse lookups. Hopefully, it's enough for the purposes of discussing BIND security.
DNS security can be distilled into two maxims: always run the latest version of your chosen DNS software package, and never provide unnecessary information or services to strangers. Put another way, keep current and be stingy!
This translates into a number of specific techniques. The first is to limit or even disable recursion. Limiting it is easy to do using configuration-file parameters; disabling recursion altogether may or may not be possible, depending on the name server's role.
If, for example, the server is an “external” DNS server with the sole purpose of answering queries regarding its organization's public servers, there is no reason for it to perform lookups of nonlocal host names (which is the very definition of recursion). On the other hand, if a server provides DNS resolution to end users on a local area network (LAN), it definitely needs to recurse queries from local hosts, but can probably be configured to refuse recursion requests, if not all requests, from nonlocal addresses.
Another way to limit DNS activity is to use split DNS services (see Figure 2). Split DNS refers to the practice of maintaining both public and private databases of each local name domain (zone). The public zone database contains as little as possible: NS records listing publicly accessible name servers, MX records listing external SMTP (e-mail) gateways, public web servers and other hosts that one wishes the outside world to know about.
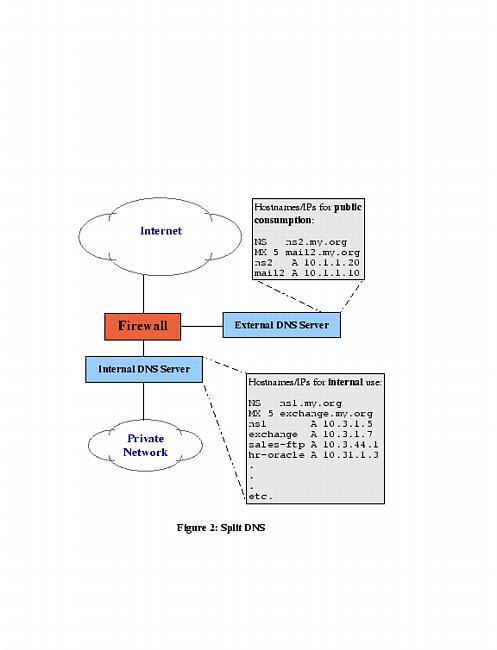
Figure 2. Split DNS
The private zone database may be a superset of the public one, or it may contain entirely different entries for certain categories or hosts. For example, many organizations use a Microsoft Exchange server for internal e-mail, but maintain a completely separate SMTP gateway system to receive mail from the outside world. This is sometimes actually the organization's firewall, or perhaps a dedicated mail server in a DMZ network connected to the firewall but separate from the internal network.
The value of such an architecture should be obvious: compromise of the SMTP gateway does not automatically result in the exposure of internal e-mail to outsiders. Other services commonly split this way are WWW (which separates public web data from intranet data), FTP, and virtually all other TCP/IP services for which it's desirable to differentiate between public and private data. DNS, however, is arguably the most important service to split, since most other TCP/IP services depend on it.
The other aspect to DNS stinginess is the content of zone files themselves. Even public zone databases may contain more information than they need to. Hosts may have needlessly descriptive names (e.g., you may be telling the wrong people which server does what), or too much or too granular contact information may be given. Some organizations even list individual systems' hardware and software names and versions! Such information is almost invariably more useful to prospective crackers than their intended audience.
Maintaining current software and keeping abreast of known DNS exposures is at least as important as carefully considering actual DNS data. Furthermore, it's easier: the latest version of BIND can always be downloaded for free from ftp.isc.org, and information on BIND vulnerabilities is disseminated via not only one, but several mailing lists and newsgroups (some of which are listed at the end of this article).
There's actually a third maxim for DNS security, but it's hardly unique to DNS: take the time to understand and use the security features of your software (and of your DNS-registration provider—Network Solutions and other top-level-domain registrars all offer several change request security options, including PGP. Make sure that your provider requires at least e-mail verification of all change requests for your zones!).
As of this writing, the most current version is 8.2.2, patch level 5. Due to a particularly nasty buffer-overflow problem that can lead to unauthorized root access of vulnerable systems (the “NXT” bug, described in CERT Advisory #CA-99-14) in all older 8.2 releases, it is essential that anyone using BIND be at least at version 8.2.2P5.
Note that for some time after BIND v.8.1 was initially released in May 1997, many users deliberately continued using BIND v.4 due to its stability (and possibly to postpone having to learn the new configuration-file syntax). In fact, the Internet Software Consortium(ISC) continued to support, and even patch, version 4, releasing BIND v.4.9.7 a full year after 8.1's debut.
However, the ISC no longer recommends that anybody continue using BIND v.4, even v.4.9.7. So it bears repeating: everyone who runs BIND on an Internet server should be running the latest release of version 8.x.
We've established that you need the latest version of BIND. But should you use a pre-compiled binary distribution (such as an RPM), or should you compile it from source? For most users, it's perfectly acceptable to use a binary distribution, provided it comes from a trusted source. Virtually all UNIX variants include BIND with their “stock” installations; just be sure to verify that you indeed have the latest version.
The command to do this with Red Hat Package Manager is rpm -q -v bind8 if the package has already been installed, or rpm -q -v -p ./<path & filename of package> if you have a package file, but it hasn't been installed yet. The rpm package name for BIND is usually “bind8” or “bind”.
If you perform this query and learn you have an old (pre-8.2.2p5 version), most package formats support an “upgrade” feature; simply download a more current package version from the Linux distribution web site, and upgrade it using your package manager. To do this with RPM, the command syntax is rpm -U ./<path & filename of package>, assuming you don't need special install options. If the above doesn't work, you can try rpm -U --force ./<path & filename of package>.
If you can't find a suitable binary distribution, compiling it from source is easy: there is no “configure” script to run, and none of BIND v.8x's Makefiles need be edited. Simply follow the brief instructions in the source's INSTALL file (make; make install is all most people need to do).
It's premature to start named (the main process of BIND) just yet. But how you plan to run named will determine how it should be configured. Now is a good point, therefore, to talk about some startup options that can enhance security.
As with all Internet services, it's a good idea to run named in a “padded cell” in which a prospective cracker will be trapped should he/she exploit, for example, some obscure buffer-overflow vulnerability. Three flags make this cell easy to achieve: -u <username>, -g <group name> and -t <directory for named to chroot to>.
The first causes named to run under the specified user name. The second causes named to run under the specified group name, while the third changes (“chroots”) the root of all paths referenced by named. Note that when running named chrooted, this new root is applied even before named.conf is read. Therefore if, for example, you invoke named with named -u named -g wheel -t /var/named, then it will look for named.conf in /var/named/etc rather than in /etc. That is, the default location of named.conf is always /etc, but if named is chrooted to path /other/path, /etc will be translated as /other/path/etc.
The net effect of these three flags (when used properly) is that named's permissions, environment and even file system are severely limited. Should an unauthorized user somehow hijack named, instead of gaining root permissions (prior to BIND v.8, named ran as root) they'll gain the permissions of an unprivileged account. Furthermore, they'll see even less of the server's file system than an ordinary user can: directories connected to directory-tree nodes higher than the chroot-point won't, from named's perspective, even exist.
Running named in a padded cell is paranoid and elite in itself. But that's just the beginning! BIND 8.x's configuration file, named.conf, with its large number of supported parameters, allows you to control named's behavior with a great deal of granularity.
Consider the example named.conf file as shown in Figure 3.
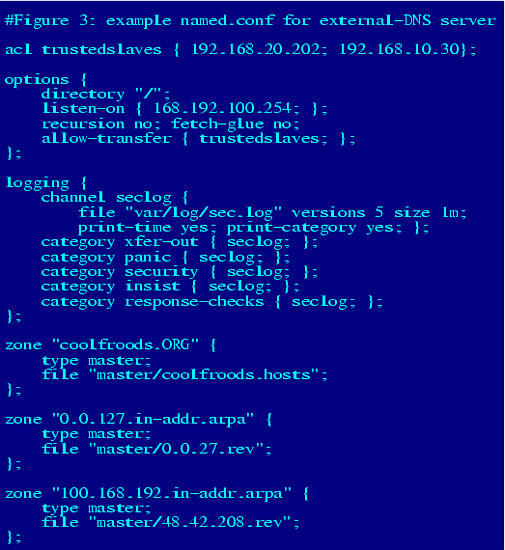
Figure 3. Example named.conf File
The hypothetical server whose configuration file is represented here is an external DNS server. Since its role is to provide information to the outside world about coolfroods.org's publicly accessible services, it has been configured without recursion. In fact, it has no “.” zone entry (i.e., no pointer to a hints file), so it knows nothing about and cannot even learn about hosts not described in its local zone files. Transfers of its local zone databases are restricted by IP address to a group of trusted slave servers, and logging has been enabled for a variety of event types.
So how do we do these and even more nifty and paranoid things with named.conf?
Although strictly optional, Access Control Lists (acls) provide a handy means of labeling groups of IP addresses and networks. And since we're paranoid, we definitely want to restrict certain actions and data by IP address.
An acl may be declared anywhere within named.conf, but since this file is parsed from top to bottom, each acl must be declared before its first instance in a parameter. Thus, it makes sense to put acl definitions at the top of named.conf.
The format for these is simple:
acl acl_name { IPaddr1;
IPaddr2; ...etc. };
Note that the IP address list can contain either complete IP addresses in the form x.x.x.x or network addresses in the form x.x.x/24, x.x/16, etc. Now, each time named.conf is read, the parser will substitute all instances of the acl's name (that occur after its definition) with its corresponding IP address list.
The next thing to add is a list of global options. Some of the parameters that are valid for this section can also be used in zone sections; be aware that if a given parameter appears both in options{} and in a zone section, the zone version will supercede the global setting as it applies to that zone. In other words, the zone-section values of such parameters are treated as exceptions to the corresponding global values.
Listing 2 shows some useful parameters that can be used in options{}.
In addition to global options, we definitely want to set some logging rules. By default, named doesn't log much more than a few startup messages (such as errors and zones loaded), which are sent to the syslog d<\#230>mon (which in turn writes them to /var/log/messages or some other file). To log security events, zone transfers, etc., you need to add a logging{} section to named.conf.
The logging{} section consists of two parts: one or more channel{} definitions (each of which defines a place to send log information) followed by one or more category{} sections (wherein each event type you wish to track is assigned one or more channels). Channels usually point to either files or the local syslog d<\#230>mon, and categories are actually pre-defined; that is, you choose from a set of pre-defined categories, specifying in each case what is to be done with event messages from that category.
Channel definitions take the following format: channel channel-name {{filename syslog syslog-type|null]; print-time [yes | no]; print-category[yes | no];};
Note that filename by default is put in named's working directory, but a full path may be given (that is assumed to be relative to the chrooted directory, if applicable).
Category specifications are much simpler:
category category-name {channel-list ; };
Note that as with IP address lists, the channel list is semicolon-delimited and must contain channels defined in a prior channel{} statement. See the BIND Operator's Guide (BOG) for the full list of supported categories; suffice it to say that xfer-out, security, load, os, insist, panic and maintenance are usually of interest to the security-conscious DNS administrator.
“Caching-only” name servers, which are not authoritative for any zones (i.e., are neither master, slave, nor even stub for anything), are inherently simpler and therefore easier to secure than other kinds of DNS servers. Little of what follows will apply when setting up a caching-only server.
The last type of named.conf section we'll examine here is the zone{} section. Like options{}, there are many additional parameters besides those described below; see the BOG for more information.
The three parameters most useful in improving zone-by-zone security are:
allow-update { IP/acl-list ; };
allow-query IP/acl-ist ; };
allow-transfer IP/acl-list ; };
allow-update lists hosts that may submit Dynamic DNS updates for the zone; allow-query specifies which hosts may even submit simple DNS queries; and allow-transfer restricts who may download entire zone files. Note that all three of these parameters may be used in either/both zone{} sections and/or the options{} section, with zone-specific settings overriding global settings.
Our secure DNS service, trapped in its padded cell and very particular about what it says to whom, is shaping up nicely. But what about the actual zone databases?
The good news here is that since our options are considerably more limited than with named.conf, there's less to do. The bad news is that there's at least one type of Resource Record that's both obsolete and even dangerous, and must be avoided by the security-conscious.
Here's a sample zone file for the hypothetical domain “boneheads.com” (see Figure 4.)
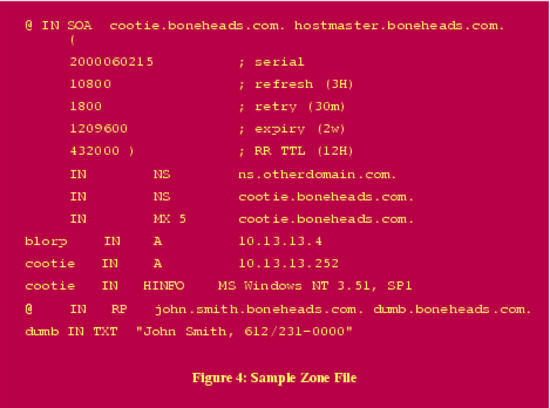
Figure 4. Sample Zone File
The first thing to consider is the Start-of-Authority (SOA) record. In the above example, the serial number follows the convention yyyymmdd##, which is both convenient and helps security, as it reduces the chances of accidentally loading an old (obsolete) zone file—the serial number serves as both an index and a time stamp.
The refresh interval is set to three hours, a reasonable compromise between bandwidth conservation and paranoia. That is, the shorter the refresh interval, the less damage a DNS-spoofing (cache-poisoning) attack can do, since any “bad records” propagated by such an attack will be corrected each time the zone is refreshed.
The expiry interval is set to two weeks. This is the length of time the zone file will still be considered valid, should the zone's master stop responding to refresh queries. There are two ways a paranoiac might view this parameter. On one hand, a long value ensures that should the master server be bombarded with denial-of-service attacks over an extended period of time, its slaves will continue using cached zone data and the domain will continue to be reachable (except, presumably, for its main DNS server!). But on the other hand, even in the case of such an attack, zone data may change, and sometimes old data causes more mischief than no data at all.
Similarly, the Time to Live interval should be short enough to facilitate reasonably speedy recovery from an attack or corruption, but long enough to prevent bandwidth cluttering. (The TTL determines how long the individual zone's Resource Records may remain in the caches of other name servers retrieving them via queries.)
Our other concerns in this zone file have to do with minimizing the unnecessary disclosure of information. First, we want to minimize aliases (“A records”) and canonical names (“CNAMEs”) in general, so that only those hosts who need to be are present. (Actually, we want split DNS, but when that isn't feasible or applicable, we should still try to keep the zone file sparse.)
Second, we want to minimize the amount of (recursive) glue-fetching that goes on. This occurs when a requested name-server (NS) record contains a name whose IP address (via an A record) is not present on the server answering the NS query. In other words, if server X knows that Y is authoritative for domain WUZZA.com but X doesn't actually know Y's IP address, life can get weird: this scenario paves the way for DNS-spoofing attacks. Therefore, if you really want to eliminate all recursion (and I hope you do by now), make sure none of your Resource Records require recursive glue-fetching, and then set the “fetch-glue” option to “no”.
Finally, we need to use RP and TXT records judiciously if at all, but must never, ever put any meaningful data into an HINFO record. RP, or Responsible Person, is used to provide the e-mail address of someone who administers the domain. This is best set to as uninteresting an address as possible, e.g., “information@wuzza.com” or “hostmaster@wuzza.com”. Similarly, TXT records contain text messages that have traditionally provided additional contact information (phone numbers, etc.) but should be kept only specific enough to be useful, or better still, omitted altogether.
HINFO is a souvenir of simpler times: HINFO records are used to state the operating system, its version, and even hardware configuration of the hosts to which they refer! Back in the days when a large percentage of Internet nodes were in academic institutions and other open environments (and when computers were exotic and new), it seemed reasonable to advertise this information to one's users. Nowadays, HINFO has no valid use on public servers, other than obfuscation (i.e., intentionally providing false information to would-be attackers). In short, don't use HINFO records!
Returning to Figure 3, then, we see that the last few records are unnecessary at best and a cracker's gold mine at worst. And although we decided the SOA record looks good, the NS record immediately following points to a host on another domain altogether—remember, we don't like glue-fetching, and if that's the case here, we may want to add an A record for ns.otherdomain.com.
Whew! We've looked at BIND security from several important angles, but we haven't even mentioned cryptographic controls. Actually, the Secure DNS protocol (“DNSSEC”, described in RFC 2535) merits an article of its own. This set of extensions to DNS provides a means of cryptographically signing zone-transfer and query transactions, including the secure exchange of all necessary key data. Since DNSSEC hasn't yet been widely implemented (and in fact isn't even fully supported in BIND v.8x), we'll limit our discussion of it to the use of Transaction Signatures (TSIGs).
Suppose you wish to sign all zone transfers between the zone's master and a slave. You would do the following:
create a key for the zone
on each server, create a key{} entry in named.conf containing the key
on each server, create a server{} entry in named.conf for the other server which references the key declared in step (2).
Step one is most easily done with BIND's dnskeygen command. To create a 512-bit signing key that can be used by both master and slave, type dnskeygen -H 512 -h -n <desired_keyname>. The output will be saved in two files named something like Kdesired_keyname.+157+00000.key and Kdesired_keyname.+157+00000.private. In this case, the key-string in both files should be identical; it will look something like “ff2342AGFASsdfsa55BSopiue/-2342LKJDJlkjVVVvfjweovzp2OIPOTXUEdss2jsdfAAlskj==”.
Steps two and three consist of creating entries similar to the following in named.conf on each server (substituting “desired_keyname” below with whatever you wish to name the key—this string must be the same on both servers!):
key desired_keyname {
        algorithm hmac-md5;
        secret "<insert key-string from either keyfile here>";
}
server <IP address of other server> {
        transfer-format many-answers;
        # (send responses in batches rather than singly)
        keys { desired_keyname; };
};
Note that key{} statements must always precede any other statements (e.g., server{} statements) that refer to them. A logical place to put key-server statements is between options{} and zone statements.
Now all you need to do is restart named (via a kill -HUP or ndc restart) on both servers. Voilà! You are now on the cutting edge of DNS security!
The guidelines and techniques we've covered here should give you a good start on securing your DNS server(s). For a more in-depth understanding of these techniques, I strongly recommend BIND's on-line version of its Operators' Guide (included in most binary distributions, or available separately from http://www.isc.org/). This is among the most useful documents provided in any OSS package. Another excellent source of BIND security information is Liu's “DNS Security” slide show (available from him in PDF format—see below).
Equally important, every BIND user should subscribe to at least one security-advisory e-mail list. CERT is my personal favorite, since it's timely enough to be useful but low-volume enough to not be a nuisance. And at your earliest convenience, you should look up and read the CERT advisories listed below—understanding the threats is an essential part of good security.

Mick Bauer (mick@visi.com) is security practice lead at the Minneapolis bureau of ENRGI, a network engineering and consulting firm. He's been a Linux devotee since 1995 and an OpenBSD zealot since 1997, taking particular pleasure in getting these cutting-edge operating systems to run on obsolete junk. Mick welcomes questions, comments and greetings.
