
Here's how to get started using a scanner from Linux, and a comparison of the features in available scanning software.
A few years ago, Linux users were often confronted by the complex relationship between off-the-shelf video hardware and the XFree86 drivers that made them work. To understand how to configure your new video card, you needed to understand detailed hardware issues, such as which chipset your video card used. While this problem has eased as more video card makers have started to support XFree86 development directly and to provide their own XFree86 drivers, the Linux scanner world still is in that detailed hardware stage.
Scanners can connect to a PC in three basic ways: through a parallel port, through a SCSI bus host adapter or through the newer Universal Serial Bus (USB). It's next to impossible to find off-the-shelf scanners that don't support USB these days, though many also support parallel interfaces as well. SCSI interfaces mostly have been dropped by scanner makers in favor of USB.
USB support in the Linux 2.4 kernel series can be handled either by using the USB kernel scanner driver or by using the libusb library. You can check for the kernel scanner driver by running the following command:
lsmod | grep scanner
If this command returns anything, you have the kernel scanner driver. If it doesn't, you can load the scanner driver with this command:
modprobe scannerThis command also will load the USB core module (called usbcore when you run lsmod) if it's not already loaded. In order for the scanner to work with USB, the right USB HCI module also must be loaded. For USB 1.0 devices, the module to load is usb-uhci. For USB 1.1 it's usb-ohci. For 2.0 devices, even when running at lower speeds, it's usb-ehci. My USB hardware is USB 1.1, so I have to load the OHCI version:
modprobe usb-ohciTo use the libusb library instead, remove the scanner modules using this command (which should be run as the root user):
rmmod scannerAlthough support for the kernel scanner driver is rumored to be going away with the forthcoming 2.6 kernel release, it's still common in the current 2.4 kernels. Therefore, for the rest of this article we assume the use of the kernel scanner driver.
You can launch your scanner software using a script that runs the appropriate modprobe commands, so you can make sure the scanner driver is already loaded. Alternatively, you can use one of the system start-up scripts, such as the /etc/rc.local file commonly used on Red Hat systems, to load the scanner at boot time.
With the scanner driver loaded, next mount the USB filesystem, again as the root user:
mount /proc/bus/usb
Then you can list the devices on the USB bus:
cat /proc/bus/usb/devicesThis command won't produce any output if you don't have the scanner, USB core and HCI drivers (either uhci, ohci or ehci, as described previously) loaded. The devices file is verbose, but what you're looking for are the vendor and product IDs:
P: Vendor=04b8 ProdID=011d Rev= 1.00Hang on to these values—you'll need them later if SANE can't find your scanner. If you want to be certain your scanner will be seen by SANE, reload the scanner driver like so:
rmmod scanner
modprobe scanner vendor=0x4b8 product=0x011d
We included the vendor and product IDs this time when we loaded the scanner driver. We also prefixed the IDs with 0x—this is required if you use the modprobe command in this way.
The sane-usb man page gives a more detailed discussion on getting your USB scanner configured. See the Linux USB Project page at www.linux-usb.org for help with general USB configuration and testing.
Now that we have the basic hardware configuration, we want to make sure the SANE software can access it. The version of SANE used for this article is 1.0.8. SANE software comes in two parts: the back-end driver software and the front-end user interfaces. SANE actually only provides the back-end drivers and a few command-line front ends. X-based graphical front ends, such as XSane and QuiteInsane, are separate projects that make use of the SANE back ends.
Most modern Linux distributions now include a version of the SANE back ends. However, many distributions are providing outdated releases. The SANE web site (www.mostang.com/sane) provides links to current binary distributions in RPM or similar formats for Red Hat, Debian, Mandrake and Slackware.
Once you have the SANE back ends installed, you need to configure the back-end drivers. The first trick is to make sure SANE can find a scanner. The SANE software provides a command-line tool, called sane-find-scanner, that can find any SCSI scanner and most USB scanners. Run this command either with your normal user ID or as root; no command-line options are necessary. The output from this command will be some comments and a line that looks something like this (for USB scanners):
sane-find-scanner: found USB scanner
    (vendor = 0x04b8, product = 0x011d)
    at device /dev/usb/scanner0
This means SANE can see the scanner using the device /dev/usb/scanner0, which is good; thus, we need to configure only this scanner's back-end drivers. However, if you don't get a line like this—if no scanner can be found—when you run sane-find-scanner as your normal user, you might have to change the permissions of the device file. You can verify this by running the command as the root user. If sane-find-scanner finds the scanner when run as root, the problem is a permissions issue. Assuming you are the only user on your machine, the problem is simple to fix:
chown owner.owner /dev/usb/scanner0
chmod 660 /dev/usb/scanner0
In this example, owner is your user ID and group ID. If you need to share this scanner with other users, you can set up a scanner group instead:
chgrp scanner /dev/usb/scanner0
chmod 660 /dev/usb/scanner0
These two commands need to be run as root. All users who need access to the scanner must be added to the scanner group. One other note on the device file: you may be tempted to make a symbolic link from /dev/usb/scanner0 to /dev/scanner. Don't. The SCSI back ends use the /dev/scanner device name, and linking it to the USB device will confuse the USB back ends.
Now that SANE can see the scanner, it's time to choose its back-end driver. This is the first tricky part. For most Epson scanners you would use the Epson back end. But for the Epson Perfection 1260—an affordable model commonly stocked by most electronics stores—the back end is actually the Plustek driver. For most scanners you can make educated guesses from the SANE web site supported-hardware list. Barring that, you can try to find the vendor and product IDs and match them to the information on the supported-hardware list on the Linux USB Project web site.
Now that you have picked the appropriate driver, it's time to configure the back end. If you installed SANE using RPMs or using the default configuration when built from source, SANE's configuration files are located under /etc/sane.d. The main configuration file is called dll.conf. This file tells SANE which drivers to use. By default, many drivers are enabled. If you have only the one, you can limit this to the driver for your specific scanner. In our example, we've uncommented only the Epson driver, because we're using the Epson KOWA back end instead of the Plustek driver.
Not all back ends support all types of scanners. No matter what type of connection your scanner uses, each back-end configuration file needs to know the name of the device file your scanner will use. Remember, we found the device filename using the sane-find-scanner tool. Unfortunately, the format used to define this in the configuration file varies from back end to back end.
The Plustek back end (the default back end for SANE support of the Epson Perfection 1260) includes distinct sections for the USB and parallel port types of scanners. To specify the device file in this configuration file, use the device keyword followed by the name of the device file, as in this example:
device /dev/usb/scanner0
This entry must go in the appropriate section of the Plustek driver configuration file. However, in the Epson configuration file used by the Epson KOWA back-end driver for the Epson Perfection 1260, the device file is specified using the USB keyword followed by the device filename, as in this example:
usb /dev/usb/scanner0Both the Epson and Plustek configuration files provide comments to help in their configuration, and all back ends have their own man pages to provide further configuration assistance. Though many configuration options are provided, the only option really required for all of them is the device file.
To test that your SANE configuration is working, try the following command:
scanimage -T
If your test fails, you may want to verify once again that the proper USB modules have been installed, that the device can be found by sane-find-scanner and that you have the correct device filename in your SANE back-end configuration file. The scanimage program's help option also can provide quite a bit of additional information about your scanner's capabilities:
scanimage --help
The hardware is configured and ready to run. What you need now is an easy-to-use, front-end graphical interface that lets you preview your scans, select regions to scan from the preview and, perhaps, make color, quality and resolution adjustments. You also need a way to get the scan into The GIMP for further processing.
There are actually three freely available front ends for use with SANE, plus a shareware tool that exists outside of SANE. Let's take a brief look at each before comparing features and quality issues.
This project has grown up with the SANE Project, side by side. The user interface is based on GTK+, and it includes a GIMP plugin to allow scanning directly from the File®Acquire menu in The GIMP.
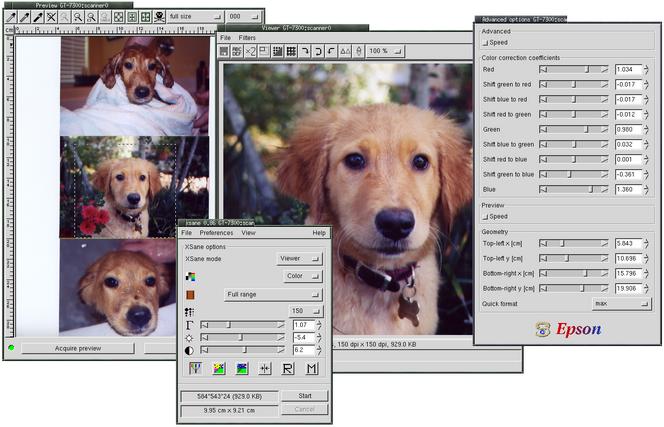
Figure 1. The XSane Front End Managing the Epson Perfection 1260
When run as a GIMP plugin, the Viewer window is not used—the scanned image is transferred directly to The GIMP in a Canvas window. Be sure to read the documentation thoroughly to get the most from this interface, including the links to the scanning tips web pages.
The Preview window allows both user-defined and automatic scan regions to be set. Black, gray and white points also can be set in the preview prior to the full-sized scan. The Viewer window provides limited editing.
Like XSane, QuiteInsane offers a GIMP plugin. However, this plugin is in early development and may not provide as much stability as XSane's. Beyond this, QuiteInsane offers much of the same functionality as XSane, plus a few extras. QuiteInsane's image viewer allows the user to select regions of the image to work with and permits printing directly from the image viewer.
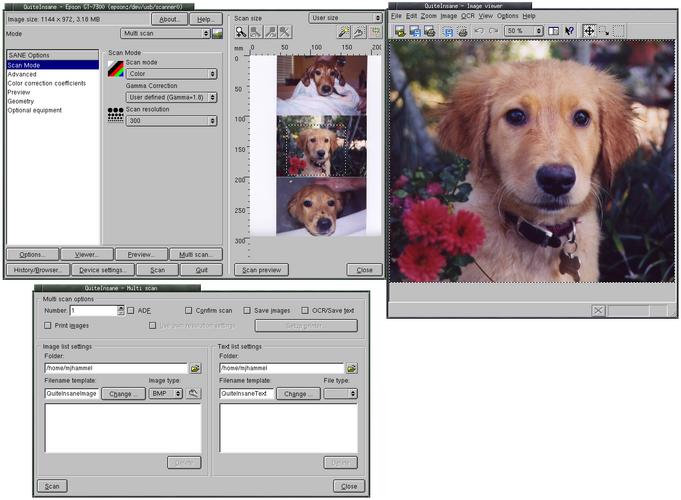
Figure 2. The QuiteInsane Front End Managing the Epson Perfection 1260
QuiteInsane integrates into the KDE desktop, allowing drag-and-drop of images from the Image Viewer into other applications. Although integrating with other applications may not be required, it's a nice feature to have for desktop users.
The only scanner maker to support the SANE Project actively is Epson. The Epson KOWA Corporation has released their own front end, known as Image Scan!, along with an updated back end that unifies support for all current Epson scanners. This product has the advantage of providing updated drivers for off-the-shelf scanners directly from the manufacturer.
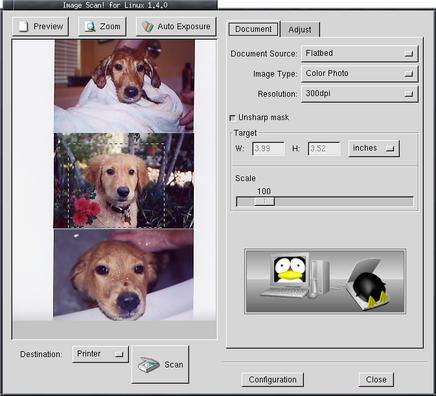
Figure 3. The Image Scan! Front End Managing the Epson Perfection 1260
This front end is less sophisticated than XSane or QuiteInsane, providing fewer features, yet it has a cleaner, less cluttered interface. It also lacks a built-in image viewer, opting to use either The GIMP specifically for image editing or saving scans directly to a file or a printer. There is no built-in help and little on-line documentation.
XSane, QuiteInsane and Image Scan! all function as front-end user interfaces to the SANE back-end scanner drivers. However, one other scanner product does not use the SANE back ends at all: VueScan from Hamrick Software. This product is shareware and provides its own set of scanner drivers for a wide variety of scanners.
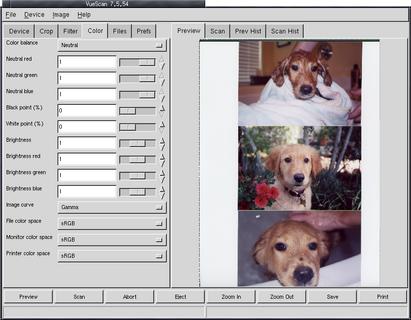
Figure 4. The VueScan Front End Managing the Epson Perfection 1260
VueScan offers many features not provided by the front ends to SANE, such as device calibration, focus and exposure. It does not provide image editing or a GIMP plugin. Scans need to be saved to file first, then opened in an image editor.
Of the four front ends, only one is limited to one vendor—Image Scan!, which supports only Epson scanners. The other three support various vendors. All front ends provide variations on gamma and color channel correction either before or after a scan, or both in some cases. XSane, QuiteInsane and VueScan all provide a built-in image viewer with limited image editing capabilities. Image Scan! scans only to a file or directly into The GIMP.
The areas of largest differentiation in all four front ends are where scans can be sent and how they can be printed. XSane offered the most destinations for scans, including e-mail and FAX. Optical character recognition (OCR) is supported by both XSane and QuiteInsane through the external gocr program.
XSane, QuiteInsane and Image Scan! provide a continuous update to the preview display when a preview scan is in progress. This means you can watch the scan as it happens. The same is true for full scans. VueScan does not provide continuous updates.
Printing is by far the biggest difference in all four. QuiteInsane is the only front end that offers printing from the application, with various print options. XSane can scan directly to the printer, but you can't print a scan from the built-in image viewer. VueScan offers printing from the image viewer, but the interface is clunky and lacks features.
Documentation for both XSane and QuiteInsane is extensive and fairly well written. HTML documentation is also provided for VueScan but is far less complete. Image Scan! has a minimalist man page.
All of the open-source tools provide GIMP plugins, though VueScan does not. XSane's plugin is the most advanced in stability. QuiteInsane's plugin is feature-rich but is under early development and may not be as stable as users might prefer. Image Scan!'s plugin is functionally equivalent to its standalone version, while XSane and QuiteInsane offer slightly modified versions for their GIMP plugins.
Table 1 is a comparison of the four scanner front ends. Although this table is a good tool for choosing which front end to start with, you would be missing out if you didn't at least try each of them.
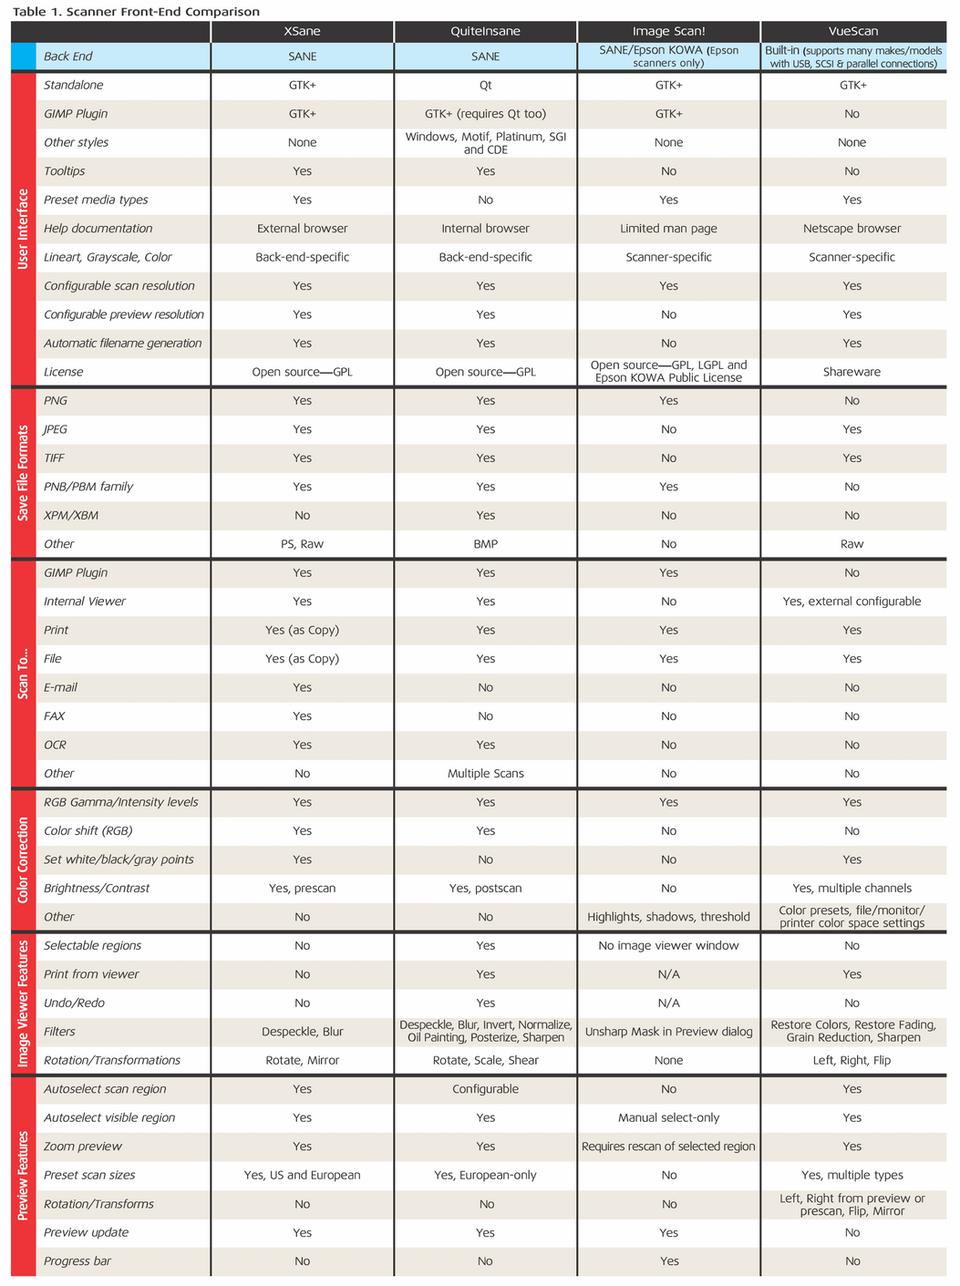
Table 1. Scanner Front-End Comparisons
All scans for XSane and QuiteInsane will be essentially the same because of the use of the common SANE back ends. Image Scan! includes a driver that provides the same level of quality as the Epson Windows driver. VueScan's driver is its own. In Figure 5, the two scans compare the Epson and the VueScan driver. Figure 6 shows a close-up of these scans around the eyes. The SANE version has a smoother transition between pixels, and the VueScan provides more detail in the reflection in the left eye.
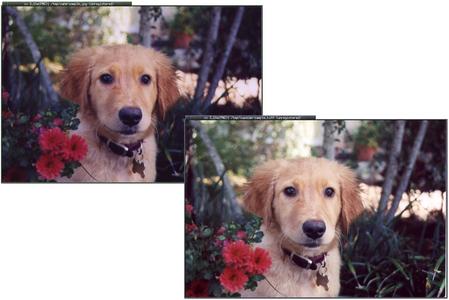
Figure 5. Comparison: Left—SANE; Right—VueScan. JPEG quality was set to 100 for the SANE version.
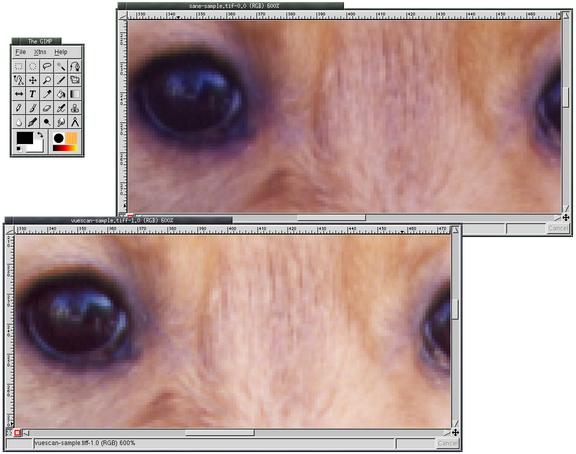
Figure 6. Close-up of the SANE (Epson) and VueScan scans showing variations in quality.
Each front end has its own unique benefits and drawbacks. XSane's support for scan quality is based on film media options, such as Agfa, Fuji and Kodak film negatives, which give it added ease of use.
Image Scan! is targeted more toward the casual desktop user. As an added bonus it provides a driver straight from Epson that supports commonly available scanners.
VueScan is much faster than the other tools for zooming in on the preview, because it keeps the scan in memory. This makes VueScan preferable to the SANE-based solutions for those who scan large numbers of images.
Only VueScan offers multiple color space support, including sRGB, PAL, NTSC, CIE, Apple, Adobe and others. It was, however, the only one to crash during testing.
QuiteInsane has numerous features that are missing from the other front ends. For example, menubars can be moved, which is a feature this front end inherited from the use of Qt. Other benefits of this tool include a user-modifiable curve graph, similar to The GIMP's Curves tool for adjusting red, green and blue channels; printing directly from the Viewer window with user-configurable scaling; margins; image resolution; and page size options.
However, there are no color-correction presets based on media types, and the available preset scan sizes are in millimeters and non-US standard sizes—no letter or legal options. Despite these few missing features, QuiteInsane has the edge.
Whether you are a professional artist or a casual photographer, there are plenty of Linux-based scanning options. Each front-end user interface offers something different, and back-end drivers are plentiful, with manufacturers such as Epson starting to offer their own versions supporting their specific models. These all combine to put scanning on Linux on par with any desktop.
