
The coolest Linux and open-source applications may be ones you already have.
How can our main server be out of disk space, François? Last week, we had enough disk left to last us into the next decade. What happened? No, mon ami, I am not accusing you of anything. I'm just curious if you, perhaps, might have an idea. Quoi? You were downloading a few packages for the cool apps issue? Let me see. Mon Dieu! There are thousands of source packages here! I know you were trying to help, François, but you didn't need to download every application on SourceForge. I see some ISO images here as well. I guess you wanted to find out which was the coolest. How many did you get? All of them! Sigh...we'll talk about this later. For now, we need to get ready for our guests' arrival. They will be here any moment.
Too late, François. Look sharp! Welcome everyone, to Chez Marcel, home to exquisite Linux and open-source software served with the finest wines and enjoyed by the greatest of clientele. Your tables are waiting. Please, make yourselves comfortable, and my faithful waiter, François, will fetch the wine. To the cellar, mon ami. I think the 2002 Vinedos de las Vientos Tannat will surprise many of our guests. The Tannat grape is a varietal from Uruguay, and as such, it's unusual for many palates. Drink and enjoy!
While we await the wine, let's look at tonight's menu of cool applications. Contrary to François' well-meaning efforts, you don't need to spend hours scouring the Internet looking for the coolest software. All you need to do is spend a little time exploring the applications you already have, and you'll discover wonders you didn't know existed, right there in front of you. Speaking of my faithful waiter, here he is. François, please pour the wine for our guests. While you enjoy that first sip, mes amis, allow me to reintroduce you to a program you already may be using.
One of my favorite photo management applications and one of the finest available, is digiKam. digiKam is a complete digital photo management system. Using digiKam, you can create collections and organize your photos (by date, type and more) in easily searchable albums (Figure 1). Selecting and downloading images from your camera is easy and fun. You can add comments to pictures, adjust light levels, fix red-eye and more. It basically has everything you would expect from a photo management suite, plus a few additional options that make it a contender for the coolness crown.
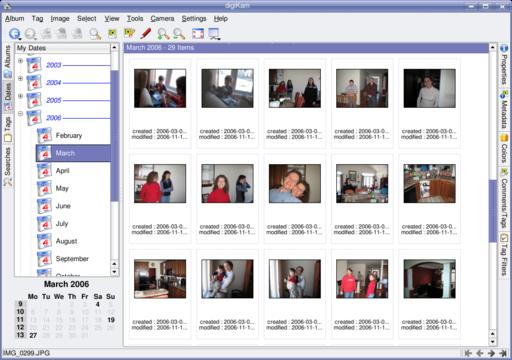
Figure 1. digiKam is a superb digital photo management suite with features you probably hadn't imagined.
As you can see from Figure 1, digiKam automatically organizes your photos by date, but there are other clever ways of organizing them. One way is to create named tags. For instance, say you had a couple hundred travel pictures, of which 30 or so are from Rome. You could assign all vacation pictures a Travel tag and further tag those Rome pictures with the word Rome. Next time you want to hunt down the shots of your Roman holiday, simply click the Rome tag. If one of those images looks like something you want to share with a friend, select the image, click Image on the menu bar, select Email Images, and a dialog appears that lets you add more images to an e-mail message or just send out the one you chose.
There's a problem with having a lot of images though. Okay, there may be more than one problem, but if you are like me, you have a tendency to copy your photos more than once. digiKam has a cool feature that lets you locate duplicate images. Simply click Tools on the menu bar, and select Find Duplicate Images.
Speaking of multiple images, wouldn't it be cool to create an MPEG slideshow—a movie of your photos? Yes, indeed, digiKam does that too. Select a group of images, click Tools on the menu bar, and select Create MPEG Slideshow. A window appears (Figure 2) from which you can choose the amount of time a picture is displayed, a fade time (if you want one), the video output format and more. You also can organize the order in which the pictures are displayed by moving them up or down in the list.
You can do many exciting things with digiKam, which I will let you explore on your own (look under the Image and Tools menu for a start), but before we move on, I do want to share one more cool feature. It's not unusual, at Christmas time, to share cards with pictures of the family. Using digiKam, you can go one step further. How about a calendar for the coming year with great color pictures selected from your collection?
To create a calendar with digiKam, click Tools, then Select Calendar. At this time, the Create Calendar dialog appears (Figure 3) from which you can create a personalized calendar in only a few steps. To begin, choose a paper size (US or A4) and the location of the image on the page. The latter selection also defines the orientation of the page. At this point, you also can choose a font and decide whether you want lines surrounding the calendar dates.
Click Next to continue on to the photo selection screen (Figure 4). This is where the real fun takes place. You've got 12 months and 12 possible images for your calendar. I suggested family photos earlier, but you could use anything. Instead of buying a calendar of artwork or travel photos, how about creating your own? Those Roman ruins would probably make a nice addition to your office wall. Click on each month to add images, or drag them from digiKam onto the month icons. To clear an icon and select a different picture, right-click the month. When you have chosen something for all 12 months, click Next. The final screen displays a status as each page is generated and an overview of the total. When the job is done, click Finish to close the dialog.
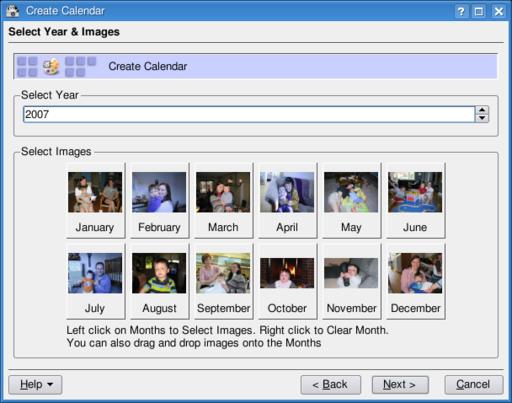
Figure 4. Half the fun of creating your own calendar is deciding what pictures will represent each month.
Another favorite application of mine is the amazing Amarok, an impressive multimedia player with a host of cool features that makes it one of the best multimedia players, regardless of operating system. Sadly for a few of your friends, you can't get Amarok on the Redmond OS, but because you run Linux, that's not a problem. When you are hard at work in front of the computer, it's nice to listen to some of your favorite tunes. Depending on where you work, you may even have the luxury of singing along with the music. But what if you don't know the words?
Click the Lyrics tab. If this is the first time you've looked at this feature, odds are the script manager won't yet be running. Click the Run Script Manager button to bring up the Script Manager. You don't need to be listening to a song to do this. At any time, you can click Tools on the menu bar and select Script Manager from there. When the Script Manager window appears (Figure 5), you'll see a list of scripts, categorized on the left. Clicking the plus sign beside each category opens the list.
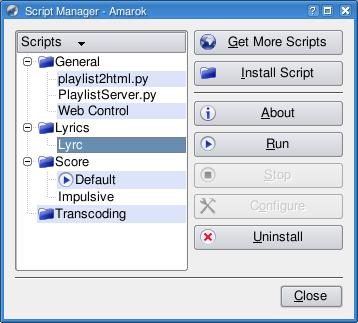
Figure 5. Amarok's feature set can be extended with scripts.
I invite you to highlight a script and click the About button to discover what each one does. You also can click the Get More Scripts button to discover additional extensions and scripts for Amarok. You'll find screensavers based on your current music, voting scripts, scripts that print album covers and playlists and more. And, of course, there are lyric scripts. One already comes with Amarok, but it isn't necessarily turned on. Click on Lyrc (under Lyrics), and then click the Run button. This activates a script that queries the lyric server at lyrc.com.ar. Then, while listening to your music, you can click the Lyric tab, and Amarok displays the words to the song, turning you into a diva (or divo).
Sometimes, you need to take your music with you. Music devices, such as iPods, are supported using a plugin architecture. What are these plugins? The popular iPod is supported, as are iRiver, Creative Nomad and several other generic audio devices. Depending on your player, you may find that it works with a plugin other than the one you expect, so keep trying. For instance, I have an iRiver T10, which works using the MTP Media Device plugin. All this is to say that if your particular player isn't listed or doesn't work immediately, don't give up; try one of the other plugins first.
To use a player with Amarok, click Tools→Configure Amarok. When the configuration window appears (Figure 6), look at the left-hand sidebar, and select Media Devices. If you haven't done so, make sure your music player (iPod, iRiver or whatever) is already connected and powered on. Depending on the type of MP3 player you are connecting, Amarok already may have detected the device, in which case you'll see the device identified at the top of the configuration window with the Plugin already chosen for you.
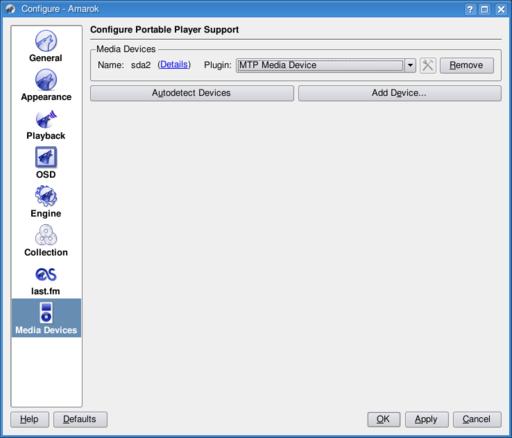
Figure 6. Amarok should be able to detect your music player, but if it doesn't, it's easy to add it manually.
If your player hasn't been detected, you can add a device manually by clicking the Add Device button. From the pop-up window that appears, select a plugin, provide your new device with a name (whatever you like), then identify its mountpoint on the system (for example, /mnt/ipod). Click Apply to close the window and return to Amarok. Now, to put music on your player, click the Devices tab on the far left. You should see your player listed at the top of the left-hand pane. Directly above the device name is a button labeled Connect. Make sure your device is connected through its USB cable, and click Connect.
If you already have tracks loaded on your music player, they will appear in Amarok's left-hand pane, sorted by artist. Incidentally, you can use this list to delete songs from the player by right-clicking on a track and selecting Delete from device. On the other hand, if your player is empty, you'll be looking at a plain window, waiting to be populated. To add songs, simply drag them from your Amarok playlist (the main window to the left) into the device window. Once you do, a Transfer Queue appears in the lower half of the media browser window on the left. At the very bottom of the media browser, you'll see a graphical bar showing the amount of storage space on your player, the amount available and the space in your transfer queue (Figure 7). When you are happy with the playlist in your transfer queue, click the Transfer button at the top of the media browser window. A progress bar appears at the lower left, updating as each track is copied to your player.
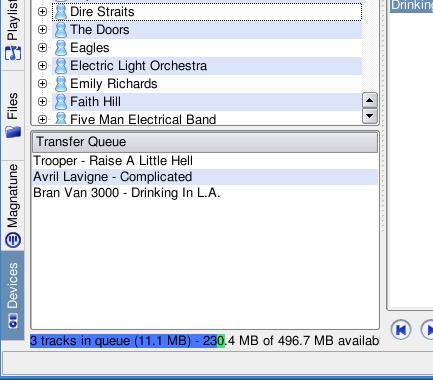
Figure 7. Add your tracks, but keep an eye on the available space.
That's it. You're ready to take your music with you. Monsieur Shakespeare said that music was the food of love. Now all you need is a little more wine.
I wish I could spend more time showing you the wild and unusual side of what you may have come to think of as ordinary, but the hour grows late. Did you know that K3b, your CD/DVD burning application also is a great tool for ripping audio tracks from your CDs? Simply click Tools and select Rip Audio CD. You also can rip a video DVD—click Tools and select Rip Video DVD.
Then there's Konqueror, the all-around file manager, Web browser combination. When using it as a file manager, you can split the screen left and right by pressing Shift-Ctrl-L. Pressing Shift-Ctrl-T splits the screen vertically. Select a location in each screen (including remote FTP or secure copy connections), then simply drag and drop from one window to the next. You even can split the already-split windows.
Konsole, your KDE terminal application, can transform to a transparent Konsole, allowing your desktop artwork to shine through. Click Settings→Schema, and then select Transparent Konsole (or one of the many other looks).
As you can see, mes amis, although it's tempting (and exciting, as temptation can be) always to be on the lookout for the latest, greatest and coolest applications, your search need not always be a long one. Sometimes the coolest applications really are the ones you already use. You just need to spend a little time getting to know them better. Uncover their secrets and your existing friendship could turn into something beautiful. Mon Dieu, I think my mind may be wandering to places other than software. If so, mes amis, surely we can blame the wine. François, please, refill our guests' glasses a final time. Raise your glasses, mes amis, and let us all drink to one another's health. A votre santé! Bon appétit!