
Get a Squid caching proxy up and running, securely.
Last month, I began a series of articles on Squid Web proxy security by introducing the theory, benefits and architecture of Web proxies. This month, we dive right in to basic Squid installation, configuration and testing, and begin hardening our Squid proxy.
As you'll recall from last month, a Web proxy provides a control point for restricting which external Web sites your users can reach. It allows you to permit Web access without allowing non-Web traffic (or even publishing a default route to the Internet), and it provides a convenient place to perform content filtering and transaction logging.
As you also may recall, unlike a firewall, a Web proxy doesn't need to be a physical choke point through which all traffic must pass for a physical path to the outside. Instead, you can use firewall rules or router ACLs that allow only Web traffic, as a means of ensuring your users will use the proxy. Accordingly, your Web proxy can be set up like any other server, with a single network interface.
This is the case with the Web server I show you how to build in this and subsequent columns. This month, we focus on Squid itself; we'll cover add-ons like SquidGuard in future columns.
So, where do you get Squid software? Naturally, the Squid Web site (see Resources) is the definitive source. But, because Squid has been the gold standard for Linux Web proxies for so many years, chances are it's a fully supported package in your Linux distribution of choice. If so, that's how I recommend getting it; it's easier to keep it patched that way, and you'll have greater assurance of stability and compatibility with the other things on your system.
On Ubuntu and other Debian variants (not to mention Debian itself), you need the packages squid and squid-common. On Red Hat and its variants, you need the package squid. And, on SUSE and OpenSUSE systems, you need squid.
At the time of this writing, all three of these families of distributions (Debian, Red Hat and SUSE) are maintaining separate packages for Squid version 3; the packages cited above are for version 2. This is because although the Squid development team recently declared Squid 3.0 to be a stable release (in November 2008), at the time of these three distributions' most recent production releases, Squid 3.0 still was considered to be a beta code branch, with 2.6 or 2.7 as the preferred production versions.
On the one hand, by the time you read this, Squid 3.0 (maybe even 3.1, which is in beta right now) may be mainstreamed into your Linux distribution of choice. On the other hand, maybe not. So for now, I'm going to use examples from Squid 2.6.18, the version on my Ubuntu system. They still should be perfectly valid for later versions—generally, later versions have additional options and features, not replaced options. I can cover Squid 3.0 in a future column.
I leave it to you to use the package manager of choice to install Squid packages on your RPM-based system, but on Debian-based systems, the most direct way is usually with the command:
bash-$ sudo apt-get install squid
(apt-get automatically will determine that it also needs squid-common and will install that too.)
By the way, you do not need to install Apache or any other Web server package on your Squid server, unless, of course, you're also going to use it as a Web server or want to use some Web-based administration tool or another. Squid itself does not need any external Web server software or libraries in order to proxy and cache Web connections.
Creating a basic, working configuration for Squid isn't much harder than installing it. Like so much else in Linux, it's a matter of making small changes to a single text file, in this case, squid.conf. In all three distribution families I mentioned, its full path is /etc/squid/squid.conf.
To get started, first open a command window, and back up the default squid.conf file (non-Ubuntu users can su to root and omit the sudo from these examples):
bash-$ cd /etc/squid
bash-$ sudo cp squid.conf squid.conf.default
Next, open squid.conf with your text editor of choice. You actually may prefer a graphical editor, such as gedit, but I've always used vi for its simplicity and ubiquity—if it's UNIX-like, it's got vi.
(Note to the emacs-loving alpha geeks among you: yes, emacs is more powerful; it's written in LISP; God kills a kitten every time someone installs Gvim; you win! But, I still like vi.)
Believe it or not, all you need to do to get Squid running is add two lines to the ACL (Access Control List) section of this file: an object definition that describes your local network and an ACL allowing members of this object to use your proxy. For my network, these lines look like this:
acl mick_network src 10.0.2.0/24
http_access allow mick_network
The first line is the object definition. The acl signifies that I'm about to define an ACL object. mick_network is the name I've chosen for this object. src means that it represents the IP address or range of addresses of hosts initiating TCP transactions with my proxy (that is, proxy clients). Finally, 10.0.2.0/24 is my LAN's network address in CIDR notation, which in this case translates to “the range of IP addresses from 10.0.2.1 through 10.0.2.254”.
The second line declares an actual ACL: allow transactions involving the object mick_network—that is, transactions initiated by hosts having IP addresses in the range 10.0.2.1 through 10.0.2.254.
If more than one network address comprises your local network, you can specify them as a space-delimited list at the end of the acl statement, for example:
acl mick_network src 10.0.2.0/24 192.168.100.0/24
Because ACLs are parsed in the order in which they appear (going from top to bottom) in squid.conf, do not simply add these acl and http_access lines to the very end of squid.conf, which will put them after the default “http_access deny all” statement that ends the ACL portion of the default squid.conf file. On my Ubuntu system, this statement is on line 641, so I inserted my custom acl and http_access lines right above that.
In case you haven't guessed, all is a wild-card ACL object that means “all sources, all ports, all destinations” and so forth. Any transaction that is evaluated against any http_access statement containing any will match it, and in this case, will be dropped, unless, of course, it matches a preceding http_access line.
Now that you've created an object and ACL for your local network, you should save squid.conf and then restart Squid by typing this command (see earlier note about su root shells vs. sudo):
bash-$ sudo /etc/init.d/squid restart
In fact, if you're editing squid.conf from a sudo vi squid.conf session, you don't even need to leave your editing session; just do a :w to save your work, then type :! /etc/init.d/squid restart to restart Squid from within vi.
To test whether things are working, you need to configure a machine other than the proxy itself to use your proxy. (Squid comes configured by default to allow transactions from 127.0.0.1, the local loopback address, to be proxied.)
Figure 1 shows the dialog for setting up Firefox to use our example proxy.
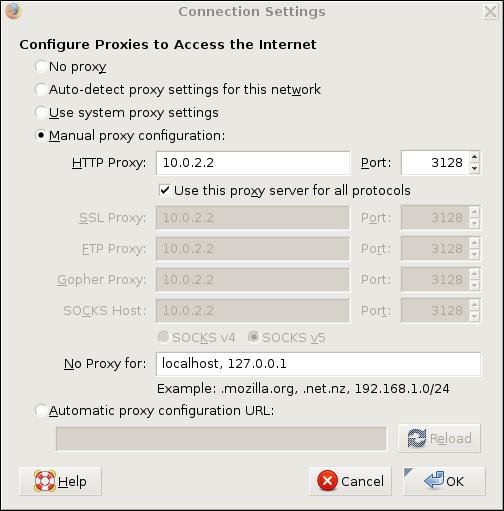
Figure 1. Setting Up Firefox to Use Proxies
In Figure 1, we've selected Manual proxy configuration and entered in an HTTP Proxy address (which can be either a hostname or IP address) of 10.0.2.2 and Port number 3128, which is Squid's default listening port for client connections. We've also selected the box to Use this proxy server for all protocols, resulting in the same values being copied automatically to the subsequent settings for other types of proxies.
We've left No Proxy for: at its default value of localhost, 127.0.0.1. The reason for not proxying connections to Web pages hosted locally on the client system is probably obvious, but you can additionally list URLs or IP addresses elsewhere on your local network that there's no need to use the proxy to reach.
At this point, you may be wondering, what does the connection between a client and a Web proxy look like? Is there some special protocol, or maybe a subset of HTTP commands or flags?
In fact, proxy connections are simpler than you may think. Normally, when you click on a hyperlink or enter a URL, your browser resolves the URL you typed or clicked on, using its own local DNS capabilities. It then takes the IP address and sends an HTTP/HTTPS request to that IP address, with the original (non-resolved) URL in the body of the request.
A proxied connection is the same without any DNS resolution. Your browser simply sends its HTTP/HTTPS request to the proxy server without trying to resolve the URL. The body of that request is identical to the one it would otherwise send directly to the Web server you're trying to reach.
Instead of configuring your Web browser's proxy settings directly, if you use the GNOME desktop on your client test system, you can set global proxy settings that can, in turn, be used by Firefox and other Internet applications. Note, however, that the proxy settings you set in GNOME will be applied only to applications that are, in turn, configured to use system settings—for example, by selecting the option Use system proxy settings shown in Figure 1. Other applications will continue to use either their own proxy settings or no proxy at all.
GNOME's Network Proxy Preferences applet, which should appear in your System→Preferences menu, is shown in Figure 2.
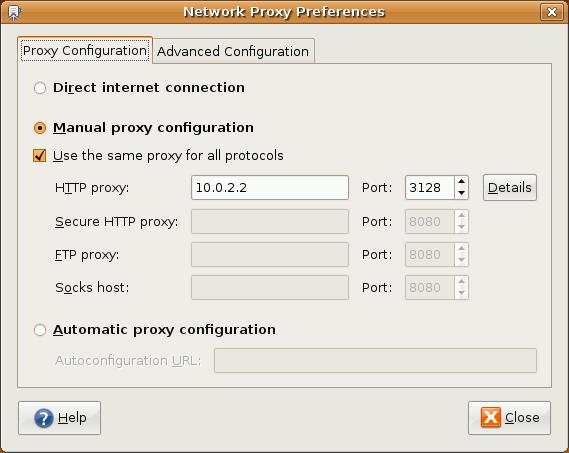
Figure 2. Setting Global Proxy Options in GNOME
It may seem like I'm spending a lot of ink explaining client-side configuration just for testing purposes, given that this is an article about building Squid servers. But, of course, the way you set up a proxy client for testing is the same as for one in production, so I would have had to explain this sooner or later anyhow.
In fact, future installments in this series may go further in covering client configuration topics. Autoproxy.pac files, for example (which is what Figure 1's Automatic proxy configuration URL setting is for), can be very handy in managing very complex or very highly scaled proxy environments.
Once you've configured your test client system to use your Squid proxy, you can attempt to navigate to some Web page to see if everything works. It's a good idea to tail Squid's access log simultaneously. To do so, enter this command on your Squid system:
bash-$ sudo tail -f /var/log/squid/access.log
If browsing works but nothing zings by in this log-tailing session, your client-side configuration is incorrect—it isn't actually using the proxy. If browsing doesn't work, you may see some useful server-side message in the log-tailing session. Squid usually returns fairly useful messages directly to client browsers as well.
If things don't work, your browser session is simply timing out and nothing is showing up in access.log, try using the ping command from your client to your proxy and vice versa. If pinging doesn't work, the problem is at the network level and has nothing to do with Squid.
With any luck, at this point, chances are that everything works! Your Squid proxy software is installed, configured to accept only client connections from itself and from hosts on your local network, and it's hard at work proxying your users' connections and caching commonly accessed content. Not a bad day's work!
Not difficult, was it? Like most server applications, Squid's default configuration file is designed to maximize your chances for success, while minimizing the odds of your shiny-new Squid server being hacked. But, also like other server applications, there's certainly more that you can and should do to secure your Squid proxy than the default settings will do for you.
That will be our starting point next month. Among other things, we'll delve much deeper into Squid's Access Control List features to further harden Squid. Until then, be safe!
