
Looking around, I was confused by the scene. The operating system (and my desktop), was nowhere to be seen—and yet, there it was, everywhere I turned. It was as though the kidnappers had created countless copies of my desktop OS and left it everywhere for me to find—a mystery indeed.
What's wrong, François? You look as though your Linux desktop has been stolen. It has? Mon ami, I was just kidding. I can see notebooks at every table in the restaurant. It's rather strange for a thief to take things yet leave them where they are, don't you think?
Ah, I see. My apologies, mon ami. That's my fault. I modified the workstations so that they would boot directly into Firefox without loading a desktop. Why? Because it's the perfect way to demonstrate tonight's feature, and now that I see your reaction, I suppose it does add an air of mystery. You'll see what I am up to shortly, but for now, we must get ready. I can see our guests arriving as we speak. Smile, François. It's all good.
Good evening, mes amis, and welcome to Chez Marcel, the home of fine wine and superb Linux and open-source software. Your tables are ready, and my faithful waiter was just getting ready to fetch our featured wine. Quickly, François, head to the cellar and bring back the 2005 La Vigna Vecchia Barbera d'Asti from Italy. Check the North wing for that one.
While we wait for François and the wine, allow me to explain the nonexistent desktops before you. Each workstation has a browser running as its sole desktop application to demonstrate a very cool cloud-based open-source desktop that runs from a Linux server.
Richard M. Stallman called cloud computing a trap, saying “It's just as bad as using a proprietary program. Do your own computing on your own computer with your copy of a freedom-respecting program. If you use a proprietary program or somebody else's Web server, you're defenseless. You're putty in the hands of whoever developed that software.”
Well, if you find yourself in agreement with old RMS, rest assured that there's another way to get the benefits of cloud computing without being tied to Google, Amazon or whatever other Web behemoth might be trying to get your cloud OS business. The answer is your own private cloud, courtesy of eyeOS (Figure 1). This is an impressive little desktop OS you can run from your Linux server. It comes bundled with small applications, fine-tuned for the Web, to play music files, watch videos, surf the Web, create documents, chat, play games and a whole lot more. eyeOS is a free and open package with a commercial company behind the product as well as an active community of users and developers. It's a great way to deploy desktops in libraries, schools, for user groups and in business. It's a thin-client network without the thin-client hardware. And, it's pretty cool.
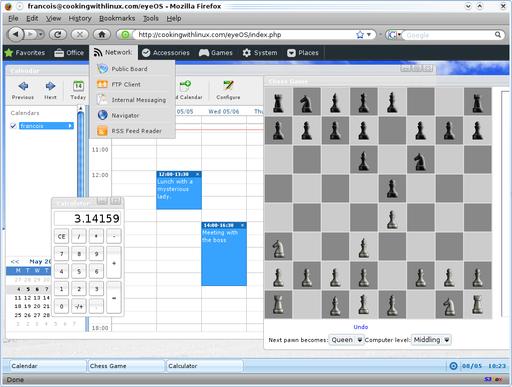
Figure 1. How would you like a screaming-fast desktop, in your own private cloud, accessible from any Web browser? Meet eyeOS.
Ah, François, good to have you back. Please pour for our guests. You'll love this one, mes amis. It's deep and complex with a plum and cherry flavor and a little hint of peppery spiciness. Enjoy.
Getting eyeOS served up on your, ahem, server, is easy—frightfully easy in fact. Your Linux server should be up to date and running PHP5 in order to use the latest eyeOS, but there isn't much more to it than that. Download the latest copy of eyeOS, and find a place for it inside your Web server's document root. Now, using your Apache user, extract it with this command:
tar -xzvf eyeOS_1.8.5.0-3.tar.gz
The package extracts into a directory called eyeOS, but you can, of course, change that if you like. If you extract it using the root user, you need to do a global group and ownership change on that directory so Apache can write to it. You can make eyeOS its own Web site or simply place it in an existing Web site tree. Assuming you put eyeOS in the root of an existing Web site, you might connect using your browser like this: http://yoursite.dom/eyeOS/index.html. Because this is your first time accessing eyeOS, you'll be redirected to the installer (Figure 2).
Notice that the installer is asking you for the root password. That's the eyeOS root password—the one that will serve as the master account for this installation of eyeOS, not the one for your server. Make sure you select a password for eyeOS specifically. Before you click the Install eyeOS button, look at the check box directly above. It's labeled Allow users to create accounts. If you check this, anyone can freely create an account on the system, without root approval (eyeOS root, that is).
Once you click the Install button, everything happens very quickly, and you find yourself at the login screen. Congratulations. That's really all there is to installing eyeOS. You could log in as root here, but let me show you what happens if you allowed registration and chose to create a user. Directly below the user name and password information on the login screen is a New User button (Figure 3). Click the New User button, and the login screen displays an extended login form where you define a user name and password of your choosing.
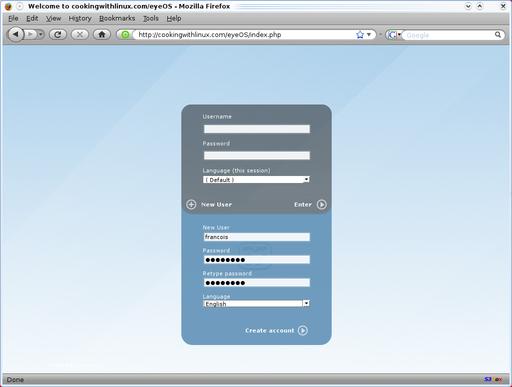
Figure 3. The login screen serves a dual purpose, allowing new users to register an account easily—if you allow it, of course.
That's all there is to it. You're ready to log in using the user name and password you've just created. Once logged in, you'll find yourself at the eyeOS desktop (Figure 4). Let's take a quick look at how this desktop is organized. Along the top is a panel referred to as the application dock. This is your gateway to an impressive collection of built-in applications (we'll explore some of those applications shortly). The desktop itself has a handful of icons to access common tools quickly, such as your calendar, the home folder and so on. To the right, you'll see a small menu floating on the desktop. Those are mini actions—functions that, although they may open an application, aren't applications per se.
Along the bottom is another panel, or bar, that shows your running applications, the date and time (along with a pop-up calendar), and a small icon that launches a system menu (Figure 5). From here, you can change your session preferences (the root user gets an enhanced Preferences dialog—more on this later), get a list of all installed applications, find out about eyeOS, launch a program (similar to the Alt-F2 quick launch in GNOME and KDE) or log out.
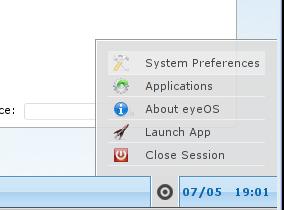
Figure 5. The system menu, the gateway to customizing your session, is right next to the system clock.
Before I give you a quick tour of applications, let me show you a little of the Preferences dialog (Figure 6). To change your personal information and password, this is stop one. It's also the place to change the look and feel of eyeOS. To change your wallpaper, click on Desktop, or to use a completely different theme that changes your window decorations, icons, application dock and more, click on Theme. Under System, you can change the behavior of the eyeOS board, a kind of built-in instant-messaging program that lets you communicate with other users logged in to your eyeOS cloud. Autorun commands are those that you want to run automatically when you log in. The application dock and the mini-actions are just two of the programs already in the Autorun queue. Security is interesting in that you can secure your personal session by IP address. If you want to make sure that you (or your user name) can log in only from your personal system, look here.
Let's say you do want to change that wallpaper. You need some background images first. That brings up the question on everyone's mind, which is, “How to I get files up to this thing?” There are a couple ways to do it, one being via the mini-tools menu and the other being the file manager. To upload via the mini-tools, click on Upload your files to bring up the Upload files dialog (Figure 7). Click the Add files button, then select files using your system's file selection dialog (Firefox uses a GTK file dialog, for instance). When you've chosen the file, or files, you want to upload, click the Upload now! button. One by one, the files will be uploaded to your eyeOS desktop.
By default, the files will be uploaded to your desktop folder. As we all know, files and folders aren't always where we want them. Besides, from time to time, you need to do a little cleanup in your virtual home. The same holds true for the folders in your cloud-based desktop. Click the Home icon on the desktop to open the file manager (Figure 8).
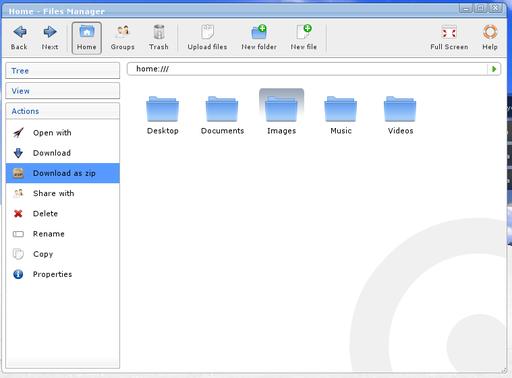
Figure 8. The eyeOS file manager lets you manipulate your data on your virtual desktop as well as compress and download to your physical desktop.
I mentioned a couple applications already, one being the eyeOS board that you can use to chat with other logged-in users. There also are, of course, the classic can't-do-without applications, namely office tools, such as a word processor and spreadsheet (Figure 9). Click the Office link on the eyeOS application dock, and select Word Processor. Although not as full-featured as OpenOffice.org (which you can install, by the way), this word processor does read and write Microsoft Word format (aka .doc) files. There's also a spreadsheet application, an address book and contact manager, a chat client and more.
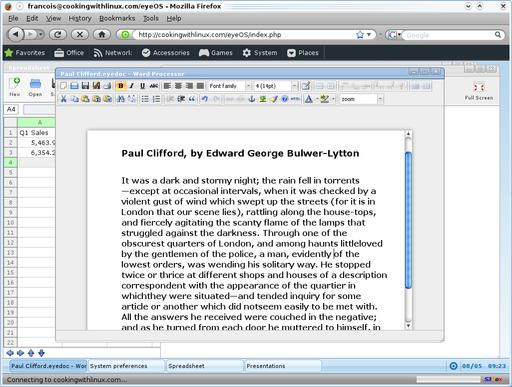
Figure 9. eyeOS even has its own word processor, capable of reading and writing Microsoft Word format files.
Although you may not find everything you need right off the bat, an eyeOS software site lists applications by category, complete with descriptions, ratings and installation information. This brings me back around to the whole issue of administration, namely the root user.
If you log in as root, the initial experience is much the same as that for any other user, but there are important differences as well. Most of these you will see when you visit the System Preferences tool. For instance, letting everyone create an account this easily probably is fine if you are truly running from a private cloud, from inside an office or on a private network. But, what if you don't want every person who logs in to have instant access? Under the System Preferences menu, there's a whole submenu for Administration (Figure 10). Under System (Permissions tab), you can turn on and off public registration. If you do so, you then will create users manually.
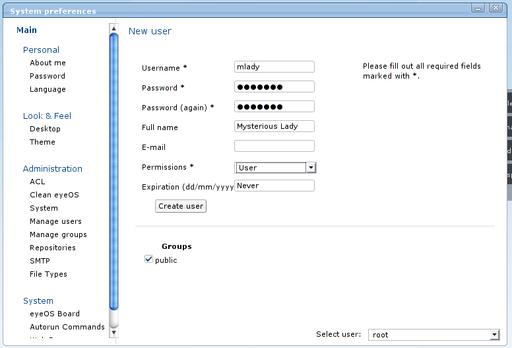
Figure 10. The root user has additional system control functions, such as controlling the addition of users, groups, e-mail and so on.
You also can set a quota for user storage space (the default is set at 1GB), set up repositories for installing software or configure your server to send mail from the eyeOS accounts. Perhaps the most important administrative function you may desire to implement is OpenOffice.org support. This involves a little server-side Linux magic to get things going, not the least of which is to install xvfb and OpenOffice.org. The eyeOS wiki has simple instructions that cover several Linux distributions, so I invite you to read the note relevant for your system at the following, friendly URL: wiki.eyeos.org/Setting_Up_Office_Linux.
Speaking of extra software, pay a visit to the eyeOS community apps repository at www.eyeos-apps.org for a huge list of additional packages built for eyeOS. And finally, there's an interesting package (currently in Alpha) that you probably will want to try out. Named eyeSync, this package allows for automatic, transparent synchronization of your eyeOS files with your personal computer. It works with Linux, Windows and Mac OS X Leopard: eyeos.org/en/downloads/eyesync.
There you have it, mes amis, a cloud-based OS that is completely open, works well with your existing Linux server and addresses the issues with closed vendor-controlled clouds. It's easy to let everyone share your cloud-based desktop, but if you really want people to stay off of your cloud (unless you want them to, of course), eyeOS provides the tools to do exactly that. You can have hundreds, even thousands, of desktops, invisible and yet always there. A final bit of cool is that if you close down your browser without logging out, you always can come back to your running eyeOS session to the keystroke where you left off.
Yes, mes amis, it's that time yet again, when we must say goodbye and return to our respective homes. After tonight, however, your desktop home can follow you wherever you want—always with you but not really there either. Life in the open-source cloud has finally arrived. On that note, I think it's time to ask that most excellent of waiters, François, to refill everyone's glass a final time before we say our goodbyes to one another. Until next time, please, mes amis, raise your glasses and let us all drink to one another's health. A votre santé! Bon appétit!