Qt always has been about cross-platform. By providing a rich API that isn't tied to a specific platform, Qt can be both intuitive to use and innovative.
The Qt toolkit originally was designed not only to be nice to work with, but also to allow for moving application source code between platforms. Today, the three major desktop environments are supported: X11, OS X and Windows. As portability is one of the key goals of the toolkit, it rarely runs into common issues, such as features missing on a specific platform or applications not integrating well in certain environments.
Qt's journey to fame really began more than ten years ago with the KDE Project. As one of KDE's cornerstones, it might come as a surprise to you that later incarnations of Qt try to integrate with GTK+ and GNOME. It even allows the incorporation of the glib event loop, all to fulfill the mission of providing portable code that looks and feels right on all platforms.
When discussing portable GUI source code, the graphical user interface is probably what comes to mind first. Providing widgets that look right on all platforms is an engineering feat. It takes many tricks to be able to use native painting methods, adapt to styling and just generally to fit in. Add to that the ability to subclass and customize widgets, and you have quite a handful of things that have to be incorporated.
And, making an application feel visually right on all platforms takes even more work. Margins, spacing, alignment—even the ordering of certain widgets—all need to be taken into account. Qt addresses all of these issues. A basic dialog window can be used to demonstrate how.
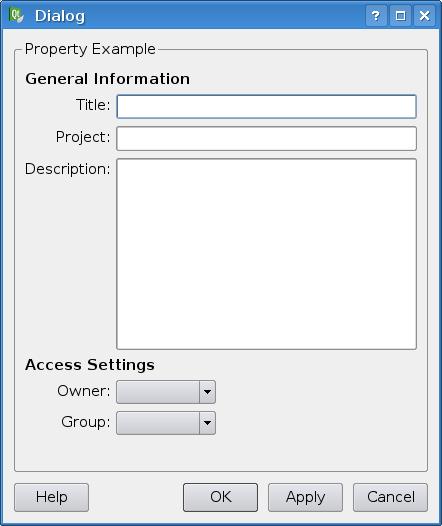
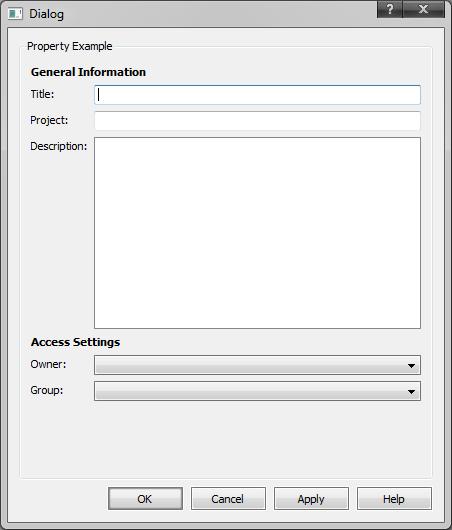
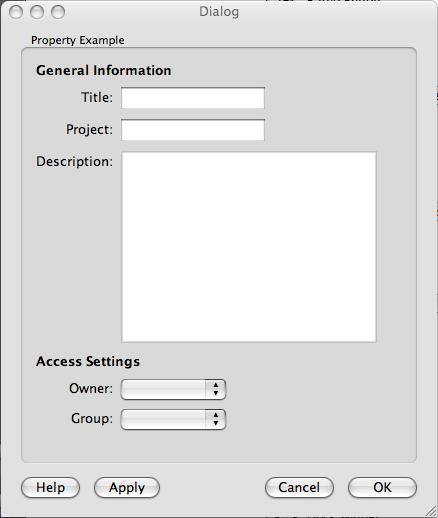
Figure 1 shows a property dialog with a set of labels to the left and fields for editing to the right. At the bottom are the standard Help, Apply, Ok and Cancel buttons. This might look like a simple dialog, but compare it to Figures 2 and 3. It's the same dialog, but on different platforms.

Figure 1. A Dialog in a KDE Environment

Figure 2. A Dialog in a Windows Environment

Figure 3. A Dialog in an OS X Environment
The platform imposes the order of the buttons at the bottom of the dialog, the alignment of the properties' labels, as well as the expansion policy of the fields representing the property values. All of these need to be handled according to the current platform's rules.
In some situations, blindly following the current platform's look and feel isn't what you are after. Sometimes you may want to subtly give hints to the user. For instance, you may want to highlight all required fields or change the color of a progress bar. Usually, this means subclassing the source widget to specialize it. Then, you will use your special widget for all the required fields. Now, imagine having not only text fields, but also check boxes, drop-down lists and more.
In Qt, you can address this problem in two ways. Either you can create a custom palette object that you apply to all fields you want to highlight or change color. Or, you can use a stylesheet.
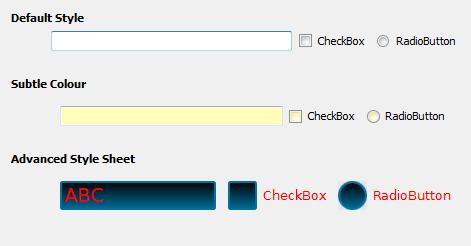
The advantage of using stylesheets is that they allow more advanced operations. Figure 4 shows this in three steps. The top row of widgets uses the standard style, and the second row uses the following stylesheet:
QLineEdit {
  background-color: rgb(255, 255, 185);
}

QCheckBox::indicator:unchecked {
  image: url(:/images/cb-unchecked.png);
}

QRadioButton::indicator:unchecked {
  image: url(:/images/rb-unchecked.png);
}

Figure 4. From Standard Style to the Extreme
As you can see, the syntax was heavily inspired by the cascading stylesheets (CSS) used in Web design. The text field is an instance of the QLineEdit class. For it, it is enough to specify a background color. For the radio button and check box, you need to provide images that represent the indicator. More states than unchecked need to be included here, but to simplify for this example, they have been left out.
Merely changing the background color could have been achieved as easily by altering the specific widgets' palette. However, the last row in Figure 4 shows that you can go further. The stylesheet used here changes the font, text color, border and background. For the QLineEdit class, the stylesheet looks like this:
QLineEdit {
  color: red;
  font: 75 14pt "DejaVu Sans";

  border: 2px solid rgb(0, 112, 157);
  border-radius: 3px;

  background: qlineargradient(spread:pad,
              ↪x1:0, y1:0, x2:0, y2:1,
              ↪stop:0 black, stop:1 rgb(0, 112, 157));
}
As you can see, the color changes are not limited to only solid colors. The background is a gradient, and the whole shape of the border has been altered—all this, while still maintaining the source code's cross-platform portability.
What we've discussed so far affects only the visuals. You can try all of this from within Qt Designer or QtCreator without writing a single line of source code (not counting the stylesheets). But, cross-platform programming is more than just look and feel. For instance, how do you traverse a filesystem on multiple platforms without providing unique source code for each platform?
Qt provides classes for this. For example, the following short snippet shows the directories contained in the root directory of each drive of a given computer. On a Windows machine, it lists the drives one by one, while on UNIX machines, it lists only the root drive / (note that foreach is a Qt-supplied C++ macro):
foreach( QFileInfo drv, QDir::drives() ) {
  qDebug( "%s contains", qPrintable(drv.absolutePath()) );
  foreach( QString name,
           drv.absoluteDir().entryList( QDir::Dirs ) ) {
    qDebug( " %s", qPrintable(name) );
  }
}
By using the QDir class to access the filesystem, you can do so in a platform-independent manner. The class contains static functions for common entry points, such as drives, the user's home directory, the current directory, as well as the system's directory for temporary files.
Another common source of cross-platform problems occurs at a much more basic level—the encoding of text and data. Qt provides a custom class for handling text strings called QString. It provides Unicode representation across all platforms. The string class itself can convert to and from UTF-8, ASCII and Latin1. It also can convert to and from most other string representations using text codecs. Qt comes with a variety of codecs, but it also is possible to create custom codecs to handle special cases.
When reading and writing text to and from files, the encoding is respected by using the QTextStream class. This class provides a stream interface based on the << and >> operators. It usually autodetects the encoding, but you can use the setCodec function to force it to a specific setting. To illustrate, the following short snippet of code reads a line from a text file encoded as UTF-32 on a big-endian system:
QTextStream stream( &file );
stream.setCodec( QTextCodec::codecForName("UTF-32BE") );
QString myString = stream.readLine();
Speaking of endianness, this is often an issue that occurs when dealing with cross-platform code. The issue with endianness is that when you write binary data, such as a 32-bit value (four bytes), you can choose to write the bytes in two different directions: left to right or right to left, aka big endian and little endian.
The default order for writing bytes depends on the endianness of the system on which the program is running. Some architectures, such as IA32 and the VAX, use little endian. Others, such as PowerPC, ColdFire and SPARC, use big endian. Others still, such as ARM, MIPS, IA64 and Sparc V9, are able to do either (although which one is used often has to be hard-wired into the system when the hardware is built). Systems based on most of these architectures are commonly targeted by Qt.
To ensure cross-platform compatibility for binary data, you need to specify the order explicitly when writing and again when reading. By using a QDataStream to handle binary file formats, endianness no longer is an issue. You simply specify the byte order to use and then use the stream operators, and it just works.
The snippet of code below shows this. It also contains the setVersion function, letting you specify which version of Qt's encoding of complex data types you want to use. For instance, if the internal representation of colors changed between version 2 and 4 of Qt, by specifying an older version, you still can read and write data in the old format using the same stream class. This is something that comes in handy when having to handle old legacy file formats from modern code:
QDataStream stream( &file );
stream.setByteOrder( QDataStream::BigEndian );
stream.setVersion( QDataStream::Qt_4_0 );
int value;
stream >> value;
When handing user preferences, Windows has the registry. UNIX systems usually rely on hidden directories, one for each application. OS X has an XML format for preferences. This works fine for users. They usually do not rely on being able to move their preferences between their computers, especially if they do not use the same operating system. From a software developer's perspective, the situation is different.
To resolve this, Qt provides the QSettings class. It provides access to each platform's preferred method. It also can be used to create and read INI files outside the platform's system that can be moved between platforms by the users.
The QSettings class relies on the name of the application and the application provider. Then, you simply use the setValue and value functions to write and read. The returned value is of the type QVariant. This type can be used to hold any type of data. The basic types, such as integers, are handled directly. More complex types, such as QColor, rely on the data stream operators:
QSettings settings( "The App Company", "The App" );
int v = settings.value("myInt").toInt();
QColor c = settings.value("myColour").value<QColor>();
Many more issues arise when moving code between platforms. Qt's solution is to provide a Qt API. This API removes almost all traces of specific platforms, while trying to support all functionality on each of the platforms involved. More complex cases than the ones shown here involve multithreading, database access, networking and so on.
So far, this discussion has focused only on moving code between different desktops, which is just half of Qt's ambition. Qt comes in three embedded flavors: embedded Linux, Windows CE and Symbian S60.
The Windows CE and S60 ports make it possible to run Qt applications on phones and palmtops. Each of the ports takes the target device's styling into account and integrates the application in a seamless manner. At the time of this writing, the S60 port is available only as a technical preview; a full release is planned later in 2009.
The embedded Linux version makes it possible to run Qt directly on the framebuffer. This greatly reduces the footprint of the system, making it embeddable. The windowing needs are covered by an integrated window manager QWS (Qt Windowing System), but generally, these systems run their applications in full-screen mode.
One interesting feature is the ability to run applications in a virtual framebuffer, making it possible to emulate the correct resolution, bit depth and input behavior on a development machine. This allows you to start developing the software earlier in the project cycle. It also can simplify debugging, as you can avoid remote debugging.
The step when moving from desktop to embedded is generally larger than when moving between desktops or embedded systems. There are a number of issues that a framework cannot solve. The most common issues are available screen space, lack of computing power and lack of memory. All these areas are becoming less of a concern as the power, memory and screen resolution of embedded systems increase.
Qt provides the ability to style and stretch interfaces to fit the screen. You also can set the global strut. This is the minimum size that any user interface element can have. By adjusting this factor, you can tune widgets to make them usable using a finger, stylus or mouse.
Qt provides an API that can be used across a variety of platforms. All major desktops are supported, but also the major embeddable platforms. The strength of Qt is that all these platforms can be reached through one API. The API is provided by one library, one set of goals and one approach to constructing APIs. To take full advantage of Qt's cross-platform ability, you should embrace the use of Qt in all fields. If you do, you can move your code as easy as you can compile it.