Every now and then an incredibly simple idea can totally change the way you take something mundane for granted, and Whyteboard is such a project. To quote the Web site: “Whyteboard is a free painting application for Linux, Windows and Mac. It is suited toward creating visual presentations and for overlaying PDF images with annotations.” Also according to the Web site, Whyteboard's features include the following:
Draw on a canvas using common tools: pen, rectangle, circle and text.
Annotate over PDF files.
Drawn shapes can be resized, moved, rotated and re-colored.
Tabbed drawing: each tab represents a whiteboard “sheet”. Each sheet has unlimited undo/redo operations.
Drawing history can be replayed on a per-sheet basis.
Each sheet has a thumbnail of the canvas that updates as you draw.
Closed sheets can be re-opened, restoring their data.
Notes, similar to Post-It Notes—a tree in a side panel gives an overview of all notes.
Resize the canvas easily by dragging it around.
Embed an audio/video player onto the canvas.
Translated into many languages (French, German, Spanish, Italian, Galician, Russian, Dutch and more).

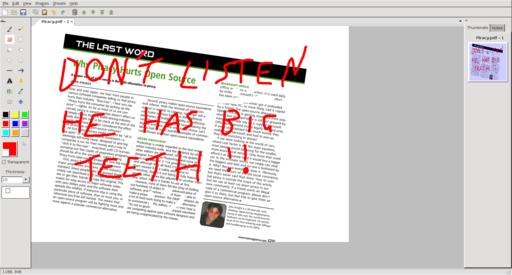
Whyteboard is a tool to manipulate otherwise static PDFs. Here I'm using it to deface an old article of mine!

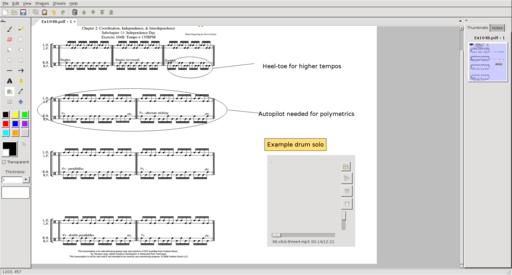
Features are plentiful in Whyteboard. Here I'm able to add notes to a Thomas Lang drum lesson and even add an example audio file.

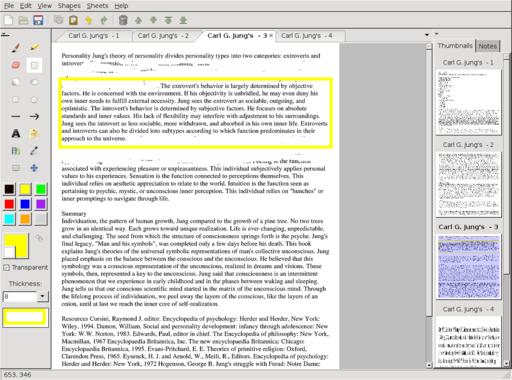
Of particular use is the eraser tool, which I'm using here to scrub out surrounding parts of text and highlight a key point.
Installation
As far as binaries go, RPM and Debian packages are available straight from the Web site, as well as Windows binaries for those lesser mortals (all angry letters to the address below). The usual source tarball also is available, and that's what I'll be running with here, but don't worry, it doesn't even need compiling to run.
As for library requirements, the documentation says you need the following:
Python: 2.5, 2.6, 2.7 (untested on other major versions; should work on 2.4). Whyteboard does not work with Python 3 (www.python.org/download).
wxPython: the latest version is always recommended (currently 2.8.11.0). Use the Unicode build. wxPython 2.8.9.0 needed at minimum (www.wxpython.org/download.php).
ImageMagick: www.imagemagick.net.
Grab the latest tarball, extract it, and open a terminal in the new folder. Assuming you have the needed libraries installed, you can run the program simply by entering:
$ python whyteboard.py
Usage
Upon entering the program, you'll notice the GUI is strongly reminiscent of the classic Microsoft Paint, so I'm sure most of the computing public will feel instantly familiar with the interface.
Before starting, you need to import a PDF file. From the menu, choose File→Import File→PDF, choose a PDF, and you're away. A word of warning, however; a large PDF (several hundred pages for instance) takes a long time to load and uses a lot of processing power, so I recommend sticking to something that's only a few pages.
For fun, to get started, choose a color from the left and start scribbling and doodling over the page. Now that that's out of the way, let's look at some of the interesting options.
Straight from the World of Paint is the Erase tool, and on PDFs, it's a revelation. Going over a technical document and being able to add notes and clear away sections around crucial text is extremely logical and quite indispensable once you're used to it. You'll wonder how you ever did without it.
Although I'm not sure whether you can rescale a page at this point in time (you can rescale the content though, as you'll see later), the resize tool is interesting in that you actually can add more whitespace to the side or bottom of a page, or crop off sections. Do this either by clicking and dragging your mouse in the gray sections outside the page or by using the Resize Canvas tool under the Sheets menu.
Using the Shape and Resize button, not only can you rescale a page's content within the actual page, while the page stands still (pretty cool in itself), but you also can rescale the content as mentioned, as well as rotate it or even just relocate it.
The most unusual feature is embedding a multimedia player within parts of the page. For instance, I could be looking at a long and technical document, such as Jung's “Structure and Dynamics of the Psyche”, for example, and include something related like a John Betts' Jungian podcast next to key points, or even a video lecture.
The most entertaining feature is the History Viewer. This shows you not only the modifications you've made, but also actually smoothly re-animates each brush stroke you've made, as you were making it. This makes for an amusing movie of your thought processes, and it really helps show whatever you were doing to get to where you are now.
Whyteboard is a beautifully simple program that anyone will be able to pick up. It re-applies existing technologies in new and innovative ways, and once you've become used to it, you won't be able to do without it. Although it's a little buggy for now, as development continues, I can see this becoming one of those daily tools used by the masses.
If you're looking for an audio converter, you could do much worse than this elegant little program. However, Transcoder's real draw is not its conversion abilities, but its extraction abilities. Feed it a video for which you've always wanted the sound (music videos spring instantly to mind), and you can extract it to play anytime you like. To quote the Web site: “Transcoder Audio Edition is an audio converter for Linux that can convert from one audio format into another and can extract audio tracks from video files and convert them into audio formats. It uses GTK+ as the GUI toolkit and FFmpeg as the back end.”

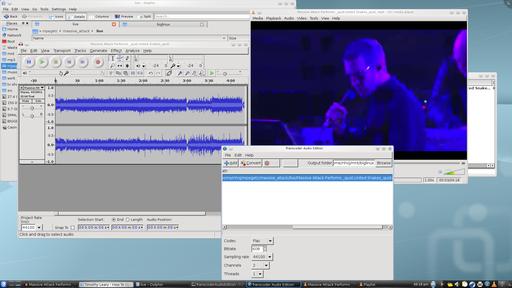
Here I've used Transcoder to extract the audio from a bad mix of a live performance to remaster it independently and sync it back with the video.
Installation
Available at the Web site is a 32-bit Debian binary (the recommended choice if possible), along with a “Binary+Source” tarball. I cover both here.
Documentation is sorely lacking, but fortunately, usage is very simple. Library requirements are minimal, with the only two real dependencies being the libglib2 and libgtk2 libraries.
I went with the Debian package first, but I had to force the architecture, as I'm running a 64-bit OS. Once installed, the program just worked with no issues. For the binary, run the program with the command:
$ Transcoderae
If you're going with the tarball, simply extract the tarball, open a terminal in the folder, and enter the command:
$ ./Transcoder
Usage
My time with Transcoder was very easy; the interface is as simple as they come. First, click the Add button, and choose either the sound file you want to convert or the video from which you wish to extract audio. On the right is the field for the Output folder, where your resulting file ends up. If you don't want the file ending up in Home, click Browse and choose another folder.
Down below are the encoding options (very important—my installation had the choice of Vorbis, AAC, MP3, MP2, AMR-NB and FLAC). Next, you can specify the bitrate, followed by the sampling rate (44100 is CD audio quality; 48000 is what you get on DVDs). Finally, you have the Channels option, set to 2 by default (stereo), and you also can specify how many processing threads to use.
Then, press Convert, and that's pretty much it.
Although this idea is by no means new, the execution is wonderful, and no one is going to be put off by such a simple interface. The applications for this program are incredibly useful. For instance, you could extract the audio from a clip you grabbed from YouTube and play it in your car. Or, you could remaster some bad audio in a video file (which I'm currently attempting on both a Metallica and a Massive Attack video, where some crucial sound has been lost after a surround-to-stereo downmix). Or you simply can convert one sound file to another in a clutter-free GUI that doesn't get in the way.
Either way, Transcoder Audio Edition is a painless program that will be of instant use to countless multimedia users.