
The user interface is progressing quickly these days. It has been 15 years since cool 3-D buttons and the like, as popularized by Windows 95 and other early windowing environments, emerged. Now, we see halo effects, shades, transparency and more—all hardware-accelerated, and all making our computers look better than ever.
A consequence of Nokia's acquisition of Trolltech, a lot of attention has been paid to Qt's abilities in the mobile device space. This not only means speed optimizations and support for more platforms, such as Symbian (and Android, if you look at community efforts), but it also means that what the Nokians refer to as device user interfaces receive quite a lot of attention.
A device user interface is basically a look and feel that integrates well with the device on which it is used. It also provides what modern consumers expect: fluid transitions, graphical effects and a polished look. The consequence of this is a move from a widget-based user interface to a scene-based one.
Qt still supports widgets, and many, if not most, applications still use them. As a matter of fact, new user interfaces are run in a specific widget—QGraphicsView. QGraphicsView, in turn, shows a QGraphicsScene, which contains QGraphicsItem instances. All of this then is managed by Qt Quick.
The Qt Quick concept consists of two parts. The first is the QML language, used to build Qt Quick user interfaces. The other is the QtDeclarative module that provides the means to execute QML components and integrate them with C++ code.
The reason for developing QML was that creating fluid user interfaces with C++ is becoming increasingly complex. By designing a language specifically for the task of doing that, the work effort needed is greatly reduced. This is done in a fashion so that Qt and C++ still can be used for their strong points, by implementing the user interface using QML and the business logic and parts requiring performance in C++. As a side effect, the always-wanted split of user interface code and the rest of the application is enforced, as the parts are implemented using different languages.
To understand how Qt Quick can be used, let's look at three aspects. First, QML in general, then how QML is used to build dynamic user interfaces and finally, how QML and C++ fit together.
QML is a declarative language, based on JavaScript. It is based on the concepts of components that are declared and properties that are bound. A simple example of this is an empty, rectangular scene:
import Qt 4.7

Rectangle {
    id: theRect

    width: 400
    height: width*1.5
}
In this snippet, the component Rectangle is instantiated. All words starting with an uppercase letter instantiate components. In the rectangle declaration, three properties are bound to values. The id property is special; it names items. In the future, the rectangle can be referenced as theRect. To access a property of the rectangle, such as its width, theRect.width can be used.
Next, the width is bound to the value 400, and the height is bound to the width times 1.5. Notice that the height is bound to width*1.5 and not assigned to the result of the multiplication. This means if the width changes, the height is updated automatically.
It also is worth noting the first line, which imports all components that are part of Qt version 4.7. This imports a set of components, such as the rectangle class, defined and implemented using C++. It is possible to import more C++-based components, components written in QML or entire modules of QML components.
I won't go into details on QML components here. Basically, a component is the contents of a given qml source file. Having imported a file named Foo.qml, its contents can be instantiated as Foo { ... }. A module is a directory containing components. Importing a module simply means importing all components of a directory. A really cool feature is that a module can be loaded from a remote location over the Internet.
One concept that is heavily integrated into QML is states and transitions between states. The Qt 4.6 release saw the introduction of the C++ classes for supporting this. However, with QML, using states and transitions is a natural thing.
The source code shown in Listing 1 demonstrates a number of QML concepts. First is the example of how to declare a hierarchy of items. The scene rectangle contains the red and blue rectangles. The red rectangle, in turn, contains a text item and a mouse area item.
The text item in the red rectangle demonstrates another feature: anchor layouts. Items can be anchored to each other, either to their sides or their center lines. The anchors can be offset using margins, and different items can be used for anchoring different parts of the same item. Basically, all your layout needs should be covered by anchor layouts. In this specific example, the center of the text is anchored to the center of the parent rectangle.
Further down, another text item is declared. This time, it is centered in the blue rectangle. Notice that the text item does not have to be a child of the item on which it is centered. This will have implications later on.
Moving on in the red rectangle, we reach the mouse area. This is another concept in QML—interactive areas are not mapped tightly to the visuals. A mouse area is used to interact with mouse events. Think of it as an invisible rectangle that can be anchored to other items, just as a visual item.
In the mouse area, the onClicked signal is bound to a piece of JavaScript. In this case, it alters the state property of the scene item. This brings us to the states and transitions.
Items in QML have a list of states and a list of transitions. In the example, the states' list contains two states: redFocus and blueFocus. Each state contains a number of PropertyChange items. These items modify properties of target items. In the case of redFocus, the scale of the red item and the rotation of the blue item are changed. Other items can be used in states—for instance, ParentChange moves items in the item hierarchy.
Looking back on the JavaScript bound to the onClicked event, the change of the state property moves between the states listed in the states property. When the state is set to an empty string, the default state is used. This means all properties are set to their initial, unaltered values.
The final piece of the puzzle is the transitions property, which is a list of behaviors for value changes of different properties. It is possible to control each individual property for each item for each transition direction. In the example, however, we control only each property for all items and all transitions. The NumberAnimation items control how long each change takes and how the change is made. The scale bounces while the rotation accelerates and decelerates according to a cubic curve, forming a smooth motion.
Looking at the screenshots in Figure 1, you can see the difference between the two texts. In the case of the red rectangle, the text is a child of the rectangle. This means the rotation and scaling of the rectangle is applied to the text too. In the case of the blue rectangle, the text simply stays centered. It is not affected by the transformations applied to the rectangle, because it is now a child of it.
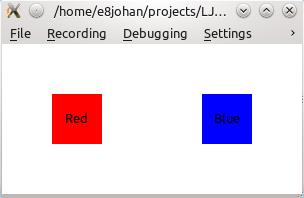
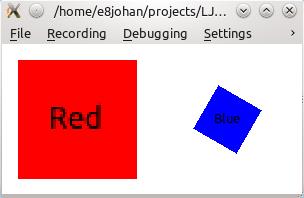
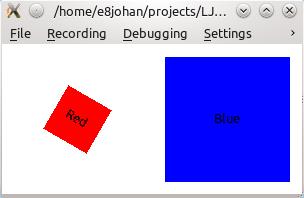
Figure 1. States and Transitions
When building user interfaces, a common scenario is to show a list of data. As you already have guessed, QML provides support for this as well. Listing 2 shows how this can be used.
The example in Listing 2 consists of four major parts: the countries model, the countryDelegate component, the highlightFrame component and the ListView item, which puts it all together. Starting from the bottom, the list view item refers to a model, a delegate and a highlight. These are the model and components implemented earlier. In addition to this, some tuning of the view's behavior is needed to allow keyboard navigation in parallel with mouse navigation.
Returning to the top of the example, the model is a ListModel containing a set of ListElement items. The properties of the list elements are made available through the view, as you can see if you continue into the countryDelegate component and its text items.
The countryDelegate component is what the list view uses to visualize each item of the list. It consists of a mouse area and a rectangle with two texts in it. The mouse area sets the current item of the list if an item is clicked, while the texts show the data of the model. Notice that the text property of the items is bound to the property names used in the list elements of the model. This makes it easy to tie items in a delegate to model data.
Let's continue to the highlightFrame component. This is a frame that the view places over the current item. In this case, it adds a border to the item. The countryDelegate changes its own background color if it is the current item. This is because the current item is shown without a background color instead of with one. That is not possible to achieve using only a highlight frame.
Finally, the list view puts it all together. The result is shown in Figure 2.
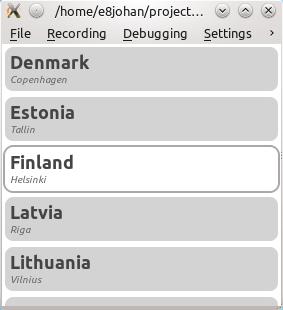
Figure 2. A List View with a Delegate and Highlight Rectangle
It is common to rely on the QML viewer tool when developing QML applications. It also is common to use QML for populating models with data, be it phony or real data. Most state management and work also can be carried out from QML with the aid of JavaScript. However, in most cases, a native application is needed as the runtime environment for any QML application. This is where the QtDeclarative module enters the picture.
For readers who are familiar with Qt, it is good to know that QML consists of a language engine, a context for the scripts to execute in and a QGraphicsScene to operate inside. All these components can be set up manually—it even is possible to add QML components to an existing scene. This way, you can upgrade an existing application gradually.
If you start from scratch with a QML application, the QDeclarativeView encapsulates all these components into a single class, which also happens to be a widget. For an application relying only on QML for its user interface, this is all that it takes.
To integrate C++ objects into QML, the QObject meta-system is used. This means that any QObject-derived class can be exposed to QML. From QML, properties, signals and slots will be available. As QML properties are bound to values, rather than assigned, any changes in the C++ part of the application is reflected automatically in the QML part.
It is beyond the scope of this article to go into details on this, but in the first example, the state could have been driven from C++. This would have let QML handle what it is good at: visuals and dynamic transitions. In the second example, a typical application would provide the model from C++—again, letting QML focus on the visuals.
This approach has a number of benefits. The first one is that the user interface is created quickly using QML as the whole language is focused on that goal. The other is that you are forced to maintain a clear division between the user interface and the rest of the application. This leads to more structure and better code.
Looking at the future of Qt Quick, many things may happen. In MeeGo, the MeeGo touch initiative is implementing new widgets using Qt Quick. In KDE, Plasma is supporting Qt Quick. One effect of this is that you can write Plasmoids using QML. In the Qt tooling department, the trolls are working on a visual designer for Qt Quick. It already has a few interesting features—for instance, layers can be imported from GIMP and Photoshop directly into the designer.
Looking at Qt, I don't think we have seen the last widget-based application yet. Actually, when creating serious software for serious tasks, I see no reason not to use widgets. However, with the new focus on mobile, not only within the old Trolltech, but the entire Linux community, I think that Qt Quick will be a very frequently used tool.
