
Create multiple private workspaces for clients, friends, family and coworkers, and share documents, calendars and tasks easily.
Google is a great company that delivers world-class solutions, yet like governments, if you rely on them or any other entity to keep your best interests at heart, you may be in need of some Freedom Technology. I am a regular user of Google's Gmail, and I was using its Calendar and Sites daily in my work. We stored all relevant assets for Web projects, like database login information, Web site content and images, logos and banners in Google Sites. Being able to access all this information from anywhere at anytime, while keeping it private, proved to be a valuable tool. One fine morning in February 2009, I tried to log in to Google Sites to begin a new project and was met with “Your Account Has Been Disabled”.
After being directed to a short form and submitting several requests for help, it took three weeks for Google to re-instate access to the account. I learned that the affiliate links we stored in Google Sites in our “Code Snippets” repository were considered to be in violation of Google's Terms of Service. Our sites were used as a private intranet, and the information stored there was used only to build Web sites, not display them, so it wasn't a violation at all. Yet, I had to re-create the information for roughly 25 different clients and projects, and I felt robbed of my data—or at least strong-armed away from it.
As soon as access was restored, I downloaded all of the remaining data, deleted it and vowed never to use Google or any other SaaS account for mission-critical data again. From now on, it's my data, and I'm taking back control. This set me on a search for a Google Apps/Sites replacement that I could run on my own server. I made a list of requirements for the ideal solution:
Store information (mainly documents, graphics and notes).
Allow me to share it with users, designers, developers and clients selectively.
Act as a repository of tasks, deadlines and milestones.
Easily keep everyone involved in the project(s) in the loop.
Share tasks and calendar events.
Be easy to back up.
Be open source/GPL'd.
Run on my server.
I discovered OpenGoo (now called FengOffice) on SourceForge less than a month later. Fast-forward two years, and my system never has experienced a hiccup, let alone data loss, and at least 25 different people I work with use it every day. My data is backed up securely, automatically every night, and it's accessible 24/7 from any Web browser or mobile device. OpenGoo uses the ExtJs framework and is designed to run completely in the Web browser, so it's platform-independent. The data is stored in open, non-proprietary formats, so I can access it from any device out there and transfer it easily between applications. It's pure Geek Zen. It's Freedom Technology.
I'm going to walk you through setting up and running your own “office in the clouds” that will give you both peace of mind and total control. Once installed on your server, you will have 24/7 access to your Web-based documents (including graphics), spreadsheets (coming soon), presentations, task lists (with time tracker), e-mail, calendars, Web links, contacts and reports.
The prerequisites for running OpenGoo are the following:
Linux server.
Apache >= 2.0.
MySQL >= 5.0 (5.2 recommended).
MySQL >= 4.1 with InnoDB support.
Note: the default memory limit for PHP is 8MB. A new OpenGoo install consumes 10MB, so you may get a message similar to “Allowed memory size of 8388608 bytes exhausted”. Solve this by setting memory_limit=32 in php.ini.
Let's launch the on-line office at http://getwebup.com/office. Here are the steps:
Download the latest version of OpenGoo at sourceforge.net/projects/opengoo/files/fengoffice.
Unpack the files and upload (via FTP) everything under feng_community to your desired location (for this example, I created and used /home/getwebup/public_html/office).
Log in to your server CPANEL, create the database and user/password (I used getwebup_office for both). You are going to have a great place to store this information soon, so go ahead and use the password generator to create a difficult password.
Add the user getwebup_office to the database: getwebup_office, and be sure to assign all privileges.

Figure 1. Adding the User to the Database in CPANEL
Now you can exit CPANEL, as the rest of the installation is done from within OpenGoo's installer. In your browser, go to getwebup.com/office/feng/public/install.
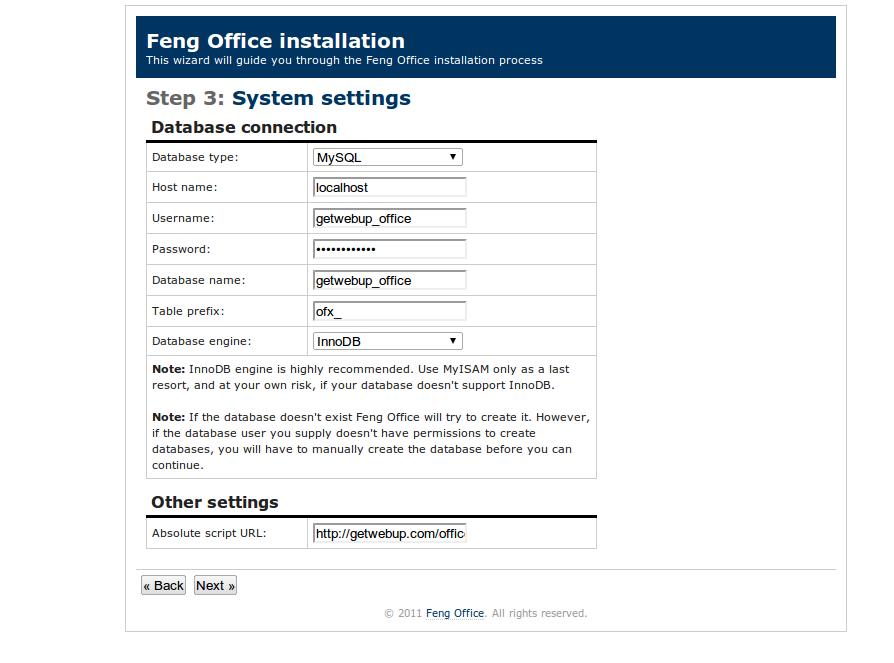
Figure 2. Installation Made Easy
The OpenGoo installation will prompt you for your database and server information, after which you create your Administrative login. Once completed, you are ready to go, and you can access your new on-line office at http://.getwebup.com/office.
Let's get to work setting up OpenGoo as your private digital workspace. I use it every day, and it's been an incredible asset. My clients tell me it's very intuitive, and they enjoy being able to keep abreast of the development process. They can schedule appointments, comment on projects, add tasks or notes and contribute documents and images easily. The developers and I don't have to search our e-mail for attachments that inevitably get lost like that “other” sock in the wash.
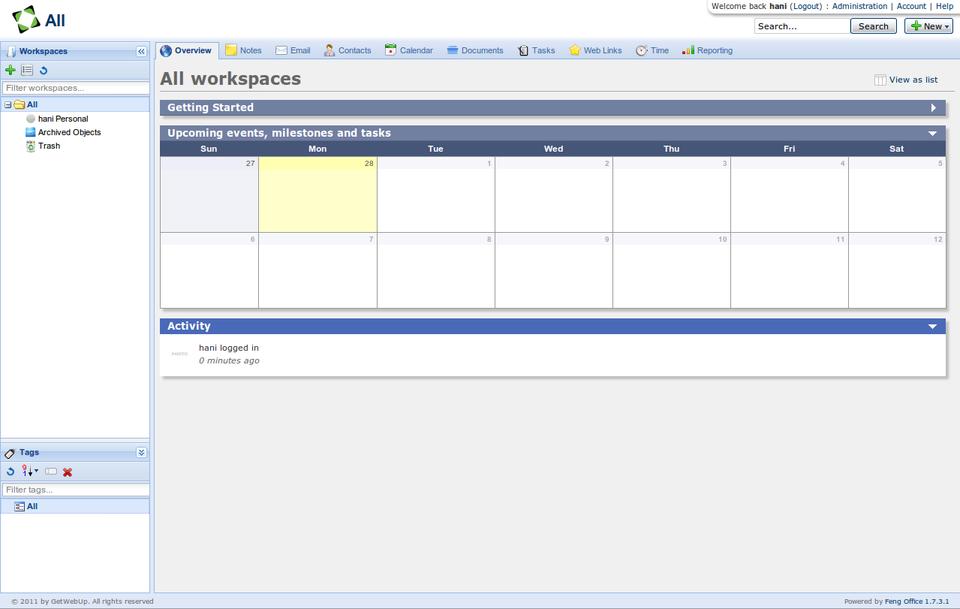
Figure 3. Here's a screenshot from our new office installation.
In the left-side window pane, you have Workspaces, and dominating the center and right of the screen is the All Workspaces Activity window and a tabbed interface with these sections: Overview, Notes, Email, Contacts, Calendar, Documents, Tasks, Web Links, Time and Reporting.
Workspaces are where all the action happens. Let's assume you are using this office for a company called GetWebUp, which provides business Web services (using only open source and open standards as the delivery vehicle). You'll note that a “userPersonal” workspace already is created. You can use this for personal login information for Web sites or even to store to-do lists, recipes and journals. This workspace will not be visible to anyone but you.
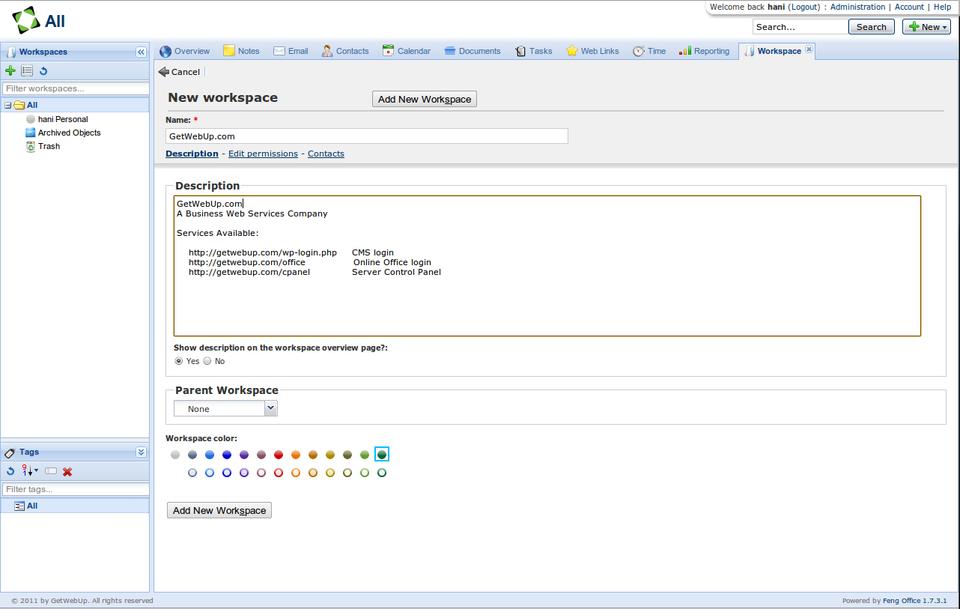
Figure 4. Adding Workspaces in OpenGoo
Create a new workspace by clicking on the green plus sign just below the Workspaces header. This opens the New Workspace page. Let's give this one the name “GetWebUp.com”. Click the Description link, and type some basic information for the project:
GetWebUp.com
A Business Web Services Company
Services Available:
http://getwebup.com/wp-login.php   CMS login
http://getwebup.com/office         On-line Office login
http://getwebup.com/cpanel         Server Control Panel
Select Yes in the Show Description option, assign a Parent Workspace (None), and give the workspace a solid-color green (for Active). Click Add New Workspace, and it's created and ready to use for organizing your GetWebUp office data.
Select the newly created workspace, click Add Workspace to create sub-workspaces under it, and add two client Workspaces. Name one Client A.com, and use a solid-color green (for Active). Name the other Client B.com, and use solid-color red (for InActive). The GetWebUp Parent Workspace is selected by default, and these two Workspaces now will appear as Sub-Workspaces, indicated by the plus sign to the left of the Workspace name. Now you've got a basic structure in place, so let's create some data.
When we bring in a new client, I create and store several logins, like control panels, WordPress logins and database servers. I use the Notes tab for this. Click on the ClientA.com Workspace, and then click Notes + New. Here you have the ability to assign multiple workspaces, tags and link objects to the Note. For now, let's just type in a title and some dummy data to serve as a placeholder. Add one note each for: “Cpanel Server”, “Database Server”, “eMail Accounts” and “Wordpress Server”.

Figure 5. Using Notes to Organize Logins
Now that you have a place to store ClientA's login information, let's visit the Documents tab and create placeholders for the Web site content. Click Documents + New, select Document from the drop-down menu and create the following by saving blank documents: “Home Page Information”, “Article 1”, “Article 2”, “Article 3”, “Testimonials” and “Contact Us Info”.
You also can upload images that will be used for the project. In the Documents tab, click + New, and select Upload: “ClientA.com-logo.png”, “ClientA.com-Banner300x300.png”.
Now you have a place to store and organize the information you get from the client before development takes place, so the content is ready when the Web site is. It also provides great version tracking with document check-outs, as well as a commenting system on each piece of content in the system. When the client has a Web site strategy, branding guidelines and marketing campaigns, those also can be uploaded or created here. For the time being, the data is assigned (and visible) only to the user hani (Admin).
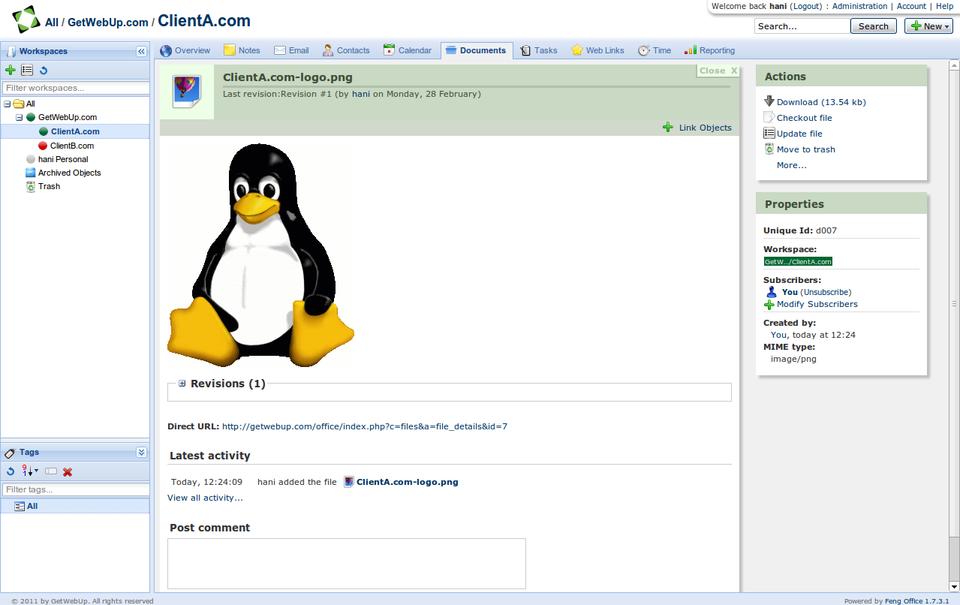
Figure 6. Storing Images in the Documents Section
You've got your Workspace set up and data in the system, so let's create some users to collaborate with. Go to the Administration panel via the link at the top right of the screen next to “Welcome back hani”. Click on + Add Company under the Client companies icon. Create Client Company. Add ClientA.com, and fill in the details as desired. Add ClientB.com, and fill in the details as desired.
Now click on + Add User under the Users icon. Create users Dave, Dirk and LJReader, and assign them to ClientA.com. Click on the Permissions link, and drill down to select the ClientA.com Workspace. All permissions for the objects in that Workspace are pre-selected. Now assign a display name, and either let the system generate a password or specify a password for the user, and check Send email notification to have it sent. Click Add User, and OpenGoo adds the user to the office under the ClientA.com Workspace.
Repeat the steps for the rest of ClientA.com's users, and do the same for these users of ClientB.com: Jill, Kyle and Shawn.
The users are ready to use the office, so let's get back to the GetWebUp.com Workspace.
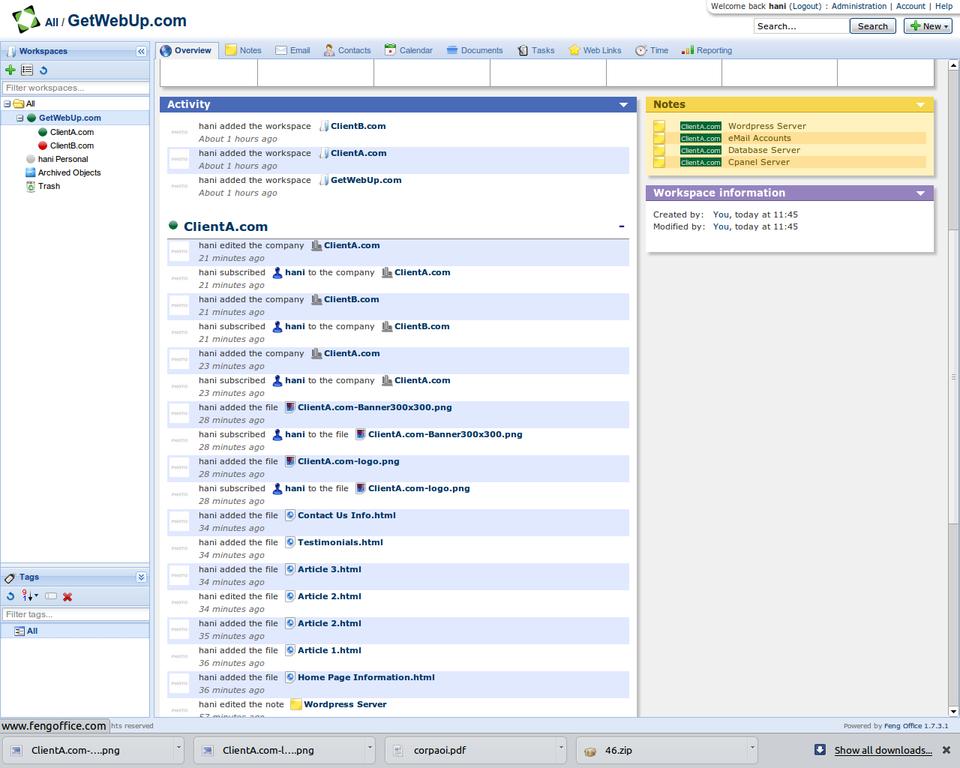
Figure 7. Workspace Activity Feed
When you return to the GetWebUp.com Workspace, you will have a default view of the Overview tab. This gives you the 42,000-foot view of the action in any given Workspace. User activity, new comments, notes, documents and tasks appear here. We have generated a lot of activity ourselves, and a news feed of what we have been doing appears here, as well as handy hyperlinks to the users/data we worked on.
Click on the Notes tab, and select all the notes you created previously (one by one) and click Edit. Here, you can assign custom properties, tags and turn commenting on or off. For now, let's just add Subscribers. This is the equivalent of sharing the data with only the specified users, so click on that link. Select hani from GetWebUp and Dave, Dirk and LJReader from the ClientA.com company. These users now will have access to and be notified of comments and changes to these notes. Click Apply. Use this same method to share all the documents you created earlier.
The calendar in OpenGoo is very well implemented. It will import from other systems and allow you to create events quickly, or you can click Edit Event Details to delve into alarms, recurrence and subscribers with ease. Your views for Month, Weekly, Daily and Agenda are present with a large +Add Event button above them. Click on the day directly in the Month view and the hour specifically in the Day view to set up appointments and meetings in that slot.
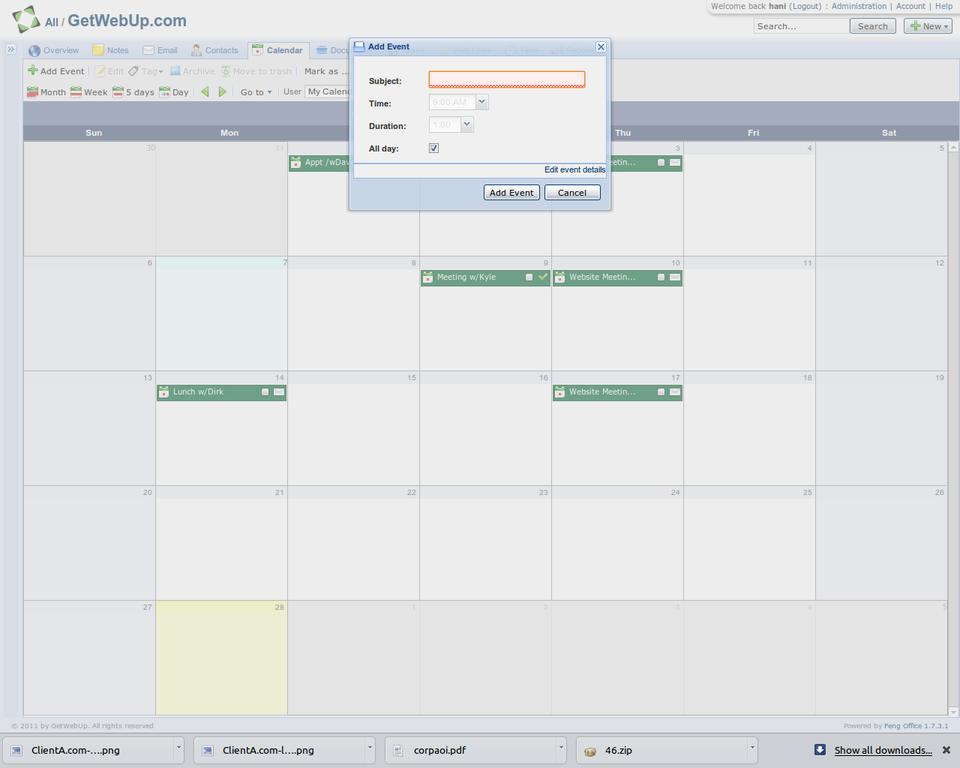
Figure 8. Monthly Calendar View with Workspace Pane Collapsed
In the Tasks tab, you can set Milestones for your projects and assign Tasks to the users involved in the project. These are treated like regular documents and allow users to comment, collaborate and share data directly within the Task's screen. This screen also includes two very useful buttons: Start Work, which is a work-timer feature, and Add Work, which allows you to add tasks within tasks. Both will give you data to crunch in the Reporting tab when you perform project time/cost analysis.
Weblinks allows you to store URLs that link to project-related sites. We use this section to store quick links to login pages, development servers and control panels. Each link can have its own Subscriber/Workspace settings, which makes it useful for a project manager to create a central repository of private and public URLS that both developers and clients can access in one place.
Once the system is in use on a regular basis, the Reporting tab will give you an inexhaustible number of ways of looking at your data. From simple time-card generation to detailed workspace usage and milestone reports, this section lets you create virtually any type of report required from the office.
Once you have your on-line office running and users on the system, you can perform regular admin tasks by visiting the Administration panel. An upgrade tool and cron jobs are available here, as are data and user tools. OpenGoo even provides the ability to create templates, user groups and perform billing functions. Let's look at the settings you can modify.
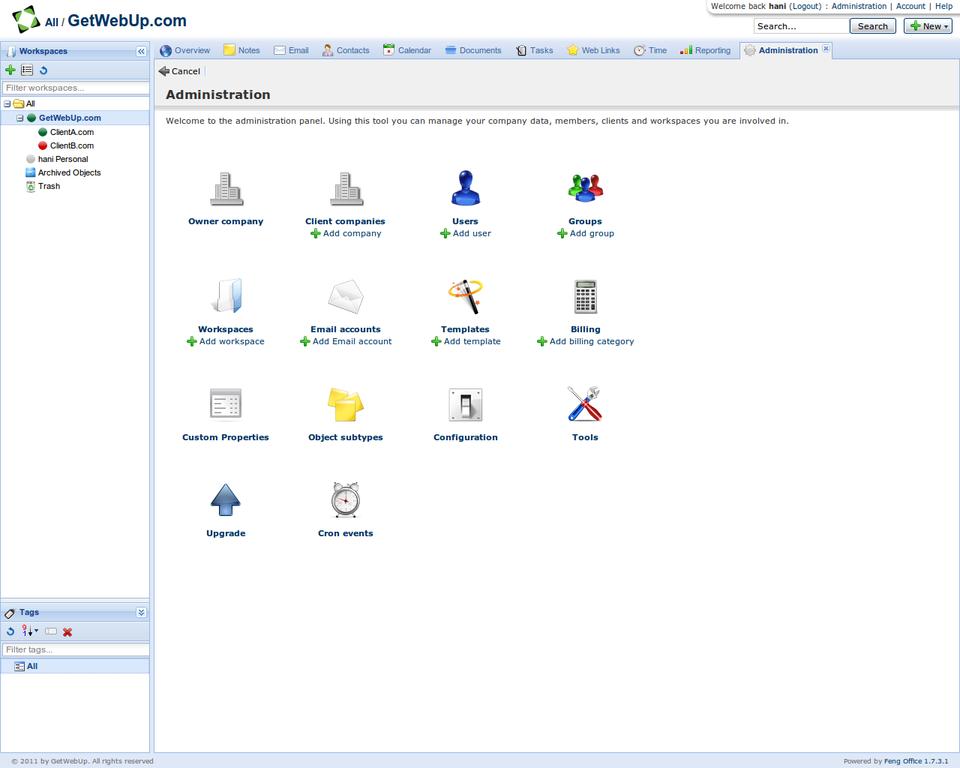
Figure 9. OpenGoo Administration Panel
In the Configuration section, you can access the General section, which allows you to specify the File storage system—either database or filesystem. I opt for the filesystem, then use rsync to send the entire office off-site for backups, restoration and portability. The database option allows you to manage your data MySQL-style from the command line. Another useful option to set here is to “use the client's logo as the application logo when they log in”. This is a nice touch, as it gives each company a sense of ownership over its office/workspace.
The Modules screen under Configuration allows you to enable or disable each section (represented by tabs) in the office. We use Gmail in lieu of the Contacts and Email sections, so I disable those modules here to save screen real estate and provide a cleaner interface. You can use the Custom Properties section to add additional fields of data to any object type. For example, you can add an expiration date property to the Note object type. Object subtypes allows you to add subtypes to task objects like “Goal 1” and “Goal 2” and so on.
The Account link is to the right of Administration, and here you can update your profile to include an avatar, specify an e-mail address, time zone and title. In the Edit Preferences screen, you can access the General, Dashboard, Task, Calendar and Email Options. Use the options under General to set a default workspace, localization and workday start time. You can add or remove Workspace widgets and set the Activity Widget size (number of items in the Activity stream) in the Dashboard options screen. The Calendar options page gives you the ability to start the week on Monday and show week numbers.
One final step I like to perform, although this is a Chrome browser feature rather than an OpenGoo setting, is to click on the wrench icon in Google Chrome, then Tools→Create Application Shortcuts to create Icons on my desktop and menus to access my office quickly. Chrome gives the application a non-decorated window, which gives it the look and feel of a desktop application. In Ubuntu, I always have this window running in its own workspace for fast access.
Now you've got your office up 24/7 and out of reach of the general public, while remaining completely platform-independent and fully featured on any device. There is talk of iPhone and Android Apps for OpenGoo on the horizon, but for now, it's best on Galaxy Tab and iPad-sized screens unless you like pinch zooming. The application itself is open source and now hosted on your own server. The data is stored in an open and non-proprietary format, so you've taken ownership of your own office in the clouds and increased the versatility of your raw data in the process. You can export your data from OpenGoo and import it into any standard application. Although once you get used to having access to your data at any time and being in total control of it, why go back to running your business on someone else's proprietary platform?
