
How to identify your firmware and partition your disk before installing Linux on an EFI computer.
In my last article (December 2011), I described some of the key characteristics of the Extensible Firmware Interface (EFI) and its second-generation variant, Unified EFI (UEFI). To recap, EFI (I use this acronym to refer to either variant generically) is the replacement for the elderly Basic Input/Output System (BIOS) firmware that most PCs have used for 30 years. EFI provides a number of improvements over BIOS, but the most important from a Linux perspective is that EFI systems boot in a manner very different from BIOS systems. This fact necessitates the use of different bootloaders, or at least different versions of bootloaders—some are available for both BIOS and EFI systems.
This article continues the EFI story by describing the preparatory steps you should take prior to installing Linux on an EFI-based computer. Specifically, you should know how to identify your firmware and how to partition your disk. Although most installers set up an EFI bootloader, I also describe ELILO configuration here. This knowledge may help you get a recalcitrant installer to boot.
This series continues with two more parts, which cover actual Linux installation procedures and maintenance of a Linux system that's been installed in EFI mode, respectively.
Before proceeding with EFI-specific preparations for installation, you may want to verify that your firmware is (or is not) EFI-capable. As noted in Part I, this task isn't always simple, because many computers use EFI, but don't advertise the fact, and use firmware interfaces that look just like those on old-style BIOSes. Many manufacturers call their EFI firmwares “BIOSes”, and they often ship with BIOS-compatibility modes that enable them to boot OSes using legacy BIOS bootloaders. (This feature sometimes is referred to as the Compatibility Service Module, or CSM.)
Some steps you can take to identify your firmware's capabilities include the following:
Check your model: all Intel-based Macs are EFI-based. So are most (perhaps all) PCs based on Intel's Sandy Bridge CPUs, which began shipping in quantity in the spring of 2011. AMD-based systems based on EFI started to become popular in mid-2011. Some models from before 2011 also are EFI-enabled, although they're rarer.
Check the manual: read your computer or motherboard's manual—particularly the section on boot options. If there are references to “EFI” or “UEFI” boot modes, those modes enable EFI boot capabilities. If the firmware includes a “legacy” boot mode, that option refers to BIOS boot capabilities, the implication being that the normal boot mode uses EFI. The lack of any such option might mean your firmware is a conventional BIOS; however, some systems lack any explicit options on this score. You can search for these terms using a PDF version of the manual, which most manufacturers make available on their Web sites.
Check your boot options: even if the manual makes no explicit mention of EFI, UEFI or legacy boot options, such options may be present in the boot menu in your computer's firmware setup utility. There also can be a clue in the form of multiple options to boot a single medium. For instance, if I insert an optical disc that's bootable in EFI mode into a computer based on an Intel DG43NB motherboard and then press F10 at boot time, the boot menu includes two options to boot from my DVD drive. One is labeled “PATA: HP DVD Writer 1040r”, and the other is labeled “INTERNAL EFI SHELL: HP DVD Writer 1040r”. The first boots the disc in BIOS mode, and the second boots the disc in EFI mode.
Check your boot state: you can try booting the computer and then check the status of the boot mode (I'll describe this in Part III of this series).
Check your Windows installation: Windows ties its partition table type to its firmware type. It installs only to GUID Partition Table (GPT) disks in UEFI mode and only to Master Boot Record (MBR) disks in BIOS mode. Thus, if a working Windows installation uses GPT, you can be sure that your firmware includes UEFI support. If the disk is in MBR mode, you can be sure your firmware includes BIOS support. Such a system also might support UEFI boots, but if you intend to keep booting Windows, it's probably best to treat it like a BIOS computer.
If you've identified your firmware as supporting EFI, you can proceed with partitioning your disk and preparing for your Linux installation.
Most EFI-based computers use the GPT partitioning system. Although it's possible to boot an EFI-based computer using the older MBR system, such a configuration is unusual. Most Linux distributions use GPT automatically when they install in EFI mode; however, it's sometimes easier to install in BIOS mode and then switch to EFI mode for booting the computer. If you do so, you may need to pre-partition the disk explicitly using GPT before installing the OS. You also may want to pre-partition your disk so that you can set up certain details in the ways you want.
In Linux, you can use either of two families of tools to partition a disk using GPT:
The libparted family: tools based on libparted support both MBR and GPT, but MBR is normally the default. To use GPT on a blank disk, you must tell the tool explicitly to create a GPT disk label. In GNU Parted, the command to do this on /dev/sda is parted /dev/sda mklabel gpt. Using GParted, you should select the Device→Create Partition Table menu option, click the Advanced button in the resulting dialog box (Figure 1), select “gpt” as the partition table type, and click the Apply button.
The GPT fdisk family: you can use gdisk, cgdisk or sgdisk to prepare a GPT disk. These tools use GPT by default, so you don't need to do anything special to do the job. They're designed to work like the Linux fdisk tools, but for GPT disks. (Note: I'm the author of the GPT fdisk tools.)
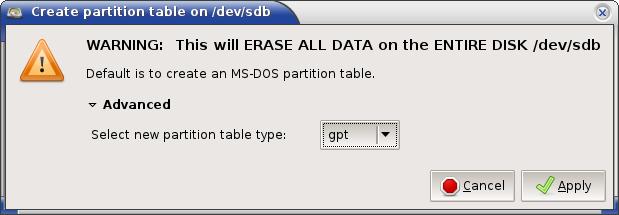
Figure 1. You must tell GParted explicitly to use GPT when creating a new partition table.
Whatever tool you use, you can partition your disks much as you would using MBR on a BIOS-based computer, but with a few twists:
To boot in EFI mode, most EFI-based computers require an EFI System Partition (ESP). This partition should have a FAT-32 filesystem, which you may need to create with mkdosfs. I recommend creating a 200 MiB to 300 MiB ESP as the first partition on the disk. To create an ESP using a libparted-based tool, create a normal FAT-32 partition and then set the “boot flag” on this partition. To create an ESP with GPT fdisk, create a partition and set its type code to 0xEF00.
To boot in BIOS mode using GRUB 2, it's helpful to have a BIOS Boot Partition. This partition can be tiny—as small as 32 KiB, although 1 MiB is a more common size. In a libparted-based tool, you can create a partition without a filesystem and then set the bios_grub flag on it. In GPT fdisk, create a partition and set its type code to 0xEF02. If you plan to do a pure EFI installation, a BIOS Boot Partition isn't necessary; however, if you have to fall back to a BIOS-mode installation followed by a change to EFI mode, a BIOS Boot Partition can be helpful. Therefore, I recommend you create one.
Some OSes, such as OS X, like to see gaps of about 128 MiB between their partitions. Thus, you may want to create your disk with such gaps, particularly after Hierarchical File System Plus (HFS+) partitions on a Mac.
If you're dual-booting between Windows and Linux, you should be aware that in the past, Linux installations used the Windows filesystem type code on GPT disks for Linux partitions. This practice resulted in Linux partitions showing up as unpartitioned Windows disks inside Windows—a potentially dangerous situation! Versions of GPT fdisk since 0.7.2 have provided a new type code (0x8300) to use for Linux partitions to avoid this problem. This type code will be supported in future versions of libparted too, and it will be used by default, but this support is not yet available, as of libparted 3.0.0. You can use GPT fdisk to change the type code after installing Linux if you want to make Linux partitions invisible to a dual-booted Windows installation.
One of the advantages of GPT over MBR is that GPT lacks the distinction between primary, extended and logical partitions. Instead, GPT supports up to 128 partitions by default, all of which act like MBR primary partitions.
If you use a libparted-based tool to partition, be aware that what such tools refer to as a “boot flag” on GPT disks is actually the type code for an ESP. You should not set this flag on anything but the ESP. This contrasts with MBR disks, on which the “boot flag” must sometimes be set on an OS partition that holds a bootloader.
Each of the four Linux EFI-capable bootloaders described in Part I of this series (ELILO, Fedora's patched GRUB Legacy, GRUB 2 and Linux kernel patches) requires its own configuration. Describing all of them is beyond the scope of this series, so I've chosen just one to describe in detail: ELILO. I selected ELILO because it's widely available, easy to configure and reliable. You may not need to configure ELILO; if your distribution installs something else and it works, you may as well stick with what it installs. Even if you need to install ELILO, you may not need to do so until after you install your distribution. I describe it here because it's sometimes necessary to install ELILO before installing Linux in order to get the installer to boot in EFI mode.
You can obtain an ELILO tarball from the main ELILO Web site (see Resources), or you may be able to use a package that's provided with your distribution. A distribution-provided package may be hard to use if you need to install ELILO before installing your distribution though.
You should begin by creating a home for ELILO on your ESP. Several possible homes exist:
You can store the binary in the EFI/BOOT directory as bootx64.efi. This makes ELILO run as the default bootloader if you haven't configured your EFI to know about any others. If a file of this name already exists though, be sure to back it up!
Distributions normally place the elilo.efi file in a subdirectory named after themselves, such as EFI/BOOT/suse for OpenSUSE.
If you multiboot with other OSes, you may want to create a directory called EFI/elilo and store elilo.efi there. This placement, however, will require that you use the efibootmgr utility or a similar feature in the EFI's user interface to add ELILO to the EFI's boot manager.
Which approach works best depends on your needs and system. If your ESP doesn't contain any other bootloaders, the default EFI/BOOT/bootx64.efi filename usually works well. If you can boot your Linux installer in EFI mode and run efibootmgr, using another name may work.
A complete ELILO installation on the ESP will include at least four files:
elilo.efi or bootx64.efi: this file is the ELILO binary. You must copy it to the ESP from the ELILO package. (It's called elilo-{version}-{arch}.efi inside the main ELILO package file, where {version} is the version number and {arch} is an architecture code.)
elilo.conf: this is the ELILO configuration file, which I describe in more detail shortly.
A Linux kernel file: ELILO loads the Linux kernel from the ESP, so you normally place this file in the ELILO directory.
A Linux initial RAM disk file: ELILO loads this file, like the kernel, from the ESP.
You can store more than one kernel and initial RAM disk on the ESP if you want to have a choice of kernels or if you multiboot multiple distributions, each of which has its own kernel and initial RAM disk.
The ELILO configuration file's format is similar to that of LILO, the BIOS bootloader (Listing 1).
The first few lines of Listing 1 set global ELILO options:
prompt tells ELILO to show a prompt at boot time rather than to boot straight into the default kernel.
timeout=50 sets the timeout period to 5 seconds. Note that the timeout period is measured in tenths of a second.
default=kernel304 sets the default kernel to the one labeled kernel304. ELILO boots this kernel if the timeout period passes without a key press from the user.
chooser=textmenu sets the user interface style to a menu rather than a prompt at which you must type an entry. This option seems to be broken though; it's always produced a blank display for me, although it accepts key presses as I'd expect. Therefore, I've commented it out by placing a hash mark (#) at the start of its line.
Listing 1 presents two stanzas following the global options. Each stanza describes one kernel that ELILO can boot. Each stanza consists of several lines:
image= identifies the Linux kernel file, which normally appears in the same directory as the elilo.efi file.
label= gives the stanza a name. ELILO should display this name in its menu if you use the chooser=textmenu option, or you can type this name at the ELILO prompt when using the default option. The name must not contain spaces.
initrd= identifies the initial RAM disk file.
read-only is a standard part of the configuration.
root= identifies the Linux root (/) filesystem. Listing 1 shows a root filesystem on a Logical Volume Manager (LVM) configuration, but if you don't use LVM, you'll probably specify a regular device filename, such as /dev/sda3, or identify a device by UUID, as in root=UUID=c607bd95-8edf-4eb1-aa93-12db8f0e66a2.
append= enables you to add arbitrary kernel options. The first stanza in Listing 1 uses the reboot=a,w option, which works around problems on some systems that cause the computer to hang when rebooted. Many distributions use additional options to enable graphical boot displays or other features. You often can omit such options, but sometimes they're necessary for proper functioning.
If you copy the files into EFI/BOOT and rename elilo.efi to bootx64.efi, you may be able to reboot into ELILO. If you copy the files into another directory though, you may need to use the efibootmgr program to add ELILO to the ESP's list of bootloaders. This program will work only if the computer already is booted in EFI mode. You must type this command on the computer on which you want to use it; it stores data in the computer's NVRAM, not on the hard disk. To use it, you would type a command like the following:
efibootmgr -c -l \\EFI\\elilo.efi -L ELILO
This command adds the EFI/elilo.efi file to the EFI's bootloader list, using the menu name ELILO. Note that you must use a double backslash (\\) as a directory separator, and the filename is relative to the ESP. You can use additional efibootmgr commands to control the order of entries in the EFI's boot list, to delete items from the list and so on. (Part IV of this series will describe these options in more detail.)
If you're having problems booting your distribution's installer in EFI mode, you can set up ELILO on your hard disk, copying the kernel and initial RAM disk from the installer's disc image to the ESP and creating an elilo.conf file that references them. I've found such tricks to be very useful in the past, although as I'll describe in Part III, the latest round of distributions has greatly improved EFI support, so with any luck, you won't need to do this.
Once it's properly installed and booted, ELILO presents a simple prompt:
ELILO boot:
Press the Enter key to boot the default kernel, press the Tab key to see a list of options, or type an option name to boot it.
Part III of this series covers OS installation using two methods: direct EFI installations and converting a BIOS-mode installation to boot in EFI mode.
