Your data under your control—a step toward freedom in the cloud.
ownCloud (currently ownCloud 3, owncloud.org/discover) helps you store your files on a computer under your control and access them yourself or share with anyone else. Besides storing files, you also can use ownCloud's calendar to keep track of important events and meetings, maintain and sync your contacts using CalDAV and stream your music via its built-in Ampache server. To start using ownCloud, all you need is a basic Web server (Apache, in this article) installation with PHP5. Let's get started.
You want your ownCloud to be truly your own, so you will want ownCloud running straight out of your home computer. Let's see how.
At the time of this writing, you easily can install ownCloud in Ubuntu via a simple sudo apt-get owncloud. On Fedora 16, the installation is a little involved, as an ownCloud package is not yet available. You can grab this installation script from https://gist.github.com/2341191, which I created so you wouldn't need to type each of the steps, and you can see what is going on in the script by following this blog post entry: echorand.me/2012/02/26/owncloud-boxgrinder-pagekite-owncloud-appliance. (It also installs MySQL server and configures it; comment the relevant lines if you want to use SQLite with ownCloud.) A key point to note in the script is giving appropriate permissions to the owncloud directory so that the Web server can read/write from/to it.
To check if everything has been set up properly, open your browser and type in the following URL: http://localhost/owncloud. If you see the screen shown in Figure 1, your ownCloud installation has been completed.
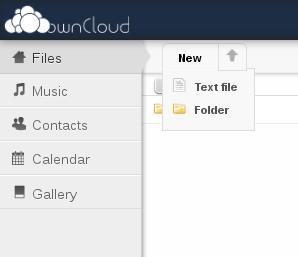
As you can see on the screen, you first need to create an admin account for ownCloud, and specify the directory where files will be stored and the database to use. Let's use the default directory, which is /var/www/html/owncloud/files, and /var/lib/owncloud/data, in the case of Ubuntu. Let's also use the SQLite database instead of MySQL, but you can choose either one. Once you click the Finish Setup button, the ownCloud home page appears where you will see a sidebar with the following contents: Files, Music, Contacts, Calendar and Gallery.
You can create a new file or a folder on this page from the New tab (Figure 2). By default, there is a maximum size limit (2MB) of files you can upload (which is really a PHP-imposed limit and not an ownCloud one). You can change it to something more desirable, say 50MB, by changing the variables: upload_max_filesize=50M and post_max_size=100M in the file php.ini (the location of which will depend on your distribution and may be found using $locate php.ini; on Fedora 16, it is /etc/php.ini). Restart your Web server, and your file upload limits will be changed.

Figure 2. User Home
Now, create a few files and directories. Mine at this point in time look like those shown in Figure 3.
If you have other installation requirements, such as running it off a virtual appliance, refer to owncloud.org/support/setup-and-installation for more information.
One thing you could use ownCloud for is to share your files with others—other users on your ownCloud installation or via a publicly accessible URL. Figure 4 shows how. When you share a file with another user, it shows up in his or her Shared directory. (The Shared directory is special in the sense that you cannot upload/create files/directories in it. It will show only the ones that have been shared with you by another user.) It seems that you either can have a publicly accessible URL or share it with another user, but not both (that's sensible, if you ask me).
There also is a built-in pdfjs-based PDF viewer, which works quite well. For example, Figure 5 shows a previous issue of Linux Journal viewed from my ownCloud installation. Mozilla Firefox had some issues rendering the PDF file, whereas Google Chrome worked perfectly (bug report: bugs.owncloud.org/thebuggenie/owncloud/issues/oc-442).
The Music section scans your directories/files and displays them (Figure 6). You can create a playlist from the files and play it in your browser, and use an Ampache client to play them either on your local machine, a remote computer or your Android phone (the Ampache.net client worked perfectly for me). Quickplay (quickplay.ampache.org) is an easy-to-use program for playing music from an Ampache server (Figure 7).
The Ampache address is http://localhost/owncloud/apps/media/, and the user name is your ownCloud user name, and the password/API key is your ownCloud password.
The Contacts and Calendar sections can be used to create, view and maintain contacts and calendars (Figures 8 and 9). As you can see, I have friends in high places and need to be reminded of a shutdown. You can have multiple address books and multiple calendars, download them and share them in standard formats and protocols.
If you have uploaded any image files in any of your directories, the Gallery section will show them. It's not my intention to show off my photography skills, but Figure 10 shows some of the photographs I've uploaded into my directories.
That pretty much sums up the basic usage scenarios for ownCloud. Now, let's go a little deeper.
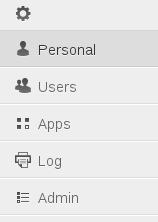
The settings section toward the bottom left of your ownCloud home page has four major sections: Personal, Users, Apps, Log and Admin (Figure 11). Note that you will see all these sections only when you are the admin user. Other users see only the Personal section.
In the Personal section, you can set the e-mail address for password recovery, your language, timezone and also view the WebDAV, CardDAV, CalDAV and Ampache addresses (Figure 12).

Figure 11. Settings
You can use WebDAV to view your files without logging in to the ownCloud installation by using the URL shown to you using browser-based authentication. You also could hook up your operating system's file manager to create an entry pointing to your ownCloud files (owncloud.org/support/webdav).
If you are looking for a command-line way to access/retrieve your files, Cadaver (www.webdav.org/cadaver) is a command-line WebDAV client and can be used to store and retrieve your files from ownCloud. It can be installed using either apt-get or yum. Once you have it installed:
$cadaver http://localhost/owncloud/files/webdav.php

Authentication required for ownCloud on server `localhost':
Username: admin
Password:
dav:/owncloud/files/webdav.php/>
The interface to Cadaver is similar to that provided by an FTP client, with commands like put for uploading files and get for downloading files. (I faced problems with getting Cadaver to work on my Fedora server installation, although on my Debian and Ubuntu installations it worked great.)
In the Users section, you can add new users and groups and assign them disk usage quotas (Figure 13). This is useful when your ownCloud installation will be used by someone other than yourself.
Use the Log section to see information if something isn't happening the way you would expect. The Admin section doesn't have much in it. The only thing you can do here is export your ownCloud installation: user files, system files and configuration as a .zip file (Figure 14). This zip file backs up the ownCloud directory, and you then can use it to replicate or replace your ownCloud installation elsewhere.
ownCloud apps are a way to extend ownCloud's functionality. In fact, the Calendar, Contacts, Gallery and Media server are all implemented as ownCloud apps. In the Apps section under Settings, you can see the currently installed apps and others available for install. More applications are available at apps.owncloud.com. However, a number of them seem quite rough and unstable at this time.
On the face of it, ownCloud is just an open-source solution allowing you to store your own files where you please. With a little thought, it becomes apparent that it helps you take one step ahead in the fight not to give up your data to services where it may not be very safe. However, to become really useful, you should be able to access your data from places outside your home/office/college network. This is where services like PageKite (pagekite.net) make the goal of having your own storage service running off your desktop computer or laptop a practical reality.
If you have used the installation script for Fedora, you already will have PageKite installed. Otherwise, follow the one-line installation process: curl -s https://pagekite.net/pk/ |sudo bash.
Once that is done, set up PageKite: pagekit.py --s signup, and follow the steps. Once the signup is done, set up your kite using $pagekit.py 80 <yourname>.pagekite.me (assuming you are running Apache on port 80). Your ownCloud service now will be accessible at http://<yourname>.pagekite.me.
ownCloud is a good experience and provides basic functionalities flawlessly. However, there still are some rough edges (bugs.owncloud.org/thebuggenie/owncloud/issues/open), which gradually should be fixed as ownCloud starts welcoming enterprise customers (owncloud.com). Besides, if there isn't something you want, you can venture into writing your own app: owncloud.org/dev/writing-apps. An official desktop app for ownCloud is not fully there yet, except for the Mirall Project for OpenSUSE (en.opensuse.org/Mirall), and a basic Android client is available from owncloud.org/support/android. It's functional, but nothing fancy.
Have fun building your own cloud storage from your desktop for yourself, your friends and your colleagues.
Credit is due to the ownCloud folks for an interesting project, to Bjarni of Pagekite.net and the awesome Shutter tool (shutter-project.org) for helping me create the screenshots for this article.