
The Linux kernel is in a military zone with guaranteed punishments for all trespassers. Let's emulate the kernel and study packet flow in the network stack.
Linux is a free operating system, and that's a boon to all computer-savvy people. People like to know how the kernel works. Many books and tutorials are available, but until you have hands-on experience, you won't gain any solid knowledge. The Linux kernel is a highly secure and powerful operating system kernel. If you try doing anything fishy, the kernel will kill your program. Suppose your program tries to access any memory location of the kernel, the kernel will send a SIGSEGV signal, and your program will core-dump by a segmentation fault. Similarly, you might come across many other examples of the kernel's punishments.
The kernel has defined a set of interfaces, and users can avail the kernel's services only through those interfaces. Those interfaces are called system calls. All system calls have a stub code to verify all the arguments passed. A verification failure will result in the program to core-dump, so it is very difficult to experiment with the kernel.
Kernel modules provide an easy way to execute programs in kernel space, but this is risky, because any faulty kernel module can mess up the operating system, and you will have to hard-reboot the machine.
All these difficulties make the kernel more mysterious. You can't easily peep into the system.
But, UML (User-Mode Linux) comes to the rescue. UML is just a process, an emulation of a Linux kernel, that acts like a Linux machine. Because it is a process, you can manipulate kernel memory and variables' values without any harm to the native Linux machine. You can attach UML to the gdb debugger and do a step-by-step execution of the kernel. If you mess up with UML, and it goes bad, you can kill that process and restart UML at any point of time.
I like to call the UML process a UML machine, because it acts like a different machine altogether. The native Linux machine is nothing but the host Linux machine where you run all these UML processes.
I've been working in the Linux networking domain for the last five years. I found it very difficult to debug kernel modules (in the network stack) because: 1) the kernel is in a highly protected zone, and 2) you need a setup of two or more machines and routers to create a packet flow. Therefore, I created a network of UML machines to overcome this problem, which not only cut down the cost but also saved a lot of time.
This article is not about building UML machines from scratch. Instead, here you will learn how to build a UML network and debug kernel modules effectively without spending resources on additional machines.
The UML source code is available with the Linux kernel. Let's download the 2.6.38 kernel from www.kernel.org and build a UML kernel. A UML kernel is a process that is in ELF-executable format. Because UML emulates an entire Linux machine, it requires a virtual disk partition to hold small programs, libraries and files, and this virtual disk partition is called the UML filesystem. The UML kernel boots up and mounts this filesystem image as its root partition. You either can create your own or download a UML filesystem from any popular distribution site.
I have done this demo on an Ubuntu 64-bit Lucid operating system (on an Intel Pentium processor). Don't worry if you are using a different Linux distribution or architecture. Just make sure that you download the 2.6.38 kernel and build a UML kernel.
You can configure the kernel using make menuconfig. Don't forget to enable CONFIG_DEBUG_INFO and CONFIG_FRAME_POINTER in the config file, as that's necessary for this demo.
I used the following command to build a 32-bit UML kernel:
root@ubuntu-lucid:~/$ make ARCH=um SUBARCH=i386
Let's build a network of three UML machines, and let's name those machines UML-A, UML-B and UML-R. UML-A and UML-B will behave as normal Linux clients in different IP subnets, but UML-R will be the router machine. UML-R is the default gateway machine for UML-A and UML-B. If you ping the IP address of UML-A from UML-B, the icmp packet should flow through UML-R. Let's make the host Linux machine as the default gateway machine for UML-R. Then, if you ping www.google.com from UML-A, the packet will flow as shown in Figure 1.
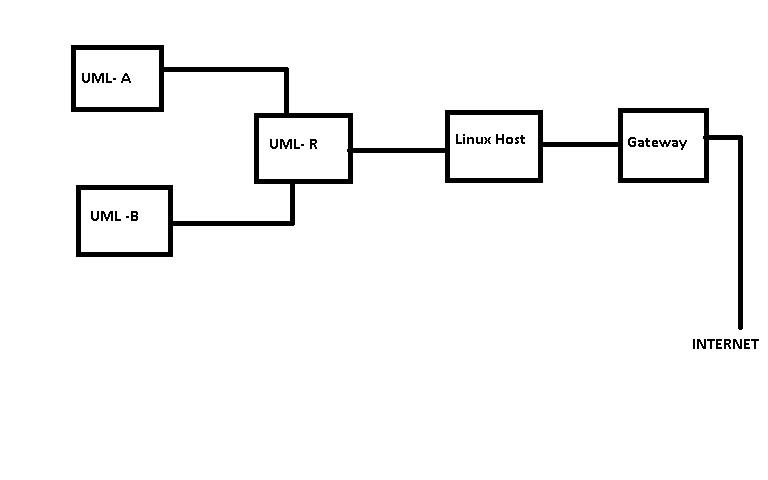
Figure 1. High-Level Block Diagram of the Example UML Setup
Let's make three copies of the UML kernel and the UML filesystem for these three UML machines. It is better to create three directories and keep each copy of the UML kernel and the UML filesystem in each directory:
root@ubuntu-lucid:~/root$ mkdir machineA machineB machineR
root@ubuntu-lucid:~/root$ cp uml-filesystem-image
 ↪MachineA/uml-filesystem-image-A
root@ubuntu-lucid:~/root$ cp uml-filesystem-image
 ↪MachineB/uml-filesystem-image-B
root@ubuntu-lucid:~/root$ cp uml-filesystem-image
 ↪MachineR/uml-filesystem-image-R
root@ubuntu-lucid:~/root$ cp linux /test/machineA/
root@ubuntu-lucid:~/root$ cp linux /test/machineB/
root@ubuntu-lucid:~/root$ cp linux /test/machineR/
If you boot up all these UML machines, they will look exactly same. So, how do you identify each of the UML machines? To differentiate between them, you can give them different hostnames. The /etc/hostname file contains the machine's hostname, but this file is part of the UML filesystem. You can mount the UML filesystem locally and edit this file to change the hostname:
root@ubuntu-lucid:~/root$ mkdir /mnt/mount-R
root@ubuntu-lucid:~/root$ mount -o loop
 ↪./uml-filesystem-image-R /mnt/mount-R
root@ubuntu-lucid:~/root$ cd /mnt/mount-R
root@ubuntu-lucid:~/root$ echo "MachineR" > etc/hostname
Now the UML-R machine's hostname is Machine-R. You can use the same commands and mount uml-filesystem-image-A and uml-filesystem-image-B locally and change the hostnames as “MachineA” and “MachineB”, respectively.
Let's boot UML-A and observe:
root@ubuntu-lucid:~/root$ ./linux  ubda=./uml-filesystem-image-A
 ↪mem=256M  umid=myUmlId  eth0=tuntap,,,192.168.50.1
UML-A boots up and shows a console prompt. This command configures a tap interface (tap0) on the host Linux machine and an eth0 interface on UML-A. The tap interface is a virtual interface. There is no real hardware attached to it. This is a feature provided by Linux for doing userspace networking. And, this is the right candidate for our network (imagine that the tap0 and eth0 interfaces are like two ends of a water pipe). Refer to the UML Wiki to learn more about the UML kernel command-line options.
The above command assigns the 192.168.50.1 IP address to the tap0 interface on the host Linux machine. You can check this with the ifconfig command on the host Linux machine. The next task is to assign an IP address to the eth0 interface in UML-A. You can assign an IP address to the eth0 interface with ifconfig, but that configuration dies with the UML process. It becomes a repetitive task to assign an IP address every time the UML machine boots up, so you can use an init script to automate that task.
UML-A and UML-B require only one interface because these are just clients, but UML-R needs three interfaces. One interface is to communicate with UML-A, and the second is to communicate with UML-B. The last one is to communicate with the host Linux machine.
Let's bring up the UML machines one by one using the commands below (you need to start UML-A, UML-R and then UML-B in that exact order):
root@ubuntu-lucid:~/root$ ./linux  ubda=./uml-filesystem-image-A
 ↪mem=256M  umid=client-uml-A eth0=tuntap,,,192.168.10.1
root@ubuntu-lucid:~/root$ ./linux  ubda=./uml-filesystem-image-R
 ↪mem=256M  umid=router-uml-R  eth0=tuntap,,,192.168.10.3
 ↪eth1=tuntap,,,192.168.20.1 eth2=tuntap,,,192.168.30.3
root@ubuntu-lucid:~/root$ ./linux  ubda=./uml-filesystem-image-B
 ↪mem=256M  umid=client-uml-B eth0=tuntap,,,192.168.30.1
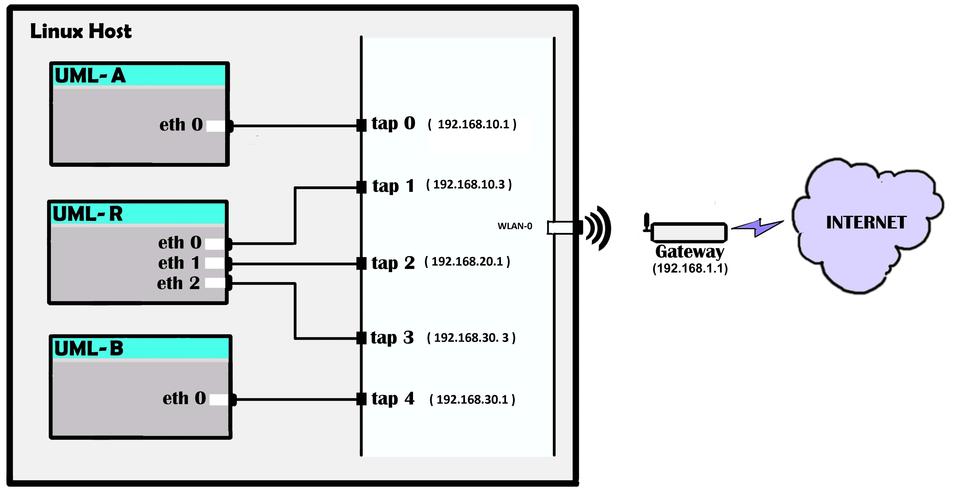
Figure 2. The Three UML Machines Once Booted Up
The IP address of the tap0 interface is 192.168.10.1. Let's assign an IP address from the same subnet to eth0 (in UML-A) and eth0 (in UML-R). Similarly, the IP address of the tap4 interface is 192.168.30.1. Assign the same subnet IP address to eth0 (in UML-B) and eth2 (in UML-R). You can add these commands in an init script to automate these configurations.
Add the commands below to the /etc/rc.local file in uml-filesystem-image-A. These commands will configure the “eth0” interface on UML-A with the IP address 192.168.10.2 and configure the gateway as 192.168.10.50 (the IP address of the eth0 interface in UML-R) on bootup:
ifconfig eth0 192.168.10.2  netmask 255.255.255.0 up
route add default gw 192.168.10.50
Similarly, add the commands below to /etc/rc.local in uml-filesystem-image-B. This command configures the “eth0” interface on UML-B with the 192.168.30.2 IP address and configures the gateway as 192.168.30.50 (the IP address of the eth2 interface in UML-R) on bootup:
ifconfig eth0 192.168.30.2  netmask 255.255.255.0 up
route add default gw 192.168.30.50
Let's configure one interface on UML-R with the 192.168.10.0/24 subnet IP address and another with the 192.168.30.0/24 subnet IP address. These interfaces are the gateways of UML-A and UML-B. Packets from UML-A and UML-B will route through these interfaces on UML-R. The last interface of UML-R is in the 192.168.20.0/24 subnet. The gateway of UML-R should be an IP address on the host machine, because you ultimately need packets to reach the host machine and route through the host machine's default gateway to the Internet. Because UML-R is the gateway for UML-A and UML-B, you have to turn on ip_forward and add an iptable NAT rule in UML-R. ip_forward tells the kernel stack to allow forwarding of packets. The iptable NAT rule is to masquerade packets.
Add the commands below to /etc/rc.local in uml-filesystem-image-R for this configuration on every UML-R bootup:
ifconfig eth0 192.168.10.50 netmask 255.255.255.0  up
ifconfig eth1 192.168.20.50 netmask 255.255.255.0 up
ifconfig eth2 192.168.30.50 netmask 255.255.255.0 up
route add default gw 192.168.20.1

echo 1 > /proc/sys/net/ipv4/ip_forward
iptables -t nat -A POSTROUTING -o eth1 -j MASQUERADE
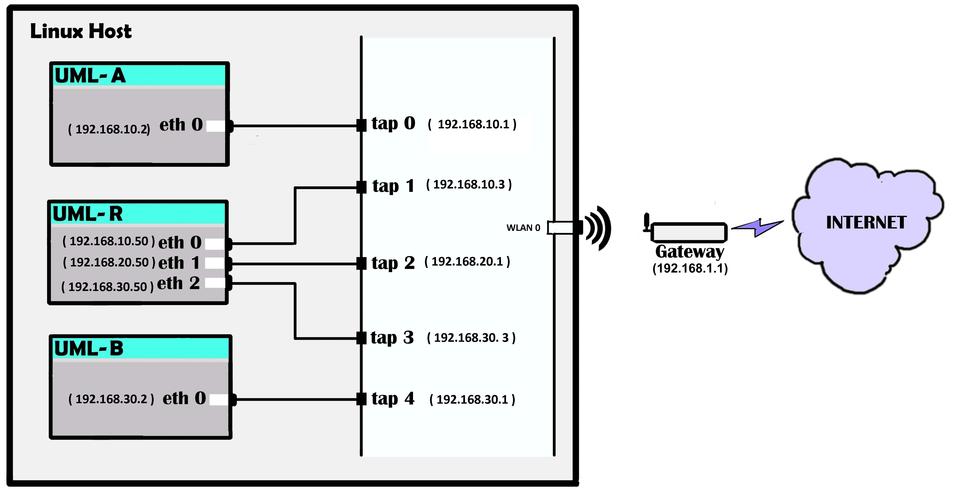
Figure 3. UML Machines, after Interfaces Are Assigned IP Addresses
The next task is to bridge the tap0 and tap1 interfaces and the tap3 and tap4 interfaces and assign IP addresses to these bridges. A bridge is a device that links two or more network segments. This is very similar to a network hub device. You can create a software bridge device on Linux using the brctl utility. You can add or delete interfaces to a bridge.
As I mentioned earlier, whatever you send in the eth interface, you can see in its corresponding tap interface. You have three UML machines up and running. Now it's time to configure the host Linux machine to route packets correctly.
Create a bridge (br0), add the tap interface of UML-A and one tap interface of UML-R to br0.
Create a bridge (br1), add the tap interface of UML-B and one tap interface of UML-R to br1.
Assign an IP address to br0 from the same subnet of UML-A's eth0 interface IP address.
Assign an IP address to br1 from the same subnet of UML-B's eth0 interface IP address.
Assign an IP address to the third interface of UML-R and its tap interface from the same subnet.
Flush the iptables filter rule on the host Linux machine so that the firewall won't drop any packets.
Add the Masquerade NAT rule on the host Linux machine.
Enable ip_forward on the host Linux machine.
Executing steps 1 through 5—bridge tap0, tap1 to br0 and assign the 192.168.10.1 IP address (the gateway IP address of UML-R ):
root@ubuntu-lucid:~/root$ brctl addbr br0
root@ubuntu-lucid:~/root$ brctl addif br0 tap0
root@ubuntu-lucid:~/root$ brctl addif br0 tap1
root@ubuntu-lucid:~/root$ ifconfig br0 192.168.10.1
 ↪netmask 255.255.255.0    up
Bridge tap3, tap4 to br1 and assign an 192.168.30.1 IP address:
root@ubuntu-lucid:~/root$ brctl  addbr br1
root@ubuntu-lucid:~/root$ brctl addif br1 tap3
root@ubuntu-lucid:~/root$ brctl addif br1 tap4
root@ubuntu-lucid:~/root$ ifconfig br1 192.168.30.1
 ↪netmask 255.255.255.0    up
Assign the tap2 IP address with 192.168.20.1:
root@ubuntu-lucid:~/root$ ifconfig tap2 192.168.20.1
 ↪netmask 255.255.255.0  up
Flush out the firewall rules in the host machine:
root@ubuntu-lucid:~/root$iptables -t nat -F
root@ubuntu-lucid:~/root$ipables  -F
At the end of step 5, you will get a setup like the one shown in Figure 4.
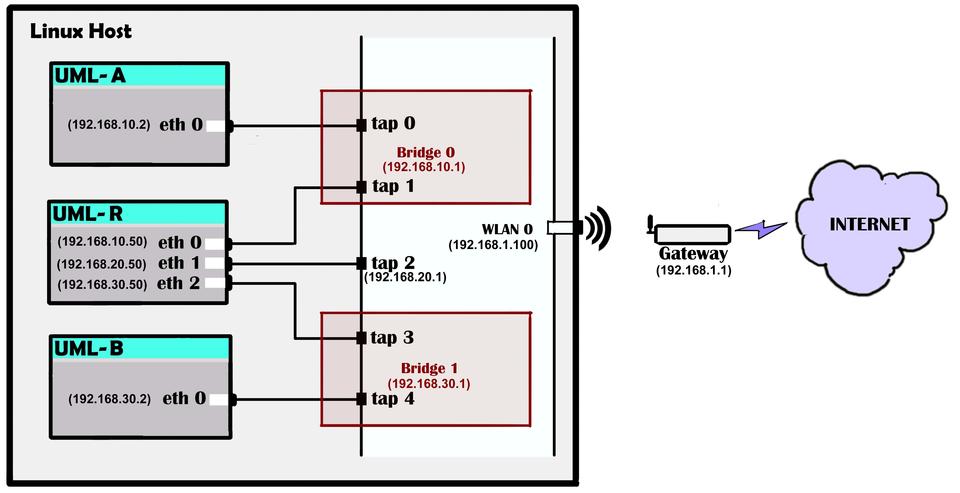
Figure 4. UML Machines, after Executing the setup_network_connections.sh Script
I have written a script (Listing 1) to automate all these tasks with comments added for easy readability. All you need to do is start UML-A, UML-R and UML-B in the same order and run the script on the host Linux machine. Note that “wlan0” is my host machine's default gateway interface; you will need to modify that with the correct interface name before executing this script.
Now the setup is ready, so if you ping www.google.com from UML-A, the icmp packet follows a path as shown in Figure 5.
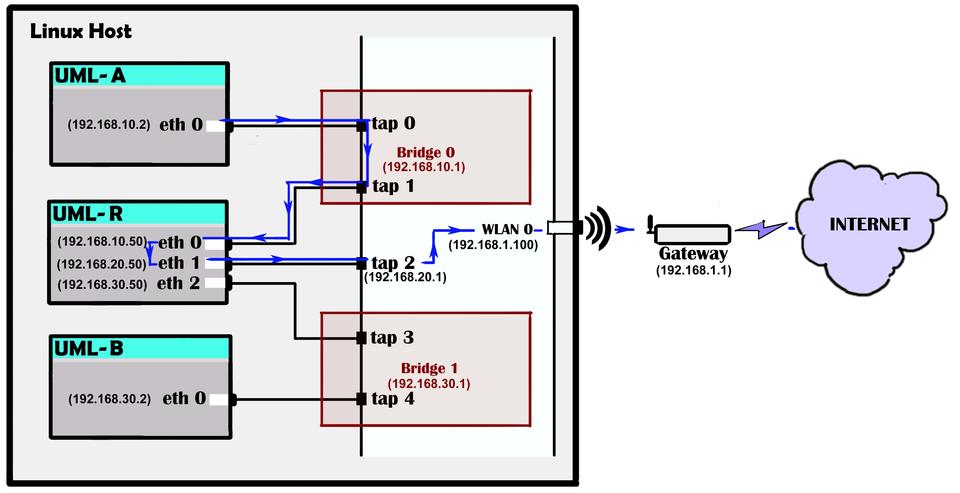
Figure 5. Packet Flow in the UML Network
How do you verify that packets are getting routed through UML-R? A utility called traceroute. The traceroute command will show all the hops in its path until the destination. Let's traceroute www.google.com from UML-A. Because www.google.com is a domain name, you have to resolve the domain name into a valid IP address. Add some valid DNS server names to the /etc/resolv.conf file in UML-A and UML-B.
I executed traceroute to 192.168.0.1 (my host machine's default gateway IP address) from UML-A. You can see from the output snapshot below that packets are routed through UML-R (192.168.10.50 is an IP address in the UML-R machine) then to the host machine (192.168.20.1 is an IP address in the host machine):
MachineA@/root# traceroute 192.168.0.1
traceroute to 192.168.0.1 (192.168.0.1), 30 hops max, 40 byte packets
 1  192.168.10.50 (192.168.10.50)  0.364 ms  0.232 ms  0.242 ms
 2  192.168.20.1 (192.168.20.1)  0.326 ms  0.293 ms  0.291 ms
 3  192.168.0.1 (192.168.0.1)  1.364 ms  1.375 ms  1.466 ms
It is not easy to develop or enhance a kernel module, because it is in kernel space (as I mentioned previously). UML helps here also. You can attach GDB to UML and do a step-by-step execution. Let's debug the ipt_REJECT.ko module in machine-R. ipt_REJECT.ko is a target module for iptable rules. Let's add filter rules on the UML-R machine. Filter rules are firewall rules by which you can selectively REJECT packets.
First, you need to make sure that ipt_REJECT is not built as part of the UML-R kernel. If it is part of the UML-R kernel, you need to run make menuconfig and unselect this module, and then rebuild the UML-R kernel again.
It is very easy to build a kernel module. You need three entities for a kernel module build:
Source code of the module.
Makefile.
Linux kernel source code.
ipt_REJECT.c is the source code of the ipt_REJECT.ko module. This file is part of the Linux kernel source code. Let's copy this file to a directory. You need to create a Makefile in the same directory. You can build this module and scp the module to the UML-R machine. There are two ways to copy files between UML and the host machine. One is with scp and the other is by mounting the UML filesystem locally and copying files to this mounted directory. The good part is that you can mount the UML filesystem even though the UML machine is running.
Here are the commands to build the ipt_REJECT.ko module:
root@ubuntu-lucid:~/root$ mkdir  /workout/
root@ubuntu-lucid:~/root$ cd /workout/
root@ubuntu-lucid:~/workout$ cp /workspace/linux-2.6.38/
↪net/ipv4/netfilter/ipt_REJECT.c  ./ipt_REJECT.c
root@ubuntu-lucid:~/workout$ echo "obj-m := ipt_REJECT.o"
 ↪> ./Makefile
root@ubuntu-lucid:~/workout$ make -C /workspace/linux-2.6.38/
 ↪M=`pwd` modules ARCH=um SUBARCH=i386
root@ubuntu-lucid:~/workout$ scp ipt_REJECT.ko
 ↪root@192.168.10.50:/tmp/
Let's see the capability of the REJECT target module. Remove all the filter rules in UML-R:
MachineR@/root# iptables -F
Ping www.google.com from MachineA:
MachineA@/root$ ping www.google.com
You can ping www.google.com because there are no filter rules loaded in the UML-R machine. UML-R is the default gateway machine for UML-A.
Now, insmod the REJECT module, and add a rule in the filter table to block all icmp packets in the UML-R machine:
MachineR@/root# insmod /tmp/ipt_REJECT.ko
MachineR@/root# iptables -A FORWARD -p icmp -j REJECT
Try to ping www.google.com from UML-A again:
MachineA@/root# ping www.google.com
ping would fail as the REJECT rule blocks ping packets (icmp packets). If you flush out the rules in UML-R (using iptables -F), icmp packets will start flowing again.
You can attach GDB to UML because UML is just a user-mode process. You need to know the UML's pid to attach to GDB. You can find the pid easily from umid (umid is nothing but an argument passed to the UML kernel):
root@ubuntu-lucid:/$ ./linux  ubda=uml-machine-R,./
↪uml-filesystem-image-R mem=256M  umid=router-uml-R
 ↪eth2=tuntap,,,192.168.10.3 eth3=tuntap,,,192.168.20.1
 ↪eth4=tuntap,,,192.168.30.3
Here, the umid is client-uml-R. The ~/.uml/router-uml-R/pid file contains the pid of the UML-R process.
Let's attach GDB to UML-R:
root@ubuntu-lucid:/$ pid=$(cat ~/.uml/router-uml-R/pid)
root@ubuntu-lucid:/$ gdb ./linux  $pid
The moment you attach GDB to UML-R, the Uml-R console stops execution. You can't type anything in UML-R. You can type c (“continue”) on the GDB prompt to make the UML-R prompt active:
(gdb) c
Detach GDB with the command q (“quit”) at the GDB prompt:
(gdb) q
You already have seen that the control reaches ipt_REJECT.ko when you pinged www.google.com from UML-A after loading an iptable REJECT rule in UML-R. You can attach GDB to UML-R and set a breakpoint in the ipt_REJECT.ko module code. ipt_REJECT.ko is an ELF file. ELF is an executable file format in the Linux OS. An ELF binary has many sections, and you can display those sections using the readelf command. In order to set a breakpoint, you need to load debug symbols to GDB and inform GDB about the “.text” section address of the module. “.text” is a code segment of the ELF binary.
You can find the code segment address from either the proc or sysfs file entry:
The proc entry: in the file /proc/modules.
The sysfs entry: in the file /sys/module/<module-name>/sections/.text.
Let's load the debug symbols and address of .text to GDB:
(gdb) add-symbol-file /workout/ipt_REJECT.ko <address_of_.text>
Now you can set the breakpoint in the ipt_REJECT.ko module. Open the ipt_REJECT.c file and check the functions available. Whenever an icmp packet flows through UML-R, the reject_tg() function gets called. Let's put a breakpoint in this function and try pinging from UML-A:
(gdb) b reject_tg
(gdb) c

MachineA@/root# ping www.google.com
Now control will hit the breakpoint, and it's time to print some variable in the module.
List the source code of the module:
(gdb) list
Print the sk_buff structure. sk_buff is the structure that holds a network packet. Each packet has an sk_buff structure (lxr.linux.no/#linux+v2.6.38/include/linux/skbuff.h#L319). Let's print all the fields in this structure:
(gdb) p *(struct sk_buff *)skb
You can use GDB's s command to do step execution. Press c or q to continue execution or to detach GDB from UML.
UML is a very versatile tool. You can create different kinds of network nodes using UML. You can debug most parts of the Linux kernel using UML. I don't consider UML to be a good tool for debugging device drivers, which has a direct dependency on a particular hardware. But certainly, it is an intelligent tool for understanding the TCP/IP stack, debugging kernel modules and so on. You can play with UML and learn a lot without doing any harm to your Linux machine. I bet you can become a Linux network expert in the near future.
