
No matter where you find yourself, there you are. And with AIDE, now you can develop code there too.
Android, as a platform, is one of the fastest growing on the planet. It is available on smartphones and a series of different tablet sizes. Most devices also include a full spectrum of sensors that are available to programs you install, so it's a very inviting platform for development. The usual workflow involves installing a development environment on some other machine, either a Windows or Linux desktop or laptop. You then do all of your code writing, compiling and debugging there before you actually copy it and install it onto your Android device.
But, there may be times when you want to develop on the road or shorten the cycle by developing on your Android device itself. One of the better options for this is AIDE, the Android Java IDE. AIDE is distributed under a freemium model. The free version allows you to develop, compile and run your code. It also allows you to install to the device on which AIDE is running. However, if you want to generate APK files that can be used to install onto other devices, you need to purchase the full version.
In this article, I start by explaining how to install AIDE and create a new program, and then I cover what is involved in coding, debugging and running your new program. For more information, see the Google+ page (https://plus.google.com/101304250883271700981/about).
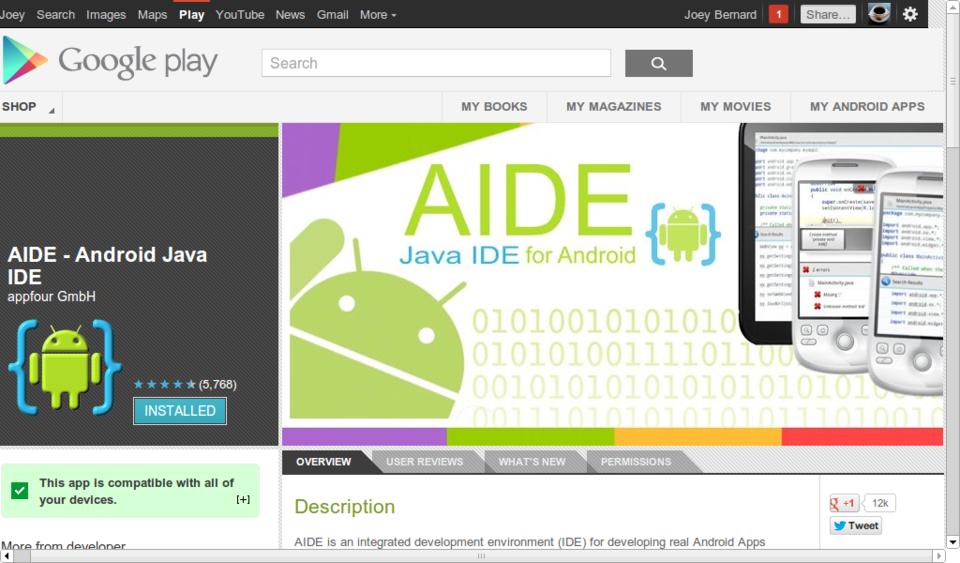
Figure 1. AIDE is available as a free download from the Google Play store.
The first step is to install AIDE on your Android device. Open up the Play Store and do a search for “AIDE”. The appropriate package should show up at the top of the list. If you are in doubt, verify that the developer is “appfour GmbH”. AIDE takes up more than 12MB, so if you are running short on space, you can transfer the majority of it to an SD card, leaving 4.45MB in your device's main storage.
The very first time you start AIDE, it will pop up a dialog box where you can enter the details for beginning a project. In this dialog, you can enter an App Name and a Package Name. You also can select an app template from some built-in ones, such as “Hello World”, “Tetris” and “Analog Clock Widget”. These templates will set up the folders and files for your new project.
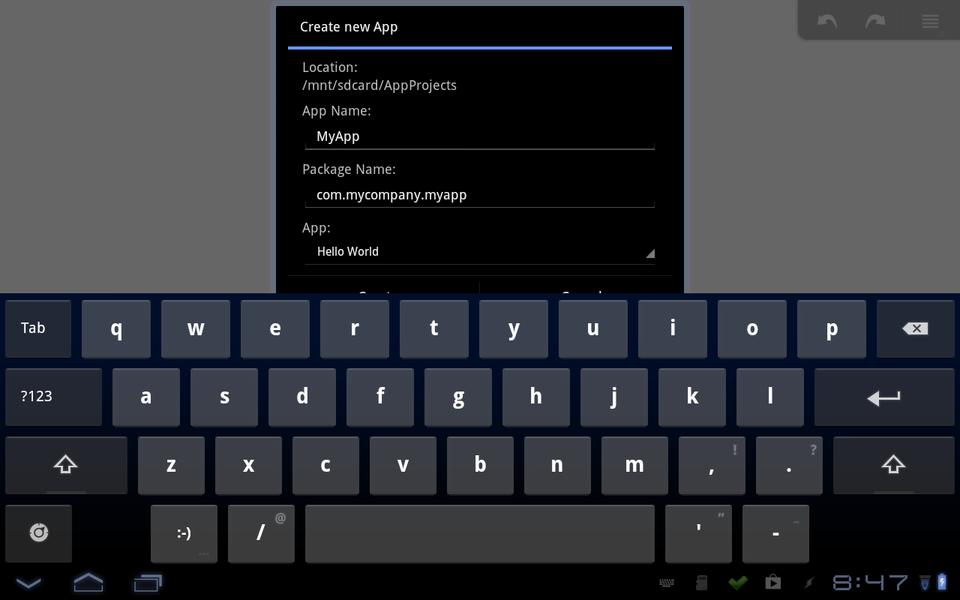
Figure 2. When AIDE starts up the first time, you are shown a dialog for your first project.
Once you click create, the files will be created in the folder /mnt/sdcard/appname (where appname is the name you gave your project), and this new project will be opened up in the IDE. The main part of the IDE consists of two panes. Their alignment depends on the size of the device on which you're running it. On my phone, the panes are one above the other, and on my tablet, the panes are side by side. The first pane is a file listing for your project, containing all the properties, resources and source files needed for an Android project. The second pane is the main editor, where the central file (MainActivity.java) gets loaded on project creation.
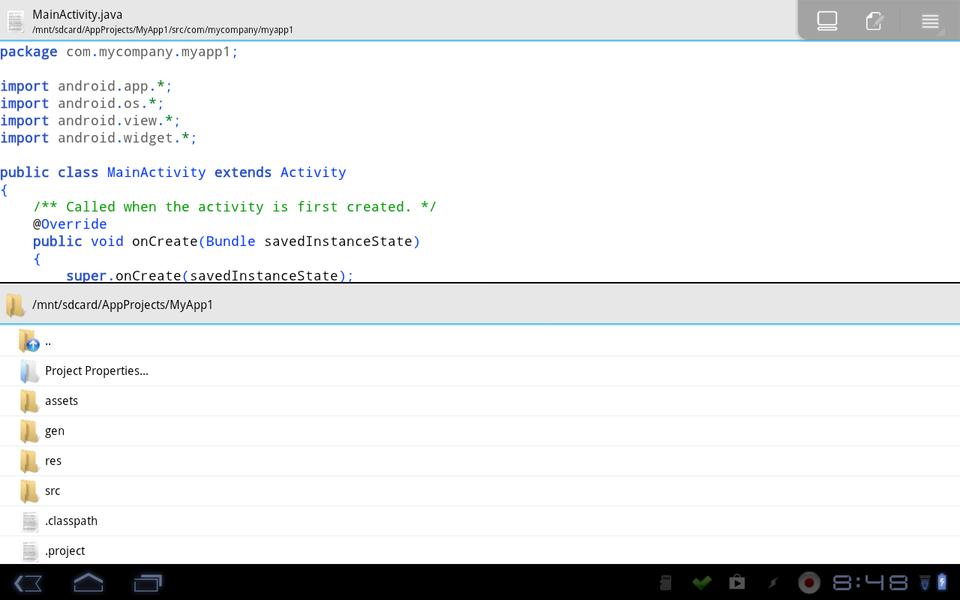
Figure 3. When you open a project, it gets pulled up into the IDE.
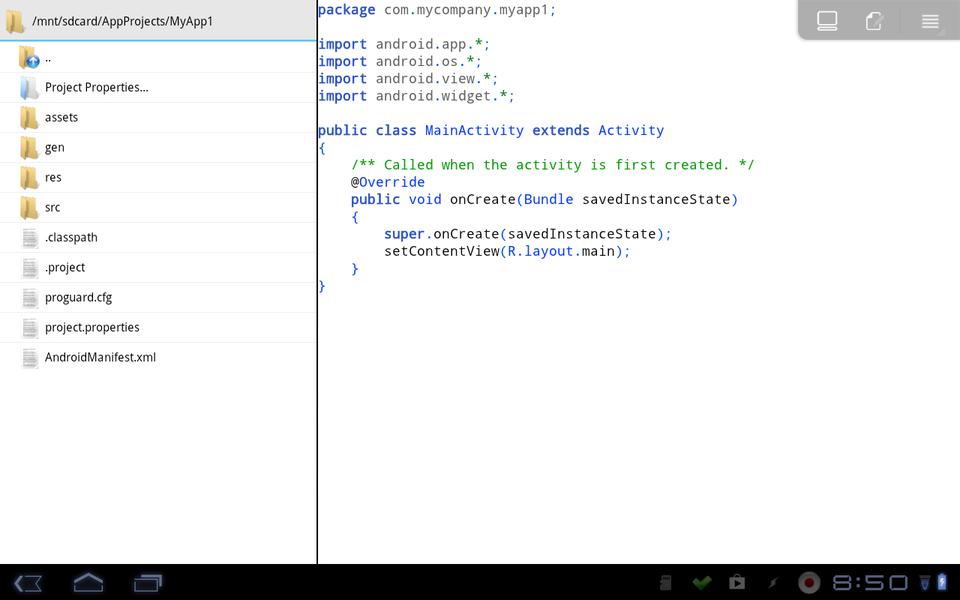
Figure 4. The tablet interface opens with panes side by side.
If you start with one of the templates, you can compile it and run it right away to see how the process works. Click on the menu button, and select the Run option. This will pop up a dialog, informing you of each step being done. It will compile your code, link it and create an APK file. In order to run it, this APK file needs to be installed. So an installation dialog will appear asking if you want to install it. Once installed, it then will start up, and you will have your very first Android application, developed completely on Android.
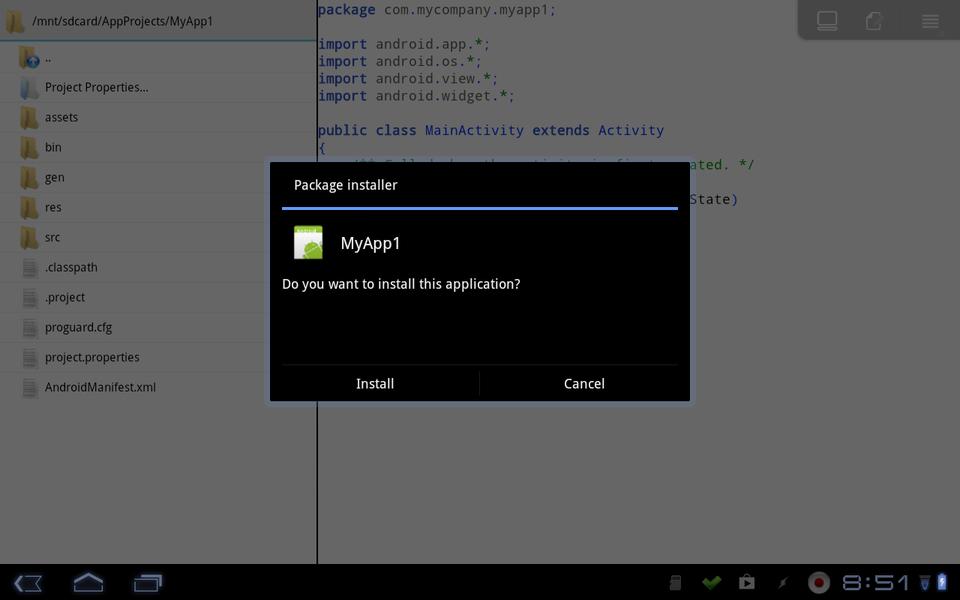
Figure 5. Security requires that you approve any app being installed.
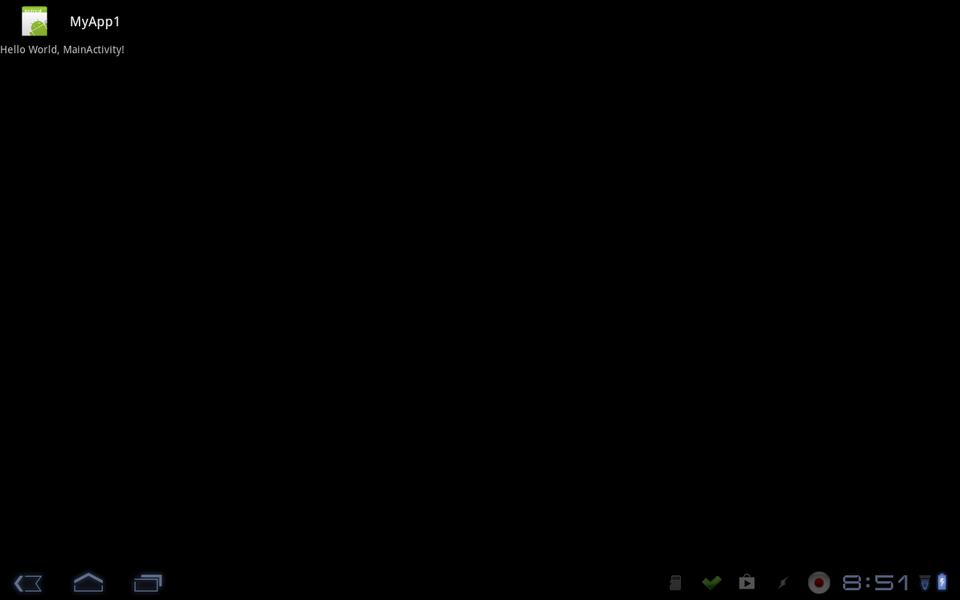
Figure 6. After compiling and installing, AIDE will run your new program.
All of the apps that you develop in AIDE are structured as projects. Anyone used to using IDEs, like Eclipse, should be familiar with that. This means if you want to work on a different app, you need to close the current project and open a new one. To close a project, click the menu button, select More and then Close Project. This still will leave you in the main directory of your current project.
To see your other projects, click on the “..” entry in the file pane to move up one directory. Here, you should see three standard entries, then a folder for each of your projects. The first entry is a tool to let you clone a Git repository to your Android device. The dialog that pops up allows you to enter a repository URL and a directory name. If you already have done some development work and have the code on Dropbox, you can download the relevant folder directly within AIDE.
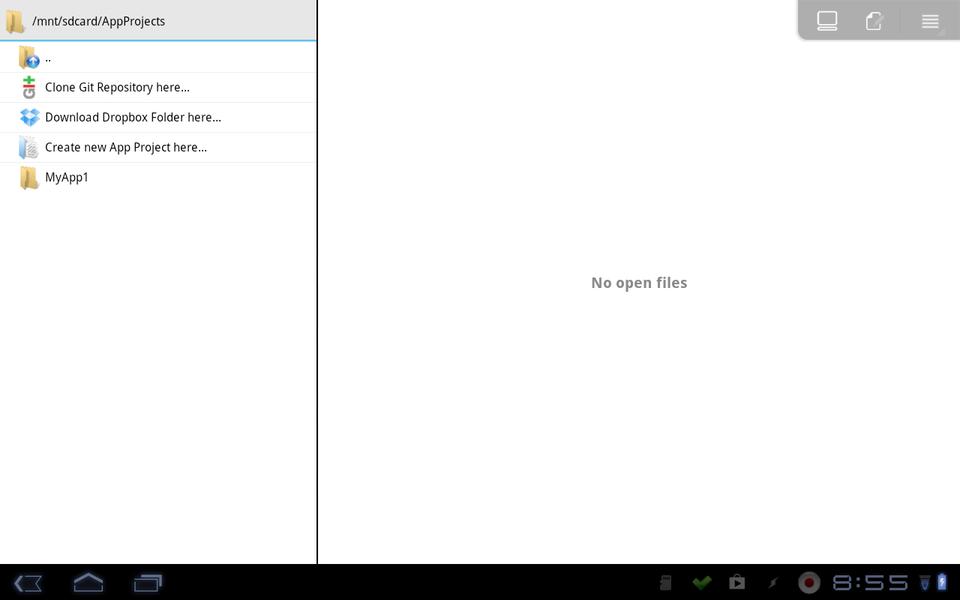
Figure 7. You can create new projects several different ways.
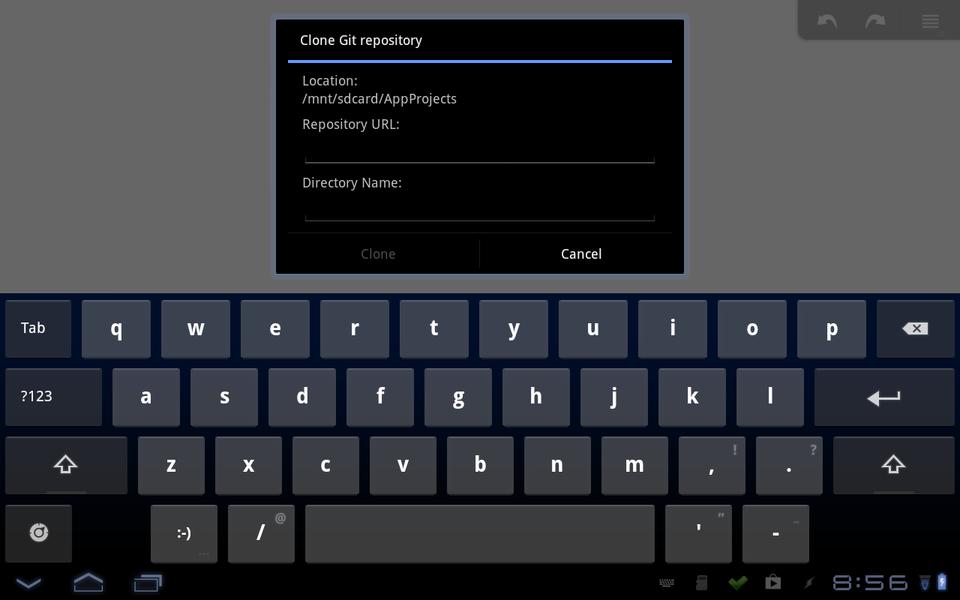
Figure 8. Cloning a Git repository is a fairly easy task.
The third option is to create a new project. Selecting this option brings up the dialog you saw when you started AIDE the very first time. To load a project into the IDE, it isn't enough simply to select the project folder. Within the folder is an option to “Open this App Project”. This loads all the meta information about your project, like its properties and resource file locations.
Now that you know a little about how projects are handled, let's start creating your very first app. If you have a project open right now, go ahead and close it. Change directories in the file pane until you are in the main directory for all of your projects. From here, you can select “Create new App Project here”, and name your project “MyFirstApp”. You can set the package name to whatever you like, as long as it follows the usual format. Also, be sure that you have selected the “Hello World” app template.
Once everything is filled in, go ahead and click the create button. This will create all of the required files and open the new project in the IDE. The file MainActivity.java extends the class “Activity”. This is the main class you will be dealing with when developing apps. Your app builds on this class and overrides the methods within it to make your app do its own thing.
The first method to override is “onCreate”. This method is called when your activity first is created. The usual tasks involve creating the graphical elements of your program and getting them initially rendered and displayed. The first step (super.onCreate) runs the code in the main class “Activity” to handle all of the OS-related tasks in creating a new activity. You then add your own code, usually GUI creation.
In the Hello World template, it includes a call to the “setContentView” method, which assigns a particular layout as the content view. The beginning value is the layout “R.layout.main”. Layouts are XML files, containing all the elements that make up your graphical interface. To get to this file, you can change to the directory res, then layout. Within this subdirectory, you will find XML files for each layout that is defined.
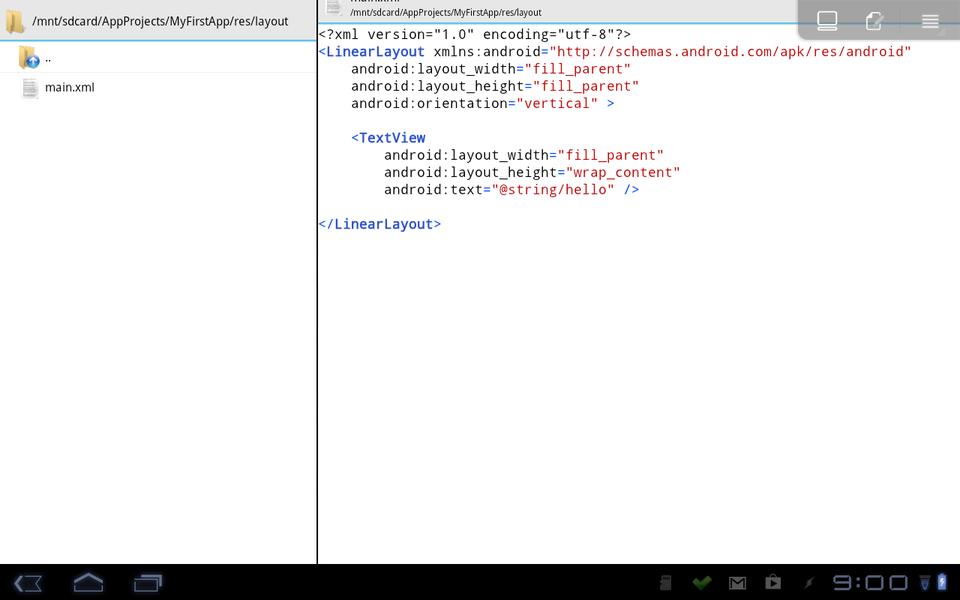
Figure 9. Layout files are stored in the subdirectory res/layout.
In this simple program, you just have a single file called main.xml. Selecting it in the file pane loads it into the editor pane. The outermost container in the XML file is the type of layout being defined. A number of options are available. In the Hello World template, the layout type being used is a LinearLayout. You can set a width and height for the entire layout with the properties android:layout_width and android:layout_height. In this example, let's leave the defaults of “fill_parent” for both. You also can set the display's orientation; in this case, it is vertical.
The individual elements for the graphical display are defined as internal XML containers within the outermost Layout container. In this example, there is a “TextView” object, where you can set various properties like the width, height or the text to be displayed. The proper way to include things like text strings, or anything else that may be reused, is to store them once as a resource and to refer to this string with a resource identifier. In this example, the identifier is “@string/hello”. The actual text string is stored in the file strings.xml, which is located in the directory res/values. The outermost container of this XML file is the tag “resources”. Within this, is the list of all of the resources available to your program. In this case, there are only two strings: one for the app name and one for the text content of the main window.
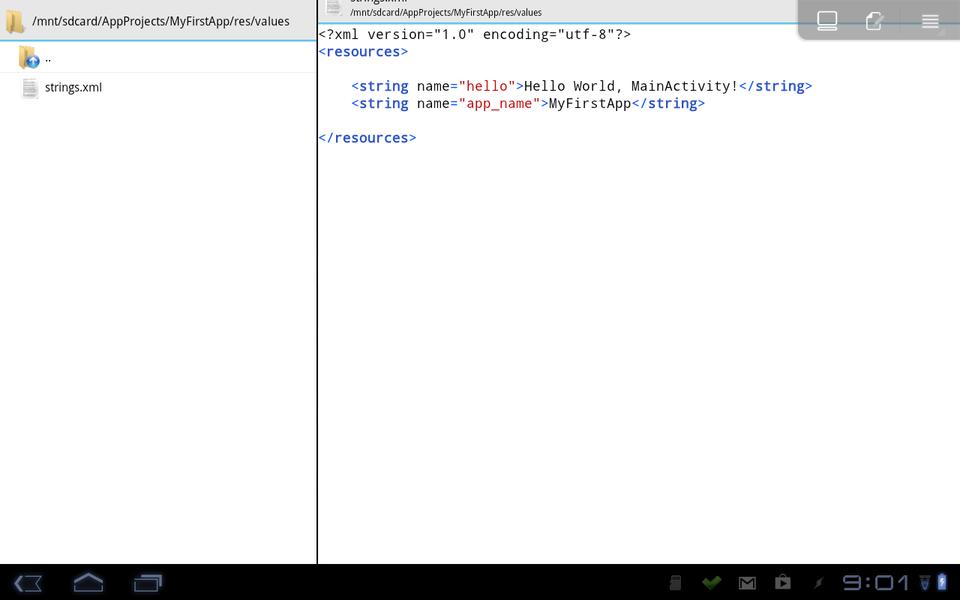
Figure 10. Resources for your program are stored in a series of XML files.
To this example, let's add a button to change the text being displayed. If you need to do any amount of typing, you will want to download and install a more complete soft keyboard or use an external Bluetooth keyboard. A good soft keyboard is the hacker's keyboard. It includes a lot of extra keys that are useful in code editing, including arrow keys to aid navigation and real control, Tab and Escape keys. Most soft keyboards included on Android devices lack these.
Open the main layout file, and below the TextView, add a new tag for a Button entry with the following code:
<Button
   android:layout_width="wrap_content"
   android:layout_height="wrap_content"
   android:text="@string/button_title" />
AIDE actually does a continuous code check to make sure there aren't any errors in the code. This means that while you are typing the above additions, you likely will see errors until you finally finish.
The editor includes tab completion, so you can start typing “<Butt” and then press Tab, and the editor will fill out the rest of the word for you. This is because “Button” actually is a special word in Android development.
Once you add the above, you can click the menu button, select More, and then select Refresh Build. This will try to do a full rebuild of your app, and you will see an error about the missing string resource. If you have multiple errors, clicking on the error in the list will bring you to the location where the error appears. To fix this particular error, you need to add the following text to the file res/values/strings.xml:
<string name="button_title">My Button</string>
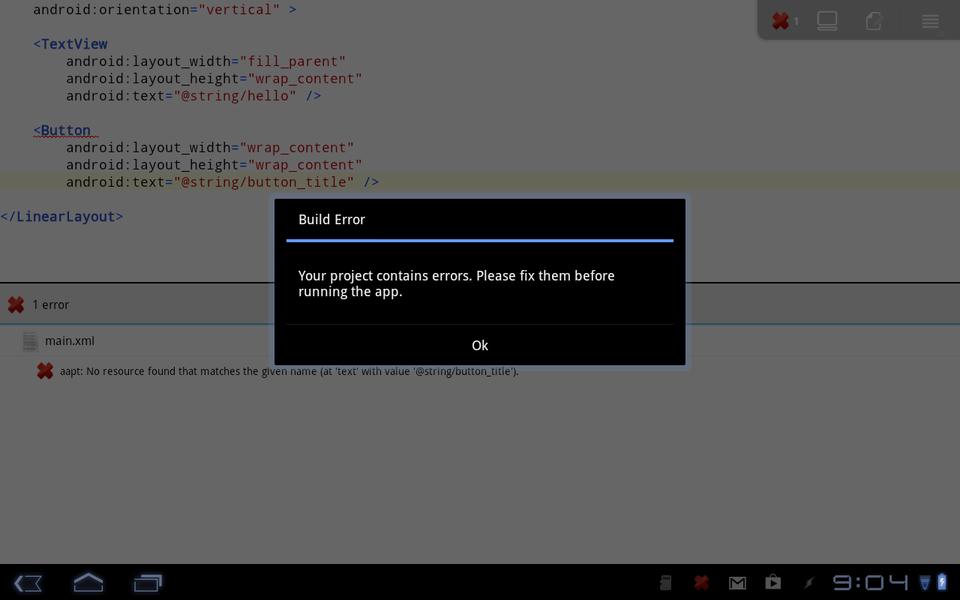
Figure 11. Any errors that crop up during a rebuild are listed here.
When you get to the end of this line and start typing “</”, the editor automatically will fill in the rest of the line for you. When you refresh the build, the error should go away, assuming that you haven't introduced any typos.
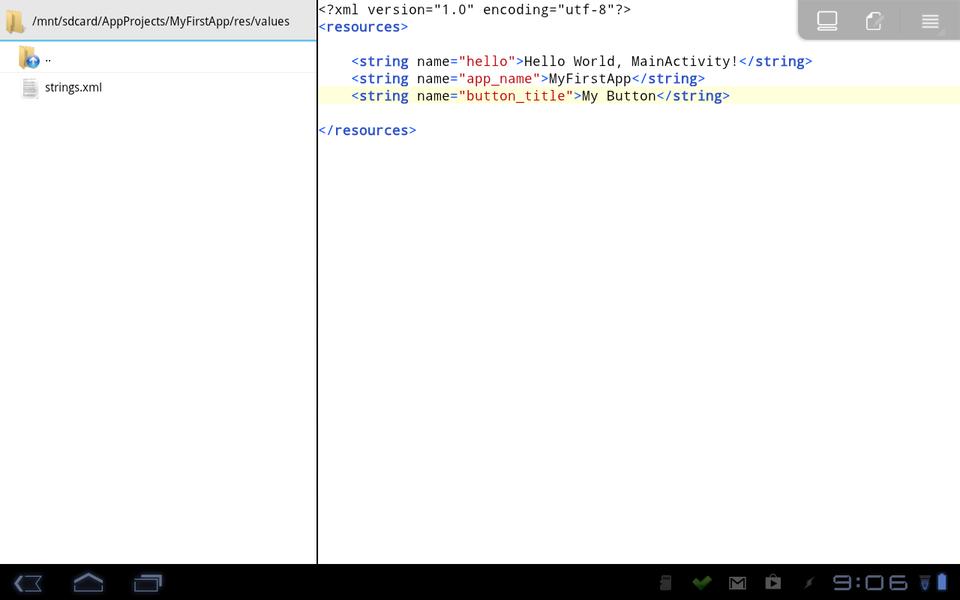
Figure 12. You can add new string resources to the file strings.xml.
Buttons are expected to trigger some reaction, however. This means you likely will want to add some kind of callback to a function in your button. This is handled within the layout file where the button is defined. You can add an extra property, “onClick”, which gives a method name to be called when the button is clicked. For example, you might have the following in the button definition:
android:onClick="my_method"
You then can add the function “my_method” to the file MainActivity.java. This new method needs to be public and return void. Also, the only input parameter is a View object. Because you want to change the text in the TextView object, you'll need to add an ID so that you can refer to it. In the main.xml file, add the following property to the TextView entry:
android:id="@+id/view_text"
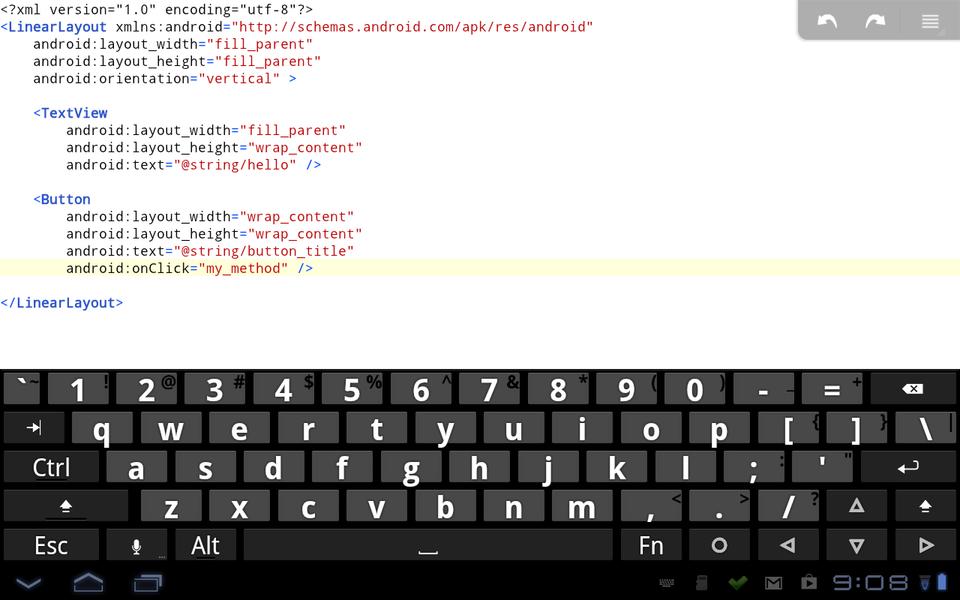
Figure 13. Add callbacks for buttons in the main.xml file.
You then can use “view_text” to access the text display. In the method “my_method”, you can get a reference to this text field with the line:
TextView tview = (TextView)findViewById(R.id.view_text);
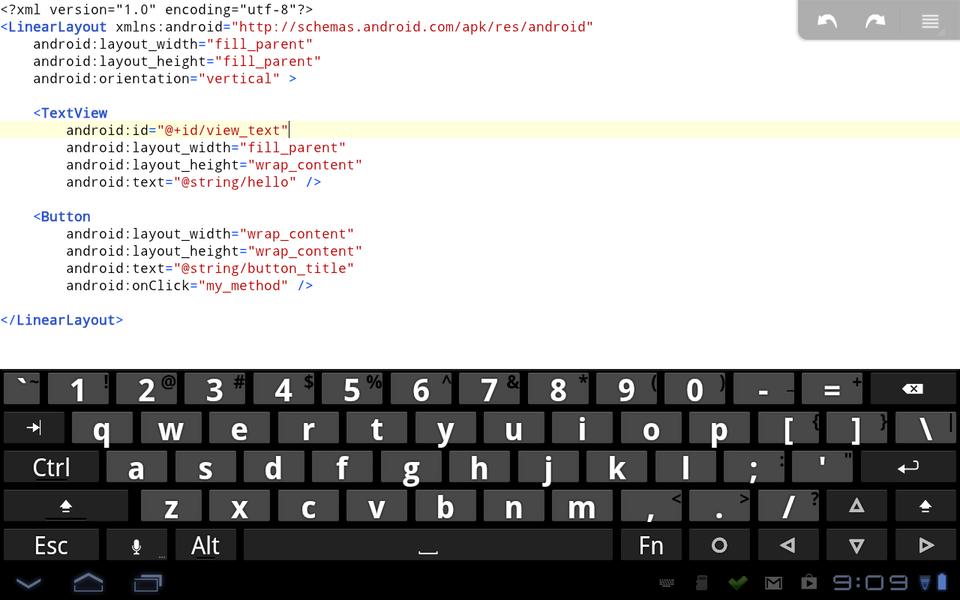
Figure 14. You need to add ID labels to interact with items in your program.
You then can reset the text to be “The button was clicked” with:
tview.setText("The button was clicked");
When you click Run, your program will be recompiled, re-installed and opened. Now you can see what happens when you click on the added button.
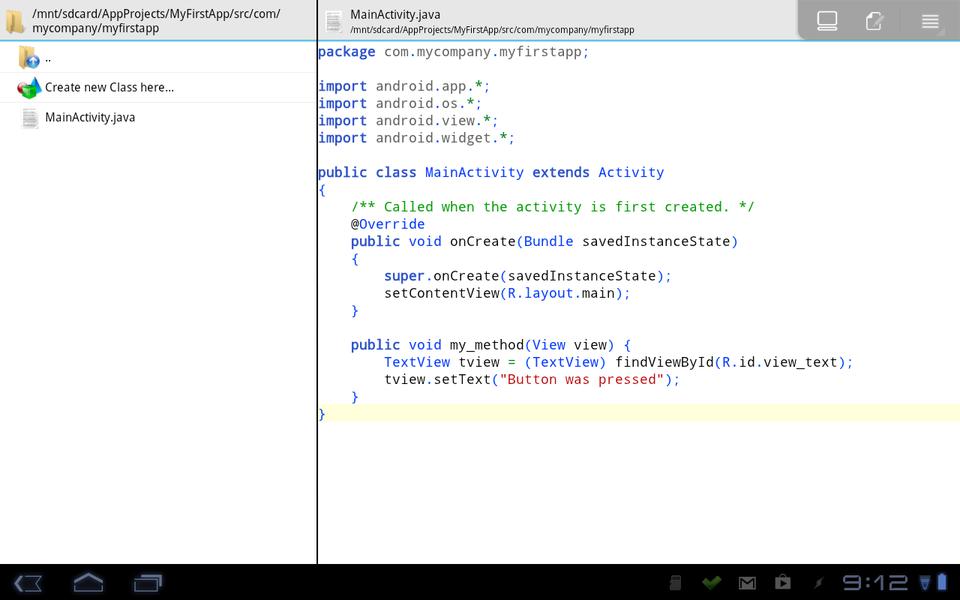
Figure 15. The actual callback code goes into MainActivity.java.
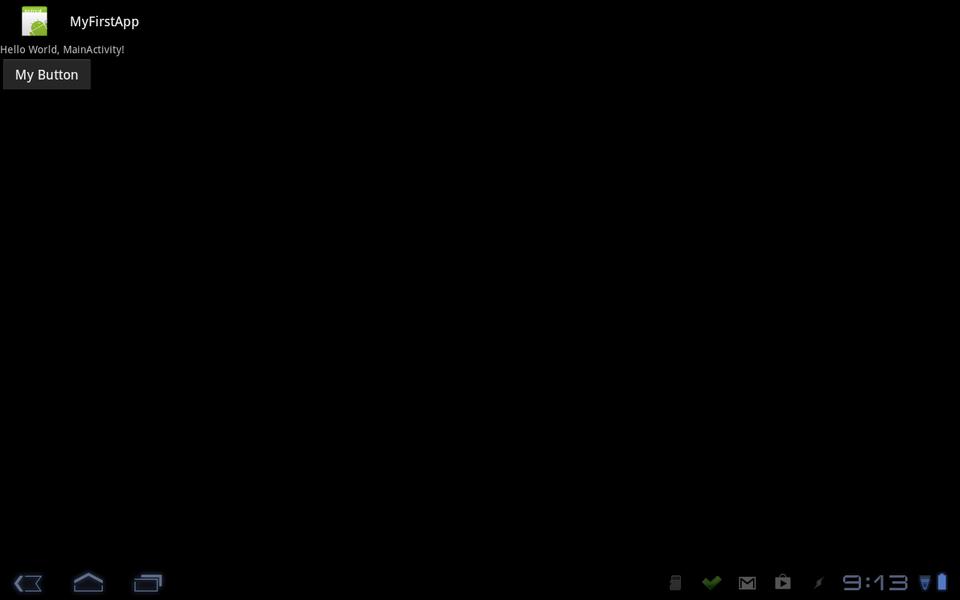
Figure 16. Before pressing the button.
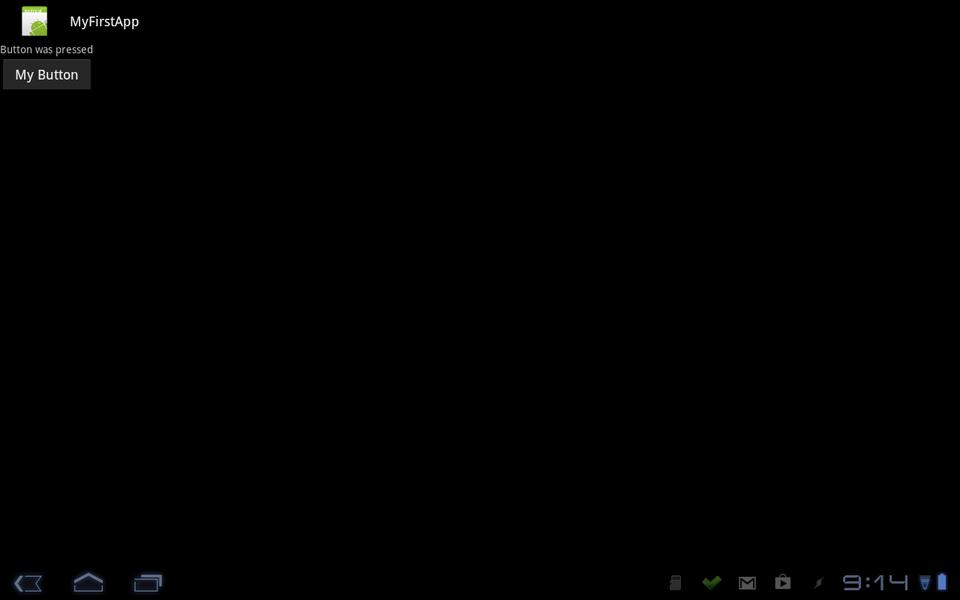
Figure 17. After pressing the button.

Figure 18. There are lots of functions in the menu not covered here.
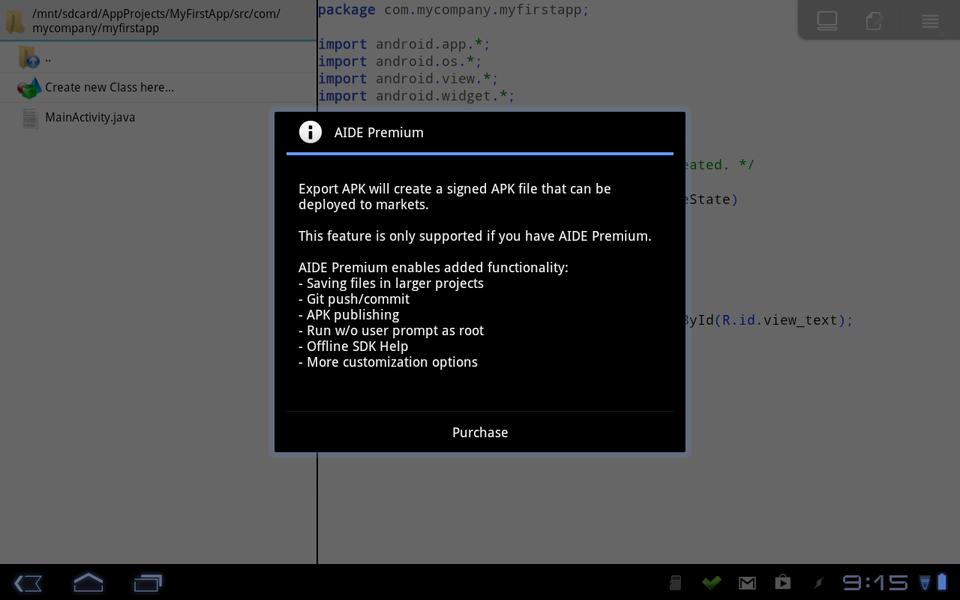
Figure 19. The premium version adds even more capabilities.
I've provided only a short introduction to AIDE and all of its super powers here. This article hasn't looked at more than the most basic features of an Android application. Lots of tutorials exist to get you up to speed in Android development, and now you can run through those tutorials on the go.
