Apache does more than serve Web pages, and now so can you.
I recently received a panicked call from a coworker who was doing a program demo for a client. The program was Java-based, so it needed to be deployed to a Java servlet engine. This coworker is a brilliant sysadmin and trainer, but was completely befuddled by Tomcat. So for this article, I'm giving a crash course on Tomcat administration and setup. If you've set up Java applications before, this article might be mundane, but if you don't know a JBoss from a Glassfish, read on.
A person easily could write a book on the various ways to host Java applications. There are tons of options, ranging from free and open to commercial and expensive. Usually, when someone talks about serving up a Java application, Tomcat is the servlet engine of choice. Why? Maybe it's the cool name. Maybe it's because it's from the Apache folks, so there's a level of trust. Maybe it's just because it works well. Whatever the reason, it's a very common way to deploy Java apps, so that's what I focus on here.
Like most open-source programs, Tomcat will run on multiple platforms. There is a Windows version, which actually is rather difficult to install properly. (Running Tomcat as a service in Windows has some weird issues that must be addressed.) Thankfully, running Tomcat under Linux is fairly simple, and it runs like any other service. Linux, we love you.
Installing Tomcat in Linux is so simple that I'm really only going to mention it. If you need a specific version of Tomcat, or need some specialty compilation options, it can be a little more complex. If you have needs that particular, however, chances are you know far more about Tomcat and Java deployment than this article covers anyway.
Basically, look in your distro's software repository for “Tomcat”. Note that Tomcat is a product from the fine folks at Apache. It's an entirely different product from the Apache Web server though. It would be a little less confusing if the Web server had a cool name, like “Apache Bearclaw”, to differentiate it from other Apache products, but sadly, we need to deal with the naming conventions as they are. Most people use the term “Apache” for the Web server dæmon and are confused with the idea of “Apache Tomcat” as a completely separate application.
Anyway, find the Tomcat version your distro provides and install it. It can be from the software center, apt-get, yum or however you install packages for your distro. Once it's installed, it should start automatically and be happily running on your system. By default, Tomcat runs on port 8080. (See, I told you it was different from the Apache Web server!)
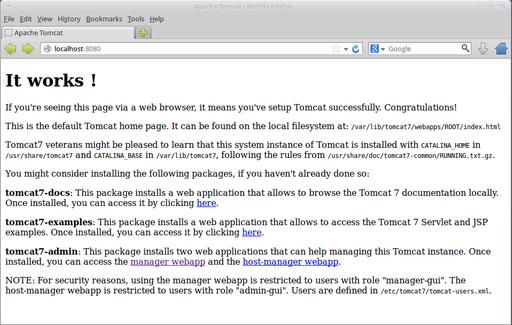
Before you deploy any Java applications, you should make sure things are working. The first thing to test is to go to http://localhost:8080 from your machine. (If it's a headless server, use the server's IP address from your workstation.) You should see a message similar to that shown in Figure 1. Of particular note, it mentions a few additional packages for installing. My example is in Ubuntu, so your distribution may include the management files with the program installation. Otherwise, like me, you'll need to install tomcat7-admin. I'm not going to do much with the management program here, but I want to install it, and point you in that direction for future exploration!

Figure 1. This looks similar to the Apache Web server's test page—and for good reason, it's from the same people!
Unfortunately, the Internet has some non-trustworthy folks attached to it. By default, Tomcat's admin package disables all access. If you try to click on that admin link (even after installing the package), you won't be able to log in. You should get a login prompt, but there aren't any logins enabled. For that, you need to edit /etc/tomcat7/tomcat-users.xml, like it says at the bottom of the “It Works!” page shown in Figure 1. Basically, you need to add a line like this to the file:
<user name="admin" password="password" roles="manager-gui" />
Note that using admin/password as your login and password is a horrible, horrible idea. But this is a magazine article, not a computer. It's very unlikely my imaginary server will get hacked. Yours, however, isn't safe. So use a good user/password combination!
Restart the Tomcat process. In Ubuntu, that means:
sudo service tomcat7 restart
Then, try to log in to the management app, located at http://localhost:8080/manager/. Obviously, replace localhost with your server name if you're not on the same machine. After entering your credentials, you should see something like Figure 2. It gives you some information about the server and also allows you to deploy WAR files directly via the Web interface. (More about that in a bit.) If you see the management console, you're in pretty good shape and have a functional Java Servlet Engine.
If anyone ever asked you to set up a Tomcat server, it's probably because he or she needs to deploy a WAR file. A WAR file (Web Application aRchive) is a set of Java files bundled up into a single file, ready to deploy onto a Servlet Engine. If Apache Tomcat were a Nintendo Entertainment System, the WAR file would be the game cartridge. Once the WAR file is deployed, it's available to use via the Web browser.
Let's deploy a WAR file to see how it works and see what actually happens. For my sample, I downloaded a sample WAR file from the Apache Foundation. If you don't have a favorite WAR file you want to deploy, you can play along at home by getting the sample WAR file from Apache. You can find one at tomcat.apache.org/tomcat-6.0-doc/appdev/sample/sample.war.
In order to deploy a WAR file, you need to copy it to the webapps folder. Its location may vary based on your distribution (or operating system, if you're a Windows user), but a quick search of your system should turn it up. In my Ubuntu server, the webapps folder is located at /var/lib/tomcat7/webapps/.
Tomcat will “hot deploy” a WAR file if it's copied to that folder, so simply do:
sudo cp sample.war /var/lib/tomcat7/webapps/
and you should be done. Nothing will be returned on the command line, but the Tomcat logs should show the application being deployed. Going back to the Web-based management app from Figure 2, you'd now see something like Figure 3, which shows the sample.war file fully deployed and active.
Now, if you go to http://localhost:8080/sample/, you should see the sample application fully deployed and working (Figure 4). Deploying other WAR files is basically the same process. Undeploying them can be done simply by deleting the WAR file from the webapps folder or clicking “Undeploy” in the Web-based management software. In fact, if you remember from my initial look at the management software, you actually can use the Web interface to deploy a WAR file, without ever needing to find the webapps folder on your own. This doesn't work for really large WAR files, as uploading via Web browser does have size limitations, but for most deployments, the management GUI works just fine.
Out of the box, Tomcat works pretty well and is fairly straightforward. Two of the most common requests are to change the port to 80 so that it functions without clients needing to enter port numbers into their browser. The other common request I get is to have an application deployed at the root level, so no folder name (like the /sample above) is required to access a single-purpose server. Thankfully, both are pretty simple.
Changing Ports:
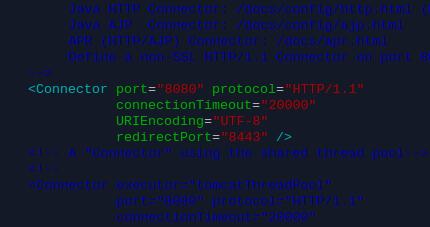
On your server, locate the server.xml file for your Tomcat install. On my Ubuntu box, that's in /etc/tomcat7/. In the server.xml file, you'll find a section that looks like Figure 5. If you change the port “8080” to “80”, it will tell the Tomcat server to listen on port 80 instead of the default 8080.

Figure 5. The syntax is confusing, but thankfully, you just need to change “8080” to “80”.
Unfortunately, because Tomcat runs as a nonroot user, telling it to listen on port 80 doesn't give the dæmon permissions to listen on the privileged port. For that, you need to grant permission. It may be a slightly different procedure on various distributions, but for Ubuntu, it's pretty straightforward. First, make sure the authbind package is installed. It most likely was installed with Tomcat, but just be sure it's installed and working. Then, edit /etc/default/tomcat7 and look for the line referencing AUTHBIND. (It's probably on the bottom of the file.) Uncomment the line, and change it to:
AUTHBIND=yes
Then, restart Tomcat:
sudo service tomcat7 restart
You should see no errors, and when you try to go to http://localhost/sample, you should see the same sample you deployed earlier, but this time, served from port 80. Note that there can be only a single dæmon listening on port 80, so you can't have the Apache Web server listening on port 80 (its default), and then expect Tomcat to work on the same port. Changing Tomcat to port 80 makes sense only if it's the only server trying to serve content on port 80. Hopefully, that makes sense.
Deploying an Application at the Root Level:
This last tidbit actually is quite simple, but it wasn't obvious to me at first. If you look in your webapps folder, you'll see there is a ROOT folder. That ROOT folder is what holds the “It Works!” page Tomcat delivers by default. If you want to put your application at the root level, it's just a matter of deleting that ROOT folder:
sudo rm -rf /var/lib/tomcat7/webapps/ROOT
(Note: be careful with rm -rf; that's some powerful stuff.)
Then, change the name of your WAR file to ROOT.war.
After that, simply deploy the WAR file like you did with the sample.war file, and it will be accessible at the root level of the Tomcat server—pretty simple!
This article is intended to get you started with Apache's Tomcat dæmon. There are plenty of tricks you can do in order to server Java applications alongside standard Web sites. You also can secure Tomcat with an SSL certificate just like a Web server. Once you understand how Tomcat works and how it's set up, it's far less scary to deploy Java apps in your production environment.
Next month, I plan to go further into setting up a heterogeneous environment that incorporates Java and standard Web apps. Plus, I want to give some tips on how to do all that from a single IP address. If you found this article interesting, you should be excited for next month!