
Brian describes how SSDs compare to HDDs with regard to longevity and reliability and provides the results from some real-world performance benchmarking.
I've been building computers since the 1990s, so I've seen a lot of new technologies work their way into the mainstream. Most were the steady, incremental improvements predicted by Moore's law, but others were game-changers, innovations that really rocketed performance forward in a surprising way. I remember booting up Quake after installing my first 3-D card—what a difference! My first boot off a solid-state drive (SSD) brought back that same feeling—wow, what a difference!
However, at a recent gathering of like-minded Linux users, I learned that many of my peers hadn't actually made the move to SSDs yet. Within that group, the primary reluctance to try a SSD boiled down to three main concerns:
I'm worried about their reliability; I hear they wear out.
I'm not sure if they work well with Linux.
I'm not sure an SSD really would make much of a difference on my system.
Luckily, these three concerns are based either on misunderstandings, outdated data, exaggeration or are just not correct.
How SSDs Differ from Hard Drives:
Traditional hard disk drives (HDDs) have two mechanical delays that can come into play when reading or writing files: pivoting the read/write head to be at the right radius and waiting until the platter rotates until the start of the file reaches the head (Figure 1). The time it takes for the drive to get in place to read a new file is called seek time. When you hear that unique hard drive chatter, that's the actuator arm moving around to access lots of different file locations. For example, my hard drive (a pretty typical 7,200 RPM consumer drive from 2011) has an average seek time of around 9ms.
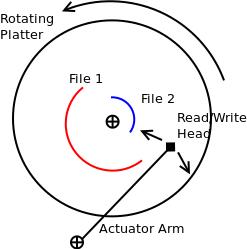
Figure 1. Hard Drive
Instead of rotating platters and read/write heads, solid-state drives store data to an array of Flash memory chips. As a result, when a new file is requested, the SSD's internal memory can find and start accessing the correct storage memory locations in sub-milliseconds. Although reading from Flash isn't terribly fast by itself, SSDs can read from several different chips in parallel to boost performance. This parallelism and the near-instantaneous seek times make solid-state drives significantly faster than hard drives in most benchmarks. My SSD (a pretty typical unit from 2012) has a seek time of 0.1ms—quite an improvement!
Reliability and Longevity:
Reliability numbers comparing HDDs and SSDs are surprisingly hard to find. Fail rate comparisons either didn't have enough years of data, or were based on old first-generation SSDs that don't represent drives currently on the market. Though SSDs reap the benefits of not having any moving parts (especially beneficial for mobile devices like laptops), the conventional wisdom is that current SSD fail rates are close to HDDs. Even if they're a few percentage points higher or lower, considering that both drive types have a nonzero failure rate, you're going to need to have a backup solution in either case.
Apart from reliability, SSDs do have a unique longevity issue, as the NAND Flash cells in storage have a unique life expectancy limitation. The longevity of each cell depends on what type of cell it is. Currently, there are three types of NAND Flash cells:
SLC (Single Later Cell) NAND: one bit per cell, ~100k writes.
MLC (Multi-Layer Cell) NAND: two bits per cell, ~10k to 3k writes, slower than SLC. The range in writes depends on the physical size of the cell—smaller cells are cheaper to manufacture, but can handle fewer writes.
TLC (Three-Layer Cell) NAND: ~1k writes, slower than MLC.
Interestingly, all three types of cells are using the same transistor structure behind the scenes. Clever engineers have found a way to make that single Flash cell hold more information in MLC or TLC mode, however. At programming time, they can use a low, medium-low, medium-high or high voltage to represent four unique states (two bits) in one single cell. The downside is that as the cell is written several thousand times, the oxide insulator at the bottom of the floating gate starts to degrade, and the amount of voltage required for each state increases (Figure 2). For SLC it's not a huge deal because the gap between states is so big, but for MLC, there are four states instead of two, so the amount of room between each state's voltage is shortened. For TLC's three bits of information there are six states, so the distances between each voltage range is even shorter.
The final twist is write amplification. Even though the OS is sending 1MB of data, the SSD actually may be doing more writes behind the scenes for things like wear leveling and inefficient garbage collection if TRIM support isn't enabled (see the TRIM section later in this article). Most real-world write amplification values I've seen are in the 1.1 to 3.0 range, depending on how compressible the data is and how clever the SSD is at garbage collection and wear leveling.
So, how long can you expect an SSD to last for you? Longevity depends on how much data you write, and the tune2fs utility makes it really easy to estimate that from your existing filesystems. Run tune2fs -l /dev/<device>. (Tip: if you're using LVM, the stats will be under the dm-X device instead of the sdaX device.) The key fields of interest are “Filesystem created” and “Lifetime writes”. Use those to figure out the average GB/day since the filesystem was created. For my laptop, it was 2.7GB/day, and for my workstation it was 6.3GB/day. With those rates, plus a rough guess for write amplification, you can estimate how much life you'd get out of any SSD.
Est. Lifespan (y) = SSDCapacity(GB) * (WriteLimit based on cell type)
                    -------------------------------------------------
                 DailyWriteRate (GB/day) * WriteAmplification * 365 (days/yr)
So if I was sizing a 256GB Samsung 840 Evo (which uses TLC cells), with a 6.3GB/day write rate and a write amplification of 3, it should give me around 37 years of service before losing the ability to write new data.
TRIM:
Undelete utilities work because when you delete a file, you're really only removing the filesystem's pointer to that file, leaving the file contents behind on the disk. The filesystem knows about the newly freed space and eventually will reuse it, but the drive doesn't. HDDs can overwrite data just as efficiently as writing to a new sector, so it doesn't really hurt them, but this can slow down SSDs' write operations, because they can't overwrite data efficiently.
An SSD organizes data internally into 4k pages and groups 128 pages into a 512k block. SSDs can write only into empty 4k pages and erase in big 512k block increments. This means that although SSDs can write very quickly, overwriting is a much slower process. The TRIM command keeps your SSD running at top speed by giving the filesystem a way to tell the SSD about deleted pages. This gives the drive a chance to do the slow overwriting procedures in the backgroupd, ensuring that you always have a large pool of empty 4k pages at your disposal.
Linux TRIM support is not enabled by default, but it's easy to add. One catch is that if you have additional software layers between your filesystem and SSD, those layers need to be TRIM-enabled too. For example, most of my systems have an SSD, with LUKS/dm-crypt for whole disk encryption, LVM for simple volume management and then, finally, an ext4 formatted filesystem. Here's how to turn on TRIM support, starting at the layer closest to the drive.
dm-crypt and LUKS:
If you're not using an encrypted filesystem, you can skip ahead to the LVM instructions. TRIM has been supported in dm-crypt since kernel 3.1. Modify /etc/crypttab, adding the discard keyword for the devices on SSDs:
#TargetName Device                             KeyFile  Options
sda5_crypt  UUID=9ebb4c49-37c3...d514ae18be09  none     luks,discard
Note: enabling TRIM on an encrypted partition does make it easier for attackers to brute-force attack the device, since they would now know which blocks are not in use.
LVM:
If you're not using LVM, you can skip ahead to the filesystem section. TRIM has been supported in LVM since kernel 2.6.36.
In the “devices” section of /etc/lvm/lvm.conf, add a line issue_discards = 1:
devices {
        ...
        issue_discards = 1
        ..
}
...
Filesystem:
Once you've done any required dm-crypt and LVM edits, update initramfs, then reboot:
sudo update-initramfs -u -k all
Although Btrfs, XFS, JFS and ext4 all support TRIM, I cover only ext4 here, as that seems to be the most widely used. To test ext4 TRIM support, try the manual TRIM command: fstrim <mountpoint>. If all goes well, the command will work for a while and exit. If it exits with any error, you know there's something wrong in the setup between the filesystem and the device. Recheck your LVM and dm-crypt setup.
Here's an example of the output for / (which is set up for TRIM) and /boot (which is not):
~$ sudo fstrim /
~$ sudo fstrim /boot
fstrim: /boot: FITRIM ioctl failed: Inappropriate ioctl for device
If the manual command works, you can decide between between using the automatic TRIM built in to the ext4 filesystem or running the fstrim command. The primary benefits of using automatic TRIM is that you don't have to think about it, and it nearly instantly will reclaim free space. One down side of automatic TRIM is that if your drive doesn't have good garbage-collection logic, file deletion can be slow. Another negative is that if the drive runs TRIM quickly, you have no chance of getting your data back via an undelete utility. On drives where I have plenty of free space, I use the fstrim command via cron. On drives where space is tight, I use the automatic ext4 method.
If you want to go the automatic route, enabling automatic TRIM is easy—just add the discard option to the options section of the relevant /etc/fstab entries. For manual TRIM, just put the fstrim <mountpoint> in a cron job or run it by hand at your leisure.
Regardless of whether you use the discard option, you probably want to add the noatime option to /etc/fstab. With atime on (the default), each time a file is accessed, the access time is updated, consuming some of your precious write cycles. (Some tutorials ask you to include nodiratime too, but noatime is sufficient.) Because most applications don't use the atime timestamp, turning it off should improve the drive's longevity:
/dev/mapper/baldyl-root / ext4 noatime,discard,errors=remount-ro 0 1
Partition alignment:
When SSDs first were released, many of the disk partitioning systems still were based on old sector-based logic for placing partitions. This could cause a problem if the partition boundary didn't line up nicely with the SSD's internal 512k block erase size. Luckily, the major partitioning tools now default to 512k-compatible ranges:
fdisk uses a one megabyte boundary since util-linux version 2.17.1 (January 2010).
LVM uses a one megabyte boundary as the default since version 2.02.73 (August 2010).
If you're curious whether your partitions are aligned to the right boundaries, here's example output from an Intel X25-M SSD with an erase block size of 512k:
~$ sudo sfdisk -d /dev/sda
Warning: extended partition does not start at a cylinder boundary.
DOS and Linux will interpret the contents differently.
# partition table of /dev/sda
unit: sectors

/dev/sda1 : start=     2048, size=   497664, Id=83, bootable
/dev/sda2 : start=   501758, size=155799554, Id= 5
/dev/sda3 : start=        0, size=        0, Id= 0
/dev/sda4 : start=        0, size=        0, Id= 0
/dev/sda5 : start=   501760, size=155799552, Id=83
Since the primary partition (sda5) starts and ends at a number evenly divisible by 512, things look good.
Monitoring SSDs in Linux:
I already covered running tune2fs -l <device> as a good place to get statistics on a filesystem device, but those are reset each time you reformat the filesystem. What if you want to get a longer range of statistics, at the drive level? smartctl is the tool for that. SMART (Self-Monitoring, Analysis and Report Technology) is part of the ATA standard that provides a way for drives to track and report key statistics, originally for the purposes of predicting drive failures. Because drive write volume is so important to SSDs, most manufacturers are including this in the SMART output. Run sudo smartctl -a /dev/<device> on an SSD device, and you'll get a whole host of interesting statistics. If you see the message “Not in smartctl database” in the smartctl output, try building the latest version of smartmontools.
Each vendor's label for the statistic may be different, but you should be able to find fields like “Media_Wearout_Indicator” that will count down from 100 as the drive approaches the Flash wear limit and fields like “Lifetime_Writes” or “Host_Writes_32MiB” that indicate how much data has been written to the drive (Figure 3).
Swap: if your computer is actively using swap space, additional RAM probably is a better upgrade than an SSD. Given the fact that longevity is so tightly coupled with writes, the last thing you want is to be pumping multiple gigabytes of swap on and off the drive.
HDDs still have a role: if you have the space, you can get the best of both worlds by keeping your hard drive around. It's a great place for storing music, movies and other media that doesn't require fast I/O. Depending on how militant you want to be about SSD writes, you even can mount folders like /tmp, /var or even just /var/log on the HDD to keep SSD writes down. Linux's flexible mounting and partitioning tools make this a breeze.
SSD free space: SSDs run best when there's plenty of free space for them to use for wear leveling and garbage collection. Size up and manage your SSD to keep it less than 80% full.
Things that break TRIM: RAID setups can't pass TRIM through to the underlying drives, so use this mode with caution. In the BIOS, make sure your controller is set to AHCI mode and not IDE emulation, as IDE mode doesn't support TRIM and is slower in general.
Now let's get to the heart of the matter—practical, real-world examples of how an SSD will make common tasks faster.
Test Setup
Prior to benchmarking, I had one SSD for my Linux OS, another SSD for when I needed to boot in to Windows 7 and an HDD for storing media files and for doing low-throughput, high-volume work (like debugging JVM dumps or encoding video). I used partimage to back up the HDD, and then I used a Clonezilla bootable CD to clone my Linux SSD onto the HDD. Although most sources say you don't have to worry about fragmentation on ext4, I used the ext4 defrag utility e4defrag on the HDD just to give it the best shot at keeping up with the SSD.
Here's the hardware on the development workstation I used for benchmarking—pretty standard stuff:
CPU: 3.3GHz Intel Core i5-2500k CPU.
Motherboard: Gigabyte Z68A-D3H-B3 (Z68 chipset).
RAM: 8GB (2x4GB) of 1333 DDR3.
OS: Ubuntu 12.04 LTS (64-bit, kernel 3.5.0-39).
SSD: 128GB OCZ Vertex4.
HDD: 1TB Samsung Spinpoint F3, 7200 RPM, 32MB cache.
I picked a set of ten tests to try to showcase some typical Linux operations. I cleared the disk cache after each test with echo 3 | sudo tee /proc/sys/vm/drop_caches and rebooted after completing a set. I ran the set five times for each drive, and plotted the mean plus a 95% confidence interval on the bar charts shown below.
Boot Times:
Because I'm the only user on the test workstation and use whole-disk encryption, X is set up with automatic login. Once cryptsetup prompts me for my disk password, the system will go right past the typical GDM user login to my desktop. This complicates how to measure boot times, so to get the most accurate measurements, I used the bootchart package that provides a really cool Gantt chart showing the boot time of each component (partial output shown in Figure 4). I used the Xorg process start to indicate when X starts up, the start of the Dropbox panel applet to indicate when X is usable and subtracted the time spent in cryptsetup (its duration depends more on how many tries it takes me to type in my disk password than how fast any of the disks are). The SSD crushes the competition here.
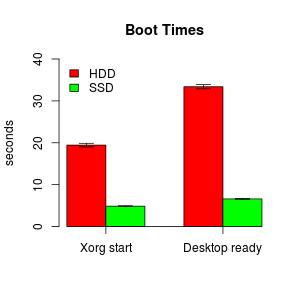
Figure 5. Boot Times
Application Start Times:
To test application start times, I measured the start times for Eclipse 4.3 (J2EE version), Team Fortress 2 (TF2) and Tomcat 7.0.42. Tomcat had four WAR files at about 50MB each to unpackage at start. Tomcat provides the server startup time in the logs, but I had to measure Eclipse and Team Fortress manually. I stopped timing Eclipse once the workspace was visible. For TF2, I used the time between pressing “Play” in the Steam client and when the TF2 “Play” menu appears.
Table 2. Application Launch Times
| Test | HDD (s) | SSD (s) | % Faster |
|---|---|---|---|
| Eclipse | 26.8 | 11.0 | 59% |
| Tomcat | 19.6 | 17.7 | 10% |
| TF2 | 72.2 | 67.1 | 7% |
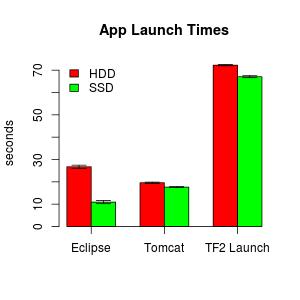
Figure 6. Application Launch Times
There was quite a bit of variation between the three applications, where Eclipse benefited from an SSD the most, and the gains in Tomcat and TF2 were present but less noticeable.
Single-File Operations:
To test single-file I/O speed, I created a ~256MB file via time dd if=/dev/zero of=f1 bs=1048576 count=256, copied it to a new file and then read it via cat, redirecting to /dev/null. I used the time utility to capture the real elapsed time for each test.
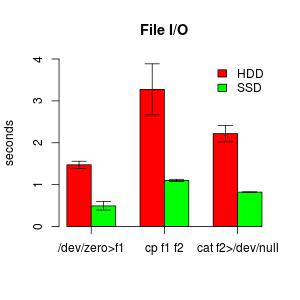
Figure 7. File I/O
Multiple File Operations:
First, I archived the 200k files in my 1.1GB Eclipse workspace via tar -c ~/workspace > w.tar to test archiving speed. Second, I used find -name "*.java" -exec fgrep "Foo" {} > /dev/null to simulate looking for a keyword in the 7k java files. I used the time utility to capture the real elapsed time for each test. Both tests made the HDD quite noisy, so I wasn't surprised to see a significant delta.
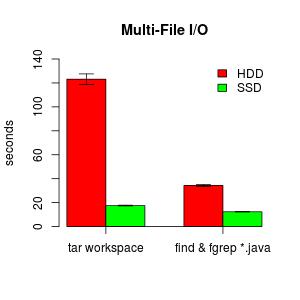
Figure 8. Multi-File I/O
If you haven't considered an SSD, or were holding back for any of the reasons mentioned here, I hope this article prompts you to take the plunge and try one out.
For reliability, modern SSDs are performing on par with HDDs. (You need a good backup, either way.) If you were concerned about longevity, you can use data from your existing system to approximate how long a current generation MLC or TLC drive would last.
SSD support has been in place in Linux for a while, and it works well even if you just do a default installation of a major Linux distribution. TRIM support, some ext4 tweaks and monitoring via tune2fs and smartctl are there to help you maintain and monitor overall SSD health.
Finally, some real-world performance benchmarks illustrate how an SSD will boost performance for any operation that uses disk storage, but especially ones that involve many different files.
Because even OS-only budget-sized SSDs can provide significant performance gains, I hope if you've been on the fence, you'll now give one a try.