
A look at some Android apps to help you get your job done.
Being a system administrator isn't simple, and being able to detect problems and quickly solve them from afar is quite an advantage. Server problems used to mean receiving an urgent phone call and then making a trip to a data center to fix whatever was needed. However, today's Android-powered phones (“phablets”) and tablets provide a vast array of tools to help you do away with most of the bother. You can monitor things remotely, receive alerts instantly and solve problems from wherever you are. In fact, given the sizes, CPUs and raw power of today's devices, it wouldn't be too far wide off the mark to say you can do anything for which you might otherwise require a desktop or laptop.
In this article, I first cover some tools for diagnostics and for server and services monitoring. Then I describe some other tools for remote access, so you can patch up things without going anywhere. I don't include tasks that are performed easily with common apps (say, Chrome for Webmin or PhpMyAdmin, Gmail for getting e-mail alerts and so on). Instead, I focus on more-specific, less-known Android apps.
I ran all the examples here on my home network, which includes a server, a couple Wi-Fi routers, several PCs, laptops and what not. I even added a virtual server running a couple services, and I set up Nagios monitoring for the servers. For extra variety, I also decided to keep an eye on an arbitrary external Web service (Open Weather Map, at api.openweathermap.org), whose public API I possibly might want to use for some application. All the tools I use will work equally well with public or private networks, so this setup won't affect your tests.
For starters, let's consider how to keep an eye on Web pages, services or servers. For Web pages, consider signing up for an on-line monitoring service (see Resources for a short list), which you can set up to be warned about failures and crashes by text message or e-mail. As a bonus, some of these companies even provide their own Android apps to check logs, run tests and more from your device. These services are quite simple to set up, so you can use them in addition to the other tools I consider here—more eyes on your systems can't hurt!
To check servers and services directly, I used to use Decaf Monitor, but nowadays I prefer Server Monitor, because I find its interface to be clearer, and it's easier to notice what isn't working right. (Of course, feel free to test both apps; they are rather similar in concept.)

Figure 1. Adding a New Server for Monitoring in Server Monitor
First, define what servers you want to monitor and give each a descriptive name, plus a hostname or IP address. Then, long-tap the server name and select “Add Component” to specify a port/service to check. (Tests can be done directly via TCP or over SSH.) Specify the component name (any description) and the port number. The main display will show your server, and below it, you'll see all of its components in green (“on-line”) or in red (“off-line”).
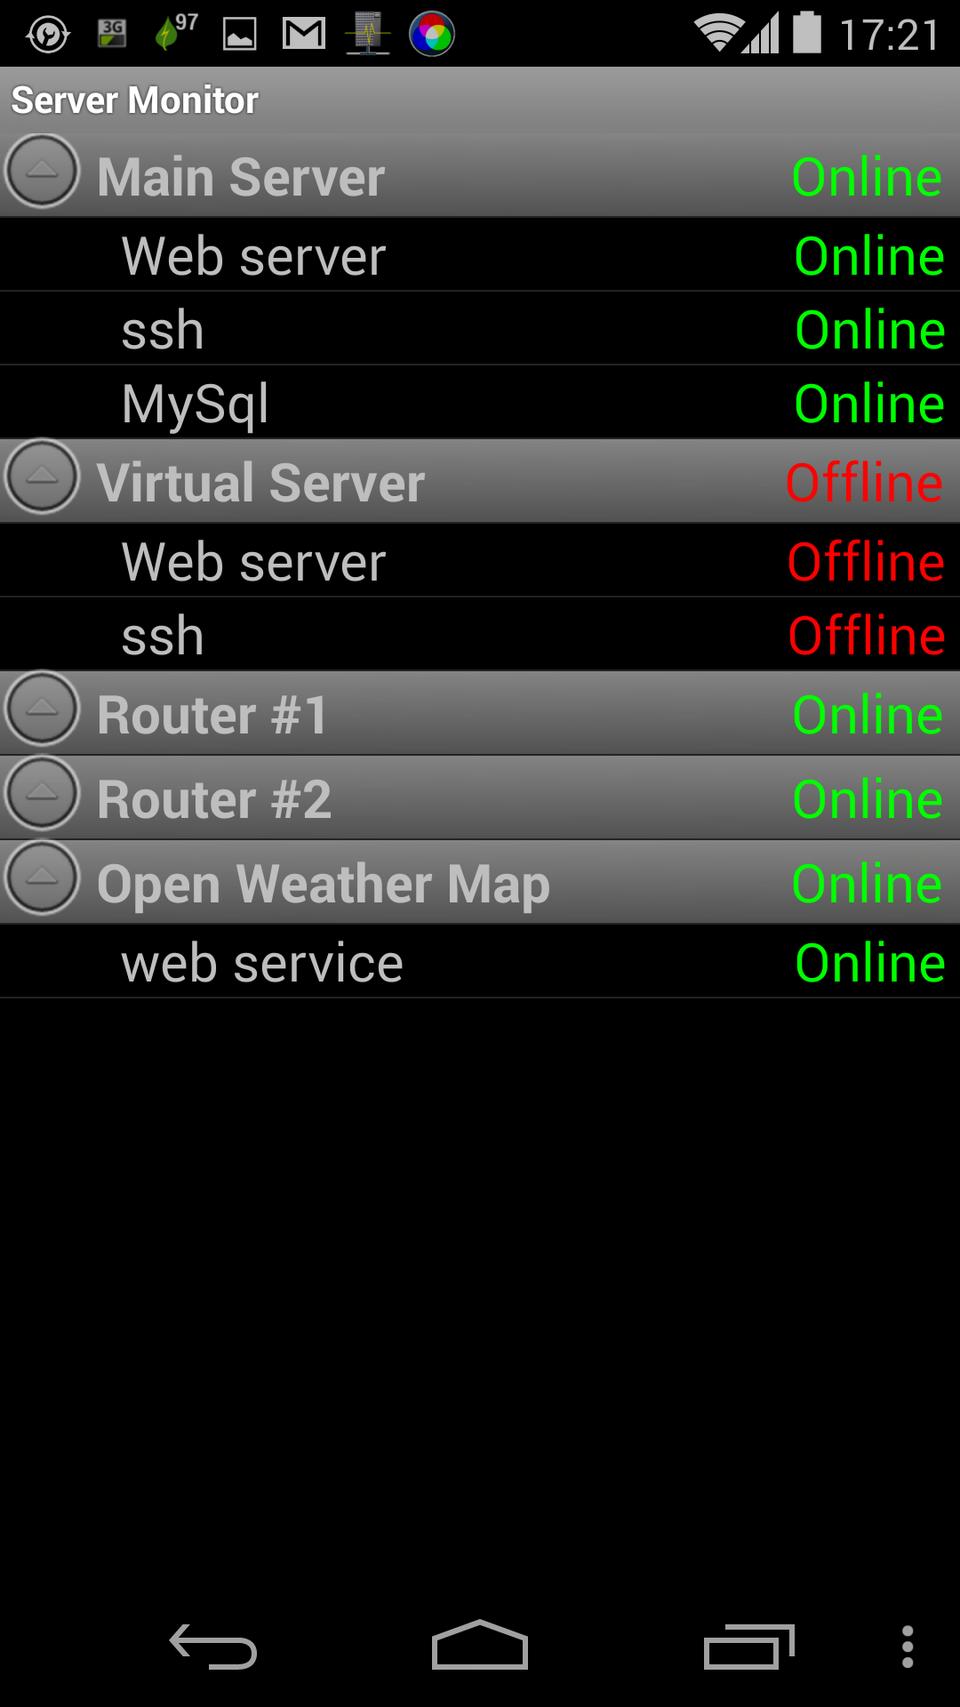
Figure 2. A problem is detected: the SSH service isn't running on a server.
Finally, go to “Settings”, and you can define whether Server Monitor will start at boot, choose the polling frequency and whether it will use sound and/or vibration to let you know if any monitored component isn't working. Server Monitor does its job simply and well, and it lets you keep an eye on servers from afar, so it's a worthy tool for your Android-monitoring bag of tricks.
For more specific and complex server setups, you probably will use a monitoring tool, such as Nagios. (There are other options, but that's what I use.) You can verify the status of all monitored servers and services over the Web, but aNag goes a bit further and does these verifications on its own and then presents a summary of results that you can analyze at a glance.
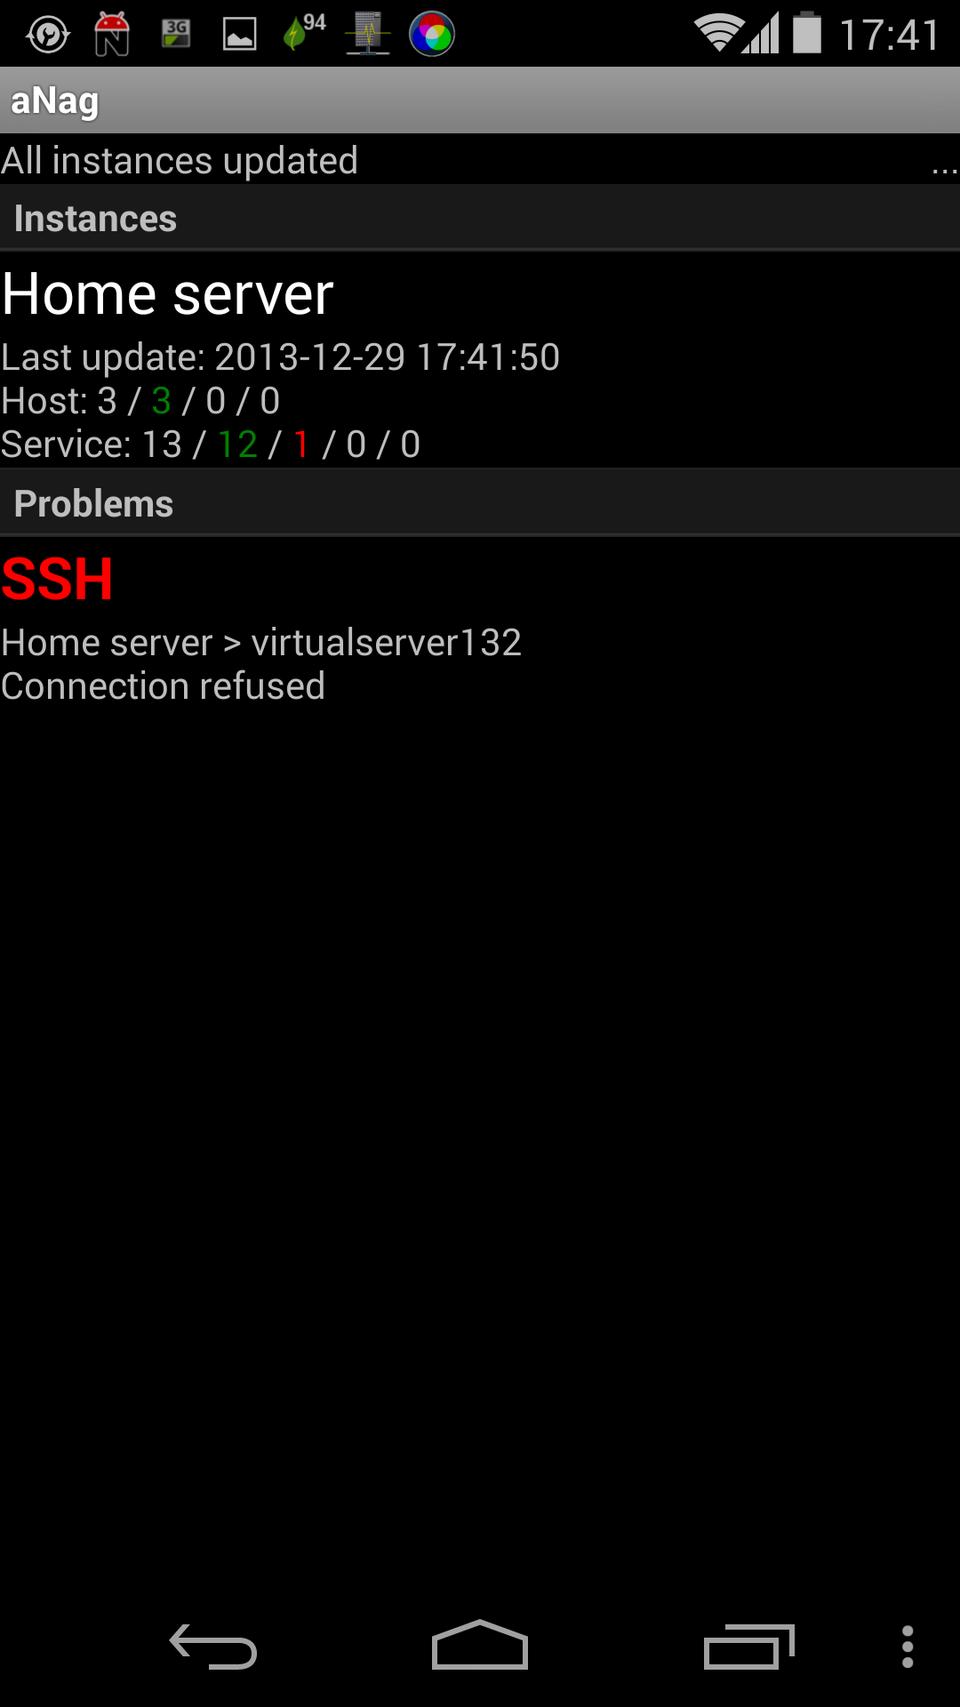
Figure 3. aNag shows that SSH isn't accepting connections on a server.
You even can opt for a widget, which will sit on your screen, updating itself periodically and warning you in the event of problems. Tapping on the widget produces a more detailed explanation. For more clarity, “T” means “Total”, “U” means “Up”, “D” is “down”, “O” is “okay”, “C” is “Critical”, “W” is “Warning”, and “U” is “Unknown”. For more details on those, check Nagios' documentation (see Resources).
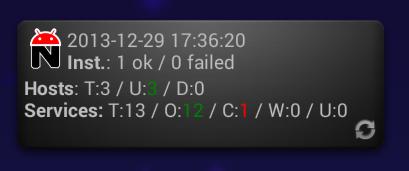
Figure 4. The aNag widget shows a critical problem with a service.
Basically, aNag works by connecting to your Nagios instances, scraping their Web pages, and summarizing and consolidating the information within in order to present it more compactly. To configure it, go to its settings, and define one or more Nagios instances. You'll need to specify its name, the URL for the CGI Web access excluding the final “status.cgi” (this parameter usually looks like http://your.own.site/nagios/cgi-bin/, but check your installation), user name and password for Nagios access, or possibly some extra parameters for custom authentication schemes.

Figure 5. To set up aNag, provide the details of all available Nagios instances it should watch.
While you are at the settings page, examine the multiple options in the Notification tab, which include not only several methods (vibration, sound, LED), but also an “Auto Silence” configuration (to avoid extra warnings after the first one) and “Quiet Hours” (periods of time during which you want no updates and no notifications). Additionally, you should set the “Auto update” delay (how often the test should run), and also take a look at all the other available configuration possibilities (there are too many to include here).
Another common problem is diagnosing a possibly faulty network, and for this kind of job, I use Fing Network Tools. (Its developer, Overlook Soft, also offers Fingbox for remote monitoring of your network by means of a locally installed sentinel, which is able not only to warn about network discoveries and events, but also to do services monitoring, server rebooting and more.) If you are curious about the name, it's a combination of two common command names, find and ping—just don't look up this word in Hungarian!
Fing's main screen provides a network discovery report, which shows all equipment (Wi-Fi, Ethernet) in your current network.
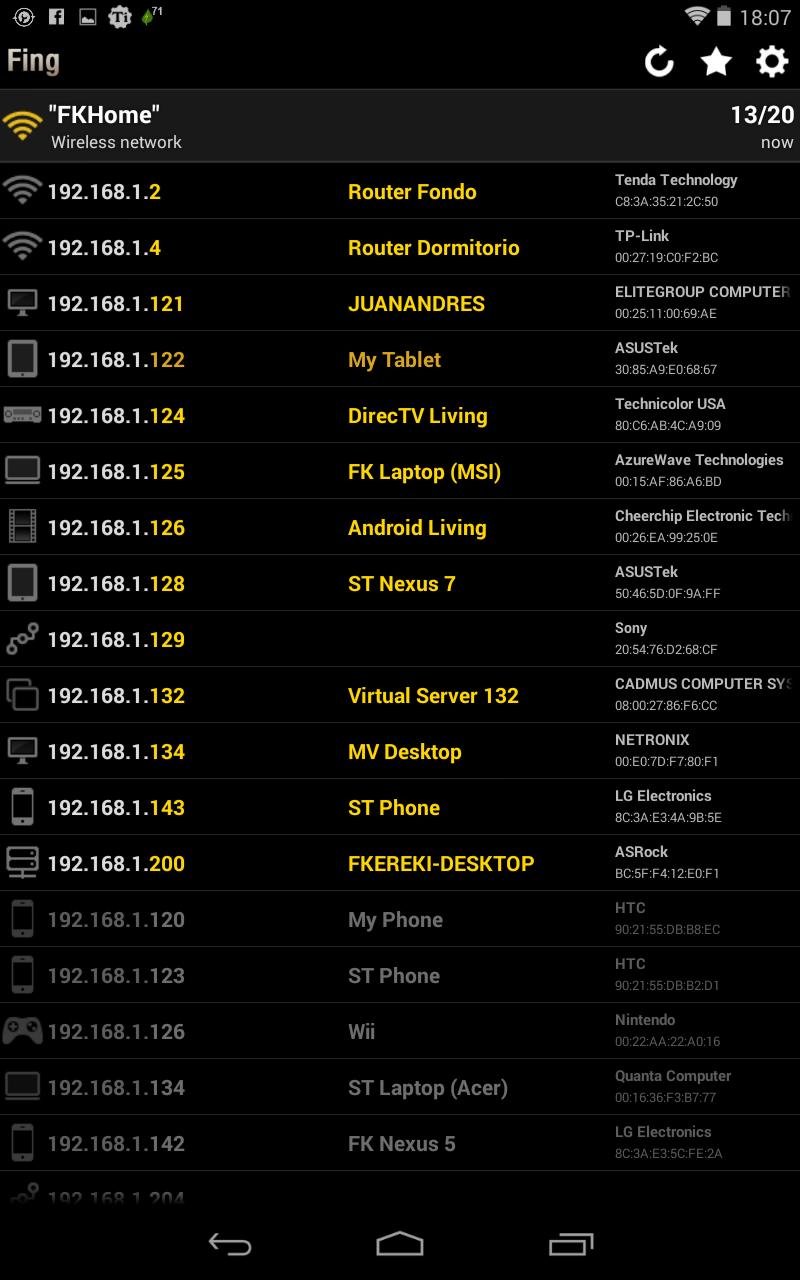
Figure 6. Fing's network discovery function provides a clear view of your network.
Tap on any entry to get full details, including IP address, MAC address, vendor, NetBIOS data (Domain, Name, User and Role) and more. You also can choose an appropriate icon, name and description for each piece of equipment. Plus, you can tap on “Scan Services” to determine all open ports, “Ping” and “Trace Route” (the equivalents of the command-line ping and traceroute commands), and “Wake on LAN” to wake up a computer remotely.
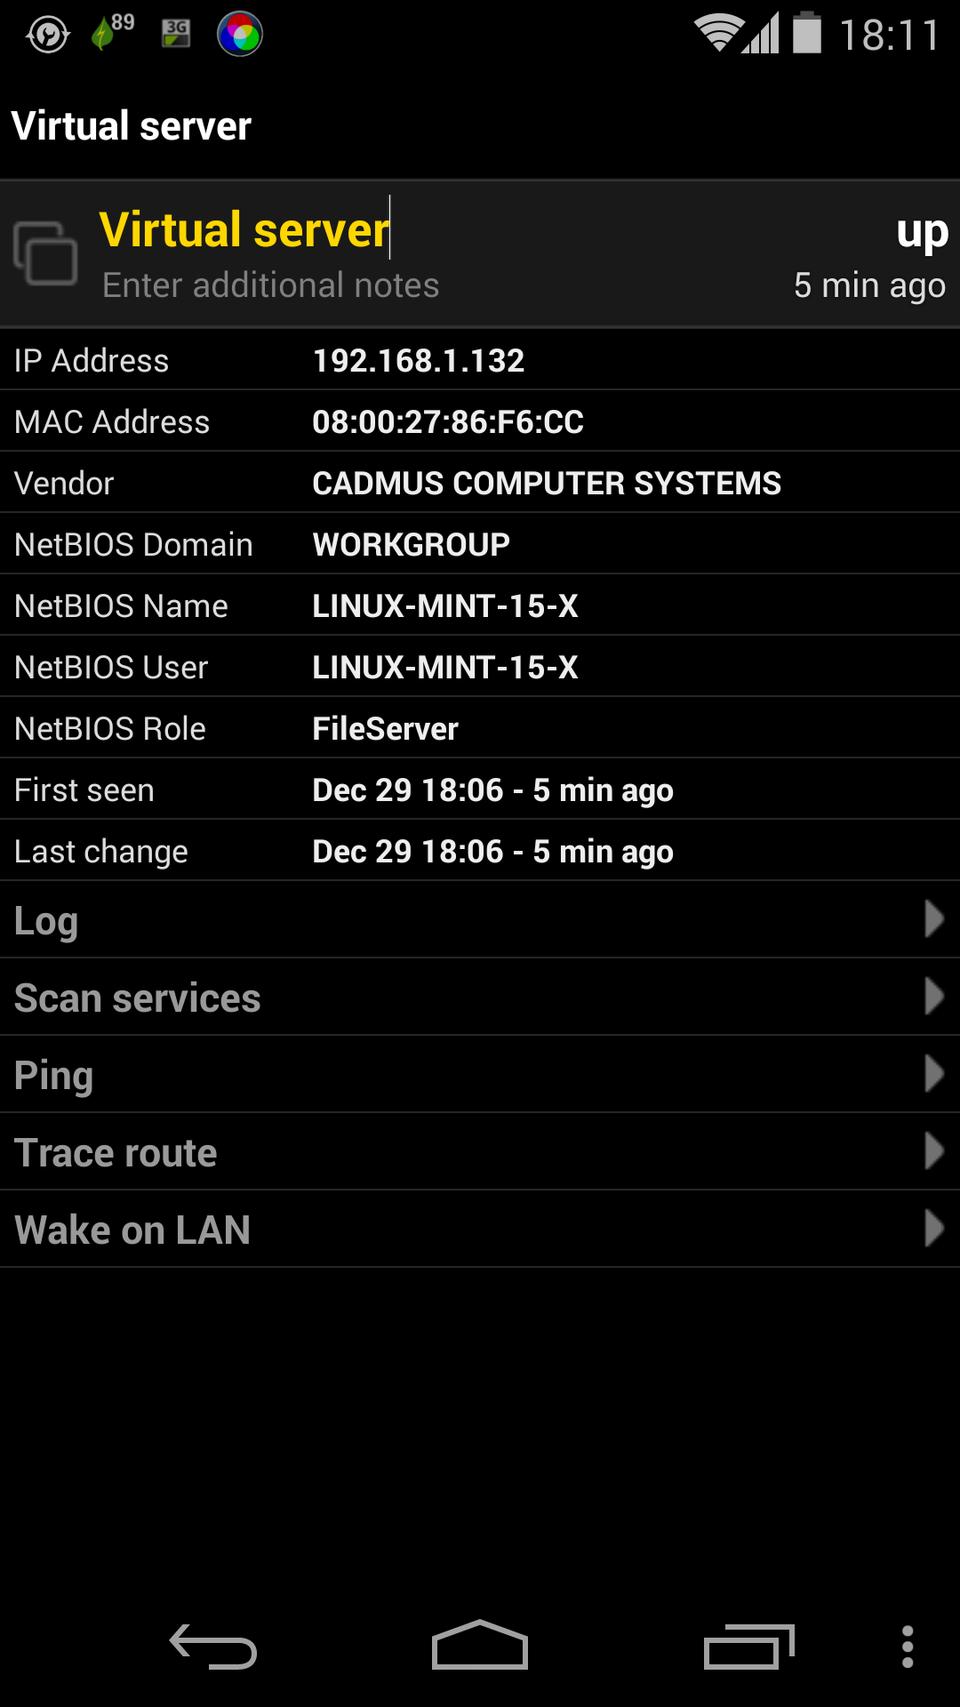
Figure 7. Tapping on an entry provides more information and access to extra functions.
Clicking on the gear in the top-right corner provides access to several more tools, including Network Discovery, Host Tools (port scanning, ping, traceroute, DNS lookup, “Wake on LAN” and TCP connection testing), as well as several configuration items, backup and restore, and more. For even more tools, consider the Net Swiss Tool, which adds even more tools to Fing's, including arp, netstat, route, whois and other functions, such as DNS testing, port scanning and more. If there was a tool with the functionality of both these apps together, using it would be a no-brainer, but for the moment, you'll have to work with this pair!
Configuring or debugging Wi-Fi setups is also a typical task, and for this, I use Wifi Analyzer. This app provides five useful tools: a channel graph, time graph, channel ratings, access points (AP) lists and a signal meter. The channel graph view shows all available networks (either in 2.4GHz or in 5GHz—touch the icon to the left to select which) along with their channels and signal strength.
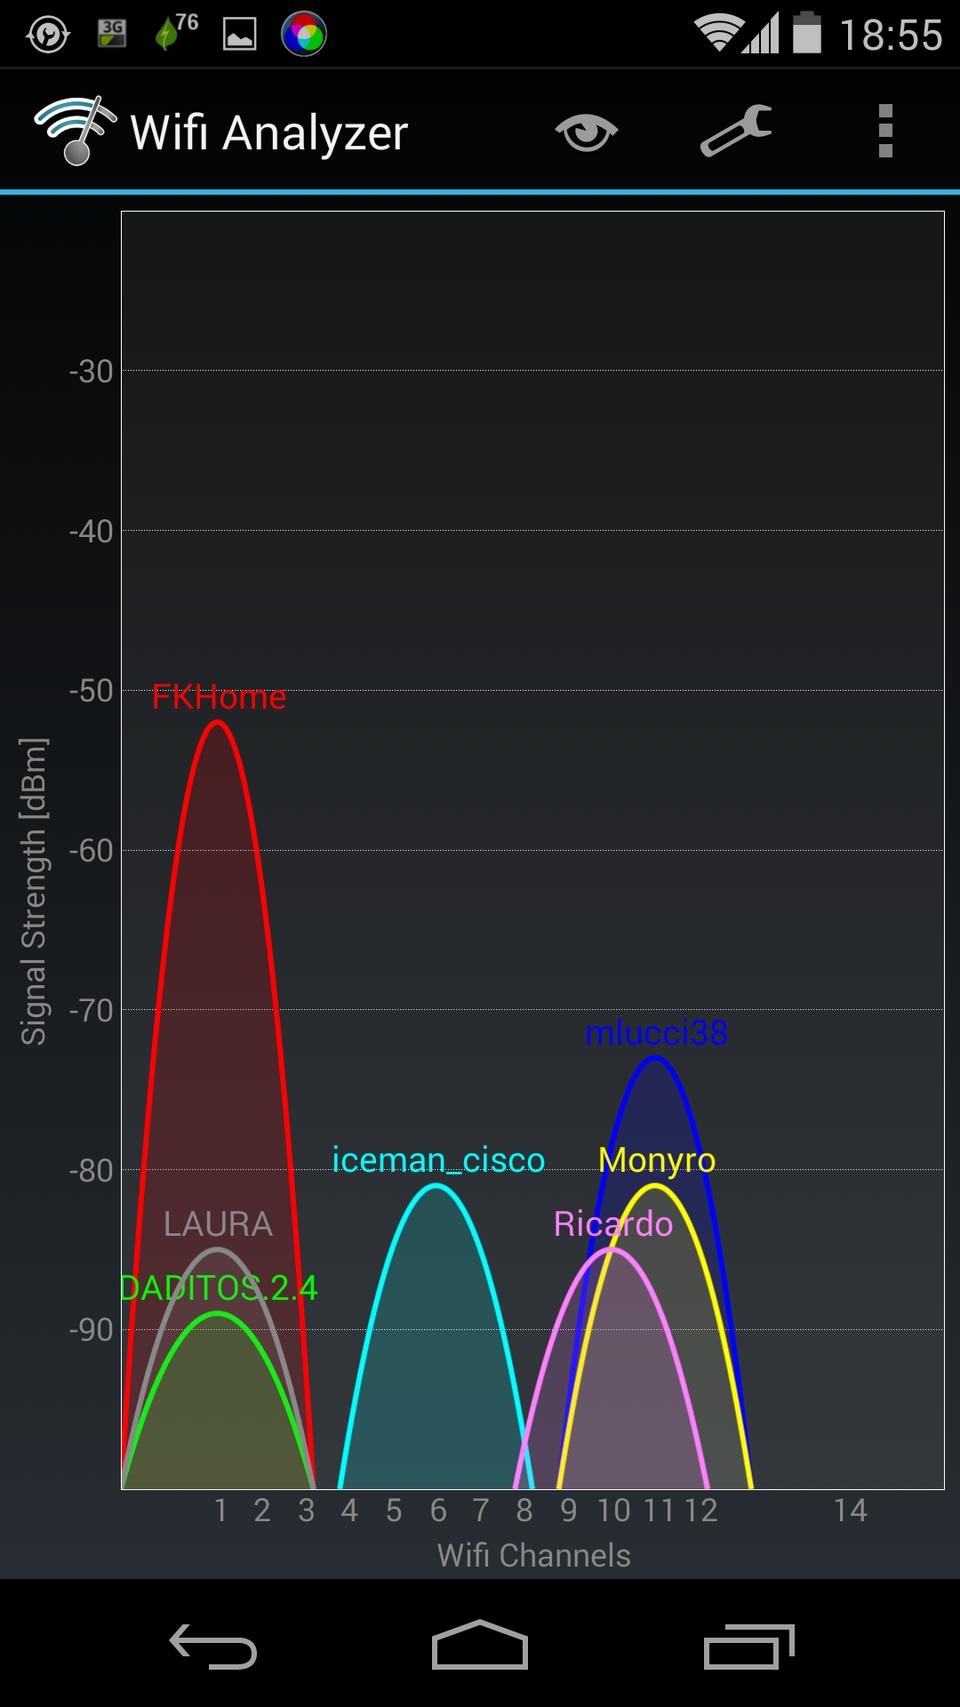
Figure 8. Tapping on an entry gives more information and provides access to extra functions.
Alternatively, you can examine the same information in listing form, by choosing the “AP list” view, which shows each available connection point, along with an icon and a bar showing the connection strength, the device brand, and the used channel and its frequency. The list can be sorted alphabetically, by channel, by signal strength, by openness, by vendor or in “natural order”, which shows your best options first in availability terms. If you want to connect to any of the shown networks, just tap on it.
The “Time Graph” view shows the different AP's strengths over time. Available AP's are at the top of the screen and are color-coded, and if you tap on one, its graph will be highlighted. To determine which channel to assign to an AP, use the “Channel Rating” view, which shows a horizontal bar graph, pointing out which would be the best options for the AP, in terms of interference with other nearby networks, on a scale from 0 to 10. Take care to configure the app and select which channels are available. In the US, there are channels 1 to 11, but 12, 13 and 14 are available in other regions. If your AP isn't using the best option, just configure it and fix the problem.

Figure 9. You also can determine the optimum channel to use for a router.
Finally, the most entertaining function (which will make you feel like a grizzled old uranium prospector, walking around with a Geiger counter looking for ore) shows a dial with a “needle” showing the current signal strength of the AP to which you are connected, and it even adds the option of beeping in proportion to the strength. Walk around, closer or farther away from the AP, and the pinging rate will vary. This will let you determine the best place for an antenna, router or repeater, and it also lets you know if the signal strength is what you expected.

Figure 10. Finding the best place for an access point or router is easy with Wifi Analyzer.
Wifi Analyzer can handle a lot of common problems, which is why it's in my bag of sysadmin tools.
If (when!) something happens, what you need is a remote console session, so you can work directly on fixing whatever is wrong. For this, over several terminal emulators, I prefer ConnectBot. Its stable version at the Google Play store is quite old (October 2010!), but work still goes on, and development versions, as new as November 2013, are available at the project site (see Resources).
With ConnectBot, you can use SSH or Telnet to connect to a remote server (or to your own Android device) for command-line work. You must specify the host and port to which to connect, and you need to provide either your user name and password or public key certificates (see michaelchelen.net/articles/android-connectbot-ssh-key-auth-howto.html for this) to gain access. ConnectBot stores your connection details to simplify reconnecting to known servers.
Figure 11. Connecting to a remote server is easy with ConnectBot.
You can be connected to several servers simultaneously and change from one to another. Select the “Disconnect” menu option, use the exit command or the key combination Ctrl-D at a console to disconnect fully. The back button returns you to the main menu, where opened connections will show a green icon; disconnected ones show it in red. Tap on an open connection to go back to that session.
You can use ConnectBot either in portrait or in landscape mode, but the latter is best, especially for using the “Hacker's Keyboard” and getting all the usual PC keys. The small console text can be hard on your eyes, so you can use the volume up and down keys to increase or reduce the font size. For even more screen space, you can remove the status line in Settings.

Figure 12. Working remotely is best with a landscape tablet and Hacker's Keyboard.
For better history, set the scrollback size to 1000 or more lines. So connections won't be dropped when they are in the background, check the box “Persist Connections”. Finally, set “Keep Screen Awake”, so your device won't turn off while working, and set “Keep WiFi active”, so your connection won't be dropped.
Working with a remote server over SSH is probably the most common way of fixing sysadmin problems, but if you want to connect to a machine running the X Window System (not quite usual on servers, but far more likely on terminals), there are ways to access that server from your tablet. (Why a tablet? Scrolling and panning a full-size display on a phone's small window is just about murder!) There are two options you should consider: android-vnc-viewer and TeamViewer. The first is totally free, and the second is free too, but only for non-commercial work (it requires a license otherwise).
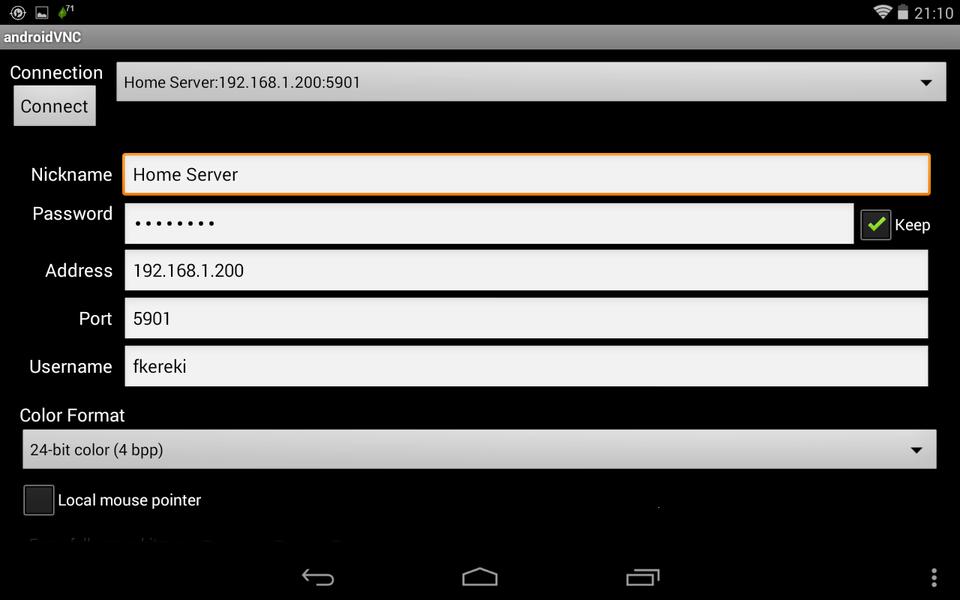
Figure 13. Defining a connection to VNC is simple.
On opening android-vnc-viewer, you can choose an earlier defined connection or create a new one. Speed for such connections usually isn't great, so you may want to investigate different color formats—24 bits of color depth look good, but fewer colors mean higher speed. When a connection is established, you can work remotely as with a browser. Your finger is the mouse, a single tap is a left-click, and a double tap is a right-click. (For other needs, try Menu→Send Keys.) Long-tapping the screen provides buttons for enlarging or reducing the display, as well as a virtual keyboard. This app can be a bit harder to configure, because you'll probably have to open ports and so on in order to access an internal machine over the Web. If this is a problem, check out the second option.

Figure 14. Yes, the remote desktop can be tiny! Zooming and panning are mandatory.
If you have someone over at the remote machine, and the security rules at your site allow for it, TeamViewer is easier to use, because it doesn't require configuring any firewalls or forwarding any ports. If a machine can connect to the Web, it can connect via TeamViewer to another machine, since the TeamViewer servers mediate the connection. You'll need a (human!) helper at the remote machine to start a session and provide you with an ID and password.
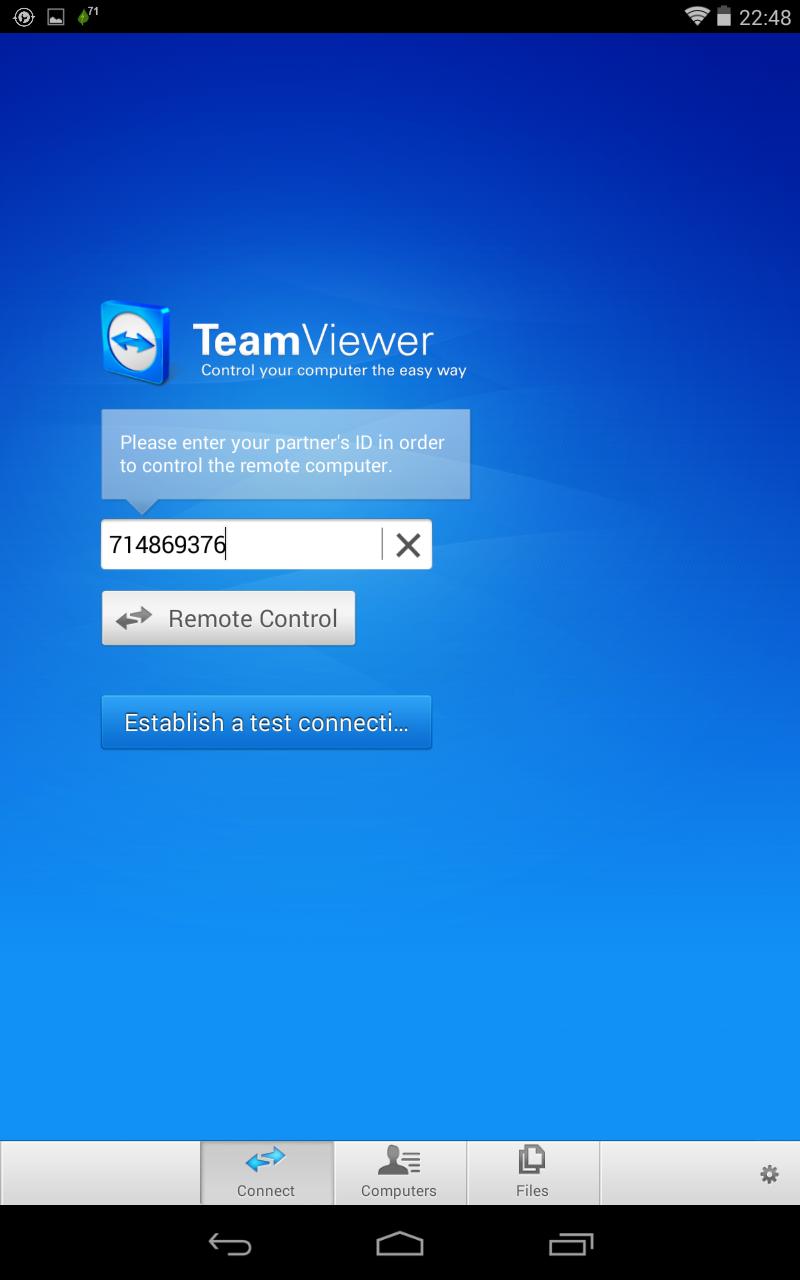
Figure 15. With the help of a user, you can connect to any machine with Internet access.
While the session is open, you not only can work remotely, but you also even can perform special actions, such as rebooting the machine or locking your helper out, so only you will be able to work. You won't need a Hacker's Keyboard with this app, as the app can show a virtual overlaid keyboard, which lets you simulate all keys, such as Ctrl, Alt and the Meta (or Windows) key.

Figure 16. Working in low resolution, speeds can be acceptable even over not-so-good connections.
There are some display method settings (for quality or for speed) that can change the connection speed. Performance can be lower than with VNC, but given that connection requirements are minimal (Web access), this app may help you out in difficult cases.
Apart from directly connecting to a server, you may need to upload and download files. (Of course, for just editing a file, a remote access solution does the job, but you might prefer to download the file to your tablet, edit it there with a better editor such as Jota+, and then upload it again.) Out of many available file browsers, I find ES File Explorer to be the most useful. You not only can browse local files (even the “/” directory, on rooted devices), but you also can use several Web protocols (SMB, FTP, FTPS, SFTP and WebDAV) and cloud services (Box, DropBox, Google Drive, S3, Skydrive, SugarSync, Yandex and Ubuntu One), working with remote files as if they were local to your device.

Figure 17. With ES File Explorer, you can connect to servers and cloud servers.
To connect to a remote server, choose “Network” in the left-hand list, then “FTP”. Next, define its parameters: protocol (FTP, FTPS, SFTP or WebDAV), server, port, user name and password (leave these empty for anonymous access), data encoding and display name. For secure connections, the remote server will require the PasswordAuthentication SSH parameter to be set to Yes. (Note that this is also a requirement for other file managers that are capable of SFTP access.) If you can't connect to the server, edit its /etc/sshd/sshd_config file (the path and name may vary depending on your distribution), change the appropriate line, and restart the service with a sudo /etc/init.d/sshd reload command.
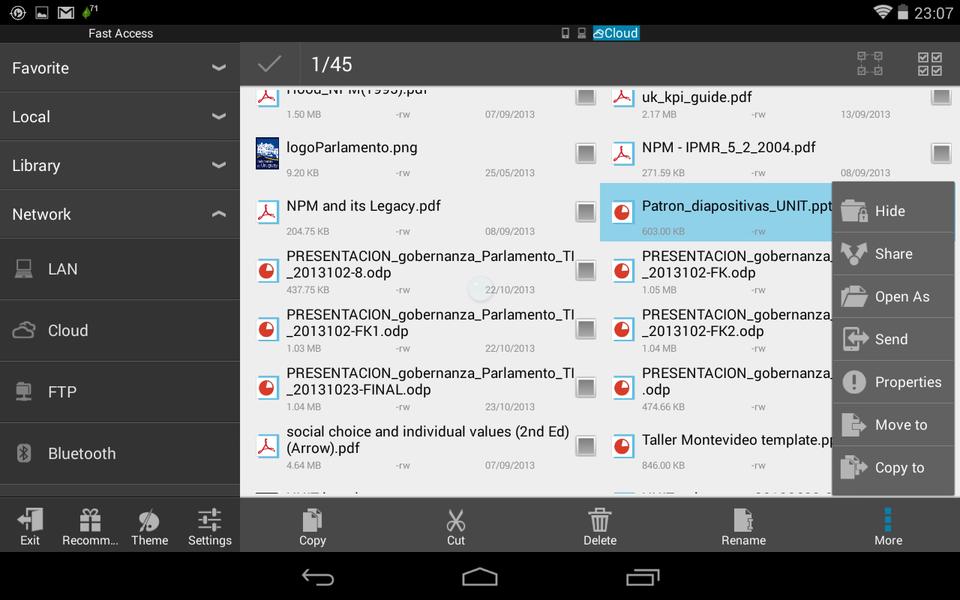
Figure 18. You can work with remote files as if they resided on your device.
Long-tap a defined server to edit it. Tap a server, and it will show its directories and files, as if they were local. Long-tap a file, and you can work with it (open, copy, cut, delete, rename, share, send and more). If you need to make only a simple fix, opening a file as text lets you edit it with a (rather basic) editor. Finally, you can select several files at a time for group operations.
File browsers are widely available, well known and similar in function. However, I find ES File Explorer to be a bit ahead of the others because of the simple way it shows and works with remote directories and files as if they were local, making work easier and faster.
Sysadmin work is never going to be really easy, but with the Android apps I've shown here, you will be able to analyze networks, monitor servers and services, detect problems as they happen, and connect to servers to get things running again. Hopefully, your life will be a tad easier than before.
