
Moving from theoretical Wi-Fi to blinky lights!
Researching my last article, I learned more about Wi-Fi than most people learn in a lifetime. Although that knowledge is incredibly helpful when it comes to a real-world implementation, there still are a few caveats that are important as you take the theoretical to the physical. One of the most frustrating parts of a new installation is that you're required to put the cart before the horse.
What do I mean by that? Well, when I set up my first Wi-Fi network in a school district, I paid a company to send technicians into the buildings with their fancy (and expensive) set of tools in order to give me a survey of the buildings so I'd know how many access points I'd need to cover things. What they failed to mention is that in order to determine how many access points I'd have to add, they tested my existing coverage and showed me dead spots. Since this was a brand-new installation, and I didn't have any access points to begin with, the survey result was “you need access points everywhere”. Needless to say, I was less than impressed.
So in order to set up a proper wireless network, the easiest thing to do is guess how many access points you'll need and put that many in place. Then you can do a site survey and figure out how well you guessed. Thankfully, your guesses can be educated guesses. In fact, if you understand how Wi-Fi antennas work, you can improve your coverage area drastically just by knowing how to position the access points.
It would be simple if Wi-Fi signals came out of the access points in a big sphere, like a giant beach ball of signal. Unfortunately, that's not how it actually happens. Whether you have internal antennas or external positionable antennas, the signal is “shaped” like a donut with its hole over the antenna (Figure 1). While it still partially resembles a sphere, it's important to note where the signal isn't. Namely, there's a dead zone directly at the end of the antenna. If you've ever considered pointing the antenna at your distant laptop, trying to shoot the signal out the end of the antenna like a magic wand, you can see why people should leave magic wands to Harry Potter.
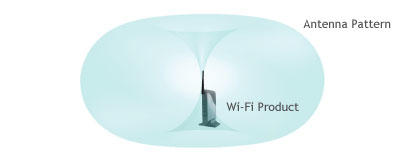
Figure 1. Knowing what the signal looks like helps with placement (image from ampedwireless.com.
I also want to mention long-range access points. When you purchase a long-range AP, it sounds like you're getting a more powerful unit. It's a little like a vacuum cleaner with two speeds—why would anyone ever want to use the low setting? With long-range access points, however, you're not getting any increased power. The trick is with how the antenna radiates its signal. Rather than a big round donut shape, LR access points squish the donut so that it has the same general shape, but is more like a pancake. It reaches farther out to the sides, but sacrifices how “tall” the signal pattern reaches. So if you have a two-story house, changing to a long-range access point might get signal to your backyard, but the folks upstairs won't be able to check their e-mail.
One last important aspect of antenna placement to consider is polarity. Wi-Fi antennas talk most efficiently when they have similar polarity. That means their “donuts” are on the same plane. So if you have your access point's antennas positioned horizontally (perhaps you have a very tall, very skinny building), any client antennas pointing vertically will have a different polarity from your access point. They'll still be able to talk, but it will be less efficient. It's sort of like if you turned this article sideways. You still could read it, but it would be slower and a bit awkward.
Since it's far better to have mismatched polarity than no signal at all, understanding the antenna pattern on your access points means you can position them for maximum coverage. If you have multiple antennas, you should consider where you want coverage as you position them vertically, horizontally or even at 45-degree angles (remember, a 45-degree angle will mess up polarity, but it might mean that distant upstairs bedroom has coverage it might not get otherwise).
If your access point doesn't have external antennas, it's most likely designed to have the “donut” stretch out to the sides, as if the antenna were pointing straight up. For units that can mount on the ceiling or wall, keep that in mind as you consider their positions, and realize coverage will be very different if you change from ceiling mount to wall mount.
Armed with an understanding of how Wi-Fi signal radiates out from the access points, the next step is to make your best guess on where you should place them. I usually start with a single access point in the middle of a house (or hallway in the case of a school), and see how far the signal penetrates. Unfortunately, 2.4GHz and 5GHz don't penetrate walls the same. You'll likely find that 2.4GHz will go through more obstacles before the signal degrades. If you have access points with both 2.4GHz and 5GHz, be sure to test both frequencies so you can estimate what you might need to cover your entire area.
Thankfully, testing coverage is easy. Some access points, like my UniFi system, have planning apps built in (Figure 2), but they are just planning and don't actually test anything. There are programs for Windows, OS X and Android that will allow you to load up your floor plan, and then you can walk around the building marking your location to create an actual “heat map” of coverage. Those programs are really nice for creating a visual representation of your coverage, but honestly, they're not required if you just want to get the job done. Assuming you know the floor plan, you can walk from room to room using an Android phone or tablet with WiFi Analyzer and see the signal strength in any given location. Just make sure the app you choose supports 2.4GHz and 5GHz, and that your phone or tablet has both as well!
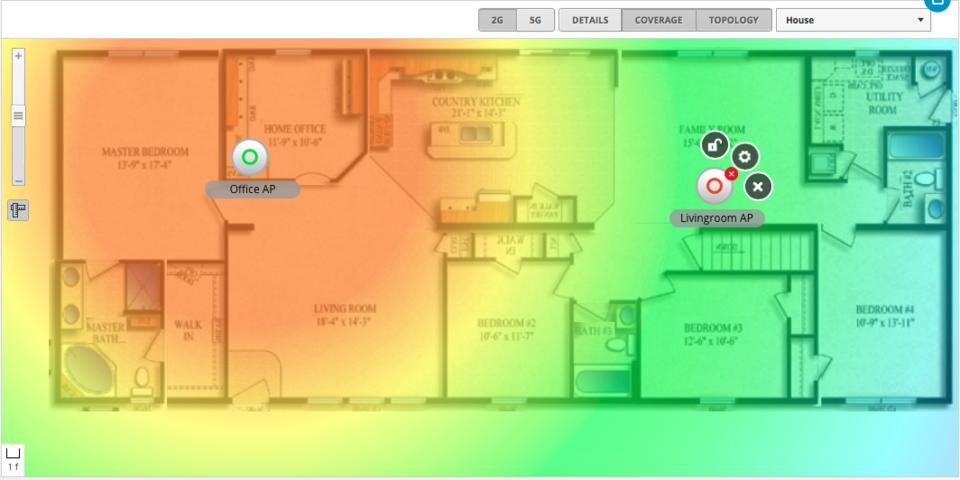
Figure 2. Since this was a fairly new house, the UniFi planning tool did a nice job of accurately predicting coverage area.
If you do want the heat map solution, Windows users will like HeatMapper from www.ekahau.com, and OS X users should try NetSpot from www.netspotapp.com. Android users should just search the Google Play store for “Wi-Fi heat map” or “Wi-Fi mapping”. I don't know of a Linux-native heat map app that works from a laptop, but if anyone knows of a good one, please write in, and I'll try to include it in a future Letters section.
Here's where installing Wi-Fi starts to get ugly. If you read my last article (in the October 2015 issue), you'll know that with 2.4GHz, there are only three channels you should be using. If you live in close proximity to other people (apartments, subdivisions and so on), your channel availability might be even worse. When you add the variable coverage distance between 2.4GHz and 5GHz, it means placing access points is really a game of compromise. There are a couple ways to handle the problem, but none are perfect.
In a home where two or three access points is going to be enough, you generally can place them in the best locations (after testing, of course) and crank the power up to full blast on the 2.4GHz and 5GHz radios. You'll likely have plenty of available channels in the 5GHz range, so you probably won't have to worry about interfering with other access points in your house or even your neighbor's. If you're in a big house, or an office complex, or in an old house that has stubborn walls (like me), you might have to plan very carefully where you place your access points so that the available 2.4GHz channels don't overlap. If you're using channel 1 in the front room, channel 6 in the basement and channel 11 in the kitchen at the back of the house, you might decide to use channel 6 for the upstairs. You need to make sure that when you actually are upstairs, however, that you can't see channel 6 from the basement, or you'll have a mess with channel conflicts.
Thankfully, most access points allow you to decrease the radio transmit and receive power to avoid channels interfering with each other. It might seem counter-productive to decrease the power, but it's often a really great way to improve connectivity. Think of it like having a conversation. If two people are having a quiet conversation in one room, and another couple is talking in the next room, they can talk quite nicely without interfering. If everyone in the house is screaming at the top of their lungs, however, it means everyone can hear other conversations, making it confusing and awkward.
It's also possible that you'll find you've worked out the perfect coverage area with the 2.4GHz frequency, but even with the radios cranked full blast, there are a few dead spots in the 5GHz range. In that case, you either can live with dead 5GHz zones or add another access point with only the 5GHz radio turned on. That will mean older client devices won't be able to connect to the additional access point, but if you already have 2.4GHz coverage everywhere, there's no need to pollute the spectrum with another unnecessary 2.4GHz radio.
Let's assume you've covered your entire house or office with a blanket of 2.4GHz and 5GHz signals, and you want your clients to connect to the best possible signal to which they're capable of connecting. Ideally, you'd set all your access points to use the same SSID and have clients select which access point and which frequency they want to associate with automatically. Using a single SSID also means roaming around the house from access point to access point should be seamless. Client computers are designed to switch from channel to channel on the same SSID without disconnecting from the network at all.
Unfortunately, in practice, not all client devices are smart enough to use 5GHz when they can. So although you might have a wonderful 5GHz signal sharing the same SSID with your 2.4GHz network, some of your compatible devices never will take advantage of the cleaner, faster network! (Sometimes they do, but I assure you, not always.)
I've found the best solution, at least for me, is to have one SSID for the 2.4GHz spectrum and one SSID for the 5GHz spectrum. In my house, that means there's a “Powers” SSID in the 2.4GHz range and a “Super Powers” in the 5GHz range. If a device is capable of connecting to 5GHz networks, I connect to that SSID and force it to use the better network. You might be able to get away with a single SSID and have your clients all do the right thing, but again, I've never had much luck with that.
I'm a hard-core networking nerd, and I know it. Even with our new-to-us 63-year-old house, I decided to run Ethernet cables to every access point location. (I just draped long cables around the house while testing; please don't drill holes into your house until you know where those holes should go!) For some people, running cables isn't possible. In those instances, it's possible to extend a single access point using a wireless repeater or extender (they're the same thing, basically). I urge you to avoid such devices if possible, but in a pinch, they're better than no coverage at all.
How an extender works is by becoming both a client device and an access point in one. They connect to your central access point like any other client, and then using another antenna, they act as access points themselves. The problem is speed. If you connect to a repeater, you can get only half the speed of a connection to a wired access point. That's because the wireless transfer speed is split between your laptop and the repeater communicating with the distant access point. It's a little more complicated than that in practice (it has to do with transmission duplexing and so on), but the end result is any connection via repeater is only half as fast as to a wired access point.
If you're talking about a 5GHz, wide-band connection, a repeated signal might be more than adequate for Web browsing from a distant bedroom. The ability to extend a network wirelessly is really awesome, but it's important to realize that awesomeness comes at a cost. You also need to understand that if you're in a room with a weak signal, placing a repeater in that room won't help. You need to place the repeater in a location between the central access point and remote client device, so it can act as a middle man relaying signals both ways. A repeater doesn't have any stronger of an antenna than a client device, so make sure if you do place a repeater, it's in a location with decent signal strength, or you'll just be repeating a horrible signal!
In my last article, I talked about the actual wireless technologies involved with Wi-Fi signals. In this article, I discussed implementation and how to get the best coverage for your particular installation. Don't forget all the stuff I covered regarding MIMO, channel width and so on. Understanding how a Wi-Fi network works means you not only can get good coverage, but you can get awesome performance as well.
I'll leave you with one last note: if you're planning a wireless install for a situation that has a large number of users, be sure to include bandwidth considerations in your planning. If you have a 54Mbps 802.11g connection shared between 26 people, that means the maximum theoretical bandwidth each person can use is 2Mbps, which is painfully slow in most instances. You actually might need to lower the radio power and add multiple access points in order to split the load across multiple access points.
Planning and installing Wi-Fi networks can be incredibly challenging, but it is also incredibly fun. Hopefully this two-part primer will help you deploy the best wireless experience possible.
