
You can run a full version of the R statistical software environment on mobile devices running Android with the help of a Linux operating system installed in a change-root environment.
The year 2014 frequently was termed the “year of wearable devices”, but besides being able to access e-mail, play games or listen to music, we have yet to see real productivity (including IDEs like RStudio, editors like Emacs or tools like LaTeX and Sweave) on wearable devices like smartphones or even tablets. Although we could not agree more with Bjarne Stroustrup (see the first minute of his YouTube video listed in the Resources for this article), early attempts to bring more productivity to wearables, such as the Ubuntu Edge campaign, so far have failed. We have no doubt that the development of productivity tools for wearable devices will come, but the hype hasn't provided a working solution so far. With that in mind, this article addresses the following question: “How can one run R on Android devices in a productive way?”
For our tests we used the Google Nexus 5 smartphone (released November 2013) with these specs: quad-core 2.3GHz CPU (Snapdragon 800, 32-bit, ARM-based); 32GB memory; 2GB RAM; and Android 5.1.1 (Lollipop). During our testing phase, we also considered Android 4.4 (Kitkat) and Android 5.0 (Lollipop). Note that in practice, people usually would rather work with R on a tablet (or at least a phablet) than on a smartphone. Our choice of such a small device (with a 5" display) is purely to demonstrate the concept and its potential (and because we already owned this device).
The choice of Android as an operating system is natural for these three reasons:
A majority of smartphones and tablets run Android.
Android is a mobile operating system based on the (free and open-source) Linux kernel.
As it turns out, it is feasible to use R on Android (whereas we are not sure how this could be done on iOS, for example).
Other approaches for running R on Android (not discussed in this article) are used by the R Console Free and GNURoot apps (available at the Google Play Store). The former allows only limited R functionality under Android; the latter follows a similar paradigm as presented here, but provides only console access to R (one of the more obvious limitations). In particular, both methods do not provide GUI access to R (so no graphics).
Our understanding of productivity goes beyond the functionality of these apps. We aim not only at running a full version of R on Android (including graphics or multicore computing), but also at tools that are naturally required to be productive with R—for example, a full version of an editor like Emacs (including ESS), LaTeX and Sweave (for writing articles or working on presentations during flights). For RStudio users, see the Tips and Tricks section at the end of this article.
We also want to consider some selected auxiliary tools from the Linux world. Note that for some of these tools (like Emacs), specific Android apps are available (such as the Emacs app), but they often are in early stages of development and have frequent crashes (not offering the functionality we need), or they are not well maintained, which leads to bugs we don't want to cope with (we've pointed out several to the respective app developers with minor success in solving them).
Also, none of these apps work or communicate with each other (as they are mainly black boxes), and for a fully functioning “R app”, Android is missing compilers, a shell and an X Window System (among other tools).
Our approach may be a bit more daunting to install, rather than using a simple thin client and connecting to an R server to address the above questions, but this is what we consider to be part of productivity (one advantage is not being limited to Internet access).
The goal is to install a Linux operating system on Android and then install the required productivity tools (including R) under this Linux OS. We then can run an SSH or VNC server on it and connect to it via a terminal or graphically, respectively. Here are the steps:
1) Prepare the Android device. This might be the technically most difficult step, and it is partly device-dependent. In particular, it involves unlocking the device's bootloader (required for rooting the device—that is, gaining root/superuser access to the device) and rooting the device (which is required by the Linux Deploy app to install a Linux OS under Android).
2) Installing and accessing the Linux OS. The main idea here is that the Linux OS will be installed in a so-called change-root (chroot) environment on Android 5.1.1—that is, in a directory tree in which a running program cannot name or access files outside the tree. The Linux OS installed this way allows for root access (and therefore to install the required productivity tools), but sees only this local environment and does not interfere with the Android OS.
3) Installing and using R and related productivity tools. Here we show how you can install R and tools like Emacs (version 24) with Emacs Speaks Statistics (ESS) and the LaTeX system TeX Live (2015) with AUCTeX. We also show how you even can do multicore computations, and we provide some tips and tricks addressing productivity when working with Android.
For this article, we assume you have a laptop computer running an Android Software Development Kit (SDK). We used a MacBook Pro (2015) running OS X Yosemite 10.10.5 and Android Studio as the SDK. During our testing phase with Android 4.4 and 5.0, we used a Lenovo X1 Carbon (2013), which ran Ubuntu 14.10 (the corresponding Android SDK was installed via sudo apt-get install android-tools-adb android-tools-fastboot). Installing these tools is straightforward. We also wanted to use the adb and fastboot tools from the OS X terminal. An easy way to accomplish this is via bash <(curl https://raw.githubusercontent.com/corbindavenport/nexus-tools/master/install.sh).
In short, rooting describes the process of gaining root or superuser access to an Android device, and it's required in order to interact with Android more deeply. Specifically, it's necessary for installing a Linux OS on the device using an app like Linux Deploy (described below). Because rooting typically completely wipes the device, do a complete backup first (rooting also may brick the device, rendering it useless, although this risk nowadays is considered comparably small for newer devices). As a last resort if the rooting procedure fails, you typically can try to flash a factory image (see Resources). A factory image for the Google Nexus 5 is available at https://developers.google.com/android/nexus/images#hammerhead.
The rooting procedure depends on the Android device under consideration (there are many good on-line resources for this). It also may depend on the version number of Android. For example, for a Google Nexus 5 running Android 4.4 and 5.0, we followed the instructions given in the Unlocking the Bootloader and Rooting sidebar. However, Android 5.1.1 requires a different approach (see Resources).
1) Make sure that your device's battery status is at least 80% and that developer mode is enabled (go to Settings→About phone and then tap the build number until developer mode is enabled).
2) Connect the Android device to the laptop via a (micro) USB cable.
3) Download UPDATE-SuperSU-v2.46.zip from www.devfiles.co/download/dr7ZBy0w/UPDATE-SuperSU-v2.46.zip.
4) Use the Android File Transfer app to copy the .zip file to the phone's root directory (the folder shown by default when Android File Transfer is opened; in the Android filesystem, this corresponds to /sdcard or /storage/emulated/0).
5) Download www.devfiles.co/download/iLJJIo60/recovery-clockwork-touch-6.0.4.5-hammerhead.img and put this file in the ~/Library/Android/sdk/platform-tools folder on the laptop.
6) Boot into fastboot mode—typically by shutting down the phone, then pressing and holding both volume keys and the power key.
7) Execute in a shell on the laptop:
cd ~/Library/Android/sdk/platform-tools
fastboot flash recovery recovery-clockwork-touch-6.0.4.5-hammerhead.img
8) Use the volume keys to select “Recovery Mode” on the Google Nexus 5, then press the Power key to enter this mode.
9) From the menu that appears, select “install zip” (via the volume keys), and press the Power key to do so. Select “choose zip from /sdcard”.
10) Use the volume keys to select the .zip file. Choose “yes” to install it, then wait until you see “Install from sdcard complete”.
11) Choose “Go back” from the menu and “reboot system now”, then “Yes - Fix root (/system/xbin/su)”. After this process finishes, you can unplug the phone.
12) Install the Super Su app and reboot the device. Then, install the Root Checker app, open it and grant superuser access. The app then indicates whether rooting the device was successful.
Once the device has been rooted successfully, you can continue installing auxiliary apps and setting up the device.
At this point, you can set up the Android device as desired. For the purposes of this article, we recommend installing the following apps from the Google Play Store:
Hacker's Keyboard: a full-size keyboard for Android, including meta keys like Tab/Ctrl/Esc. You can select the Hacker's Keyboard as the default keyboard via Settings→Language input→Current Keyboard.
Linux Deploy: an app for installing a Linux OS on a rooted Android device (note that this app requires the device to be rooted). An alternative may be the Complete Linux Installer app, but it had various rather strange bugs (for example, “Error: Unable to attach image to loop device!”, so every launch required rebooting the device) and did not provide support for Android 5.1.1 at the time of this writing.
JuiceSSH: an easy-to-use SSH client for Android. (You'll use this later to connect to the SSH server running on the Linux OS you install under Android and provide access to R via the terminal.)
VNC Viewer: a VNC client for Android you'll use later to connect to the VNC server running on the Linux OS and provide access to graphics (the R GUI).
The goal now is to install a Linux OS (in this case Ubuntu 15.04; during our testing phase, we also considered Debian Testing) in a chroot environment on Android 5.1.1, together with various productivity tools, such as Emacs (version 24) with ESS and TeX Live with AUCTeX. The Linux Deploy app provides a relatively straightforward approach for installing Linux on Android (described below), and updates to Android 5.0 and 5.1.1 also were provided in a reasonable amount of time (and the developer replied to questions).
1) Start Linux Deploy and press the arrow button pointing downward to specify the properties the Linux OS should have.
2) Choose the following:
Distribution: Ubuntu (uses the lightweight X11 desktop environment LXDE by default).
Distribution suite: “vivid” (this is Ubuntu version 15.04).
Installation path: the path where you want the Linux image to reside (for example, /sdcard/linux.img).
Image size (MB): the size of the Linux image. Due to the many pieces of software you will install for this example, choose 16000MB here.
Filesystem: ext4.
User name: an appropriate user name for the Linux OS (in our case, “mhofert”).
Select components: in addition to the components already checked, also check “X server”.
Custom mounts: check it. On startup of the Linux OS, this allows you to access files located in /storage/emulated/0 on the Android device via /mnt/0 on the Linux OS (which is handy when working on the same files from Android and within the Linux OS); see the beginning of the following section for more on this.
Now choose “Install” to install the Linux OS (hereby grant root/superuser rights to Linux Deploy via the Super Su app when prompted).
3) Choose “START” from the main menu of Linux Deploy to start the Linux OS (Figure 1). There is also an “Autostart” option available from the settings so that the Linux OS starts once Android is booted.
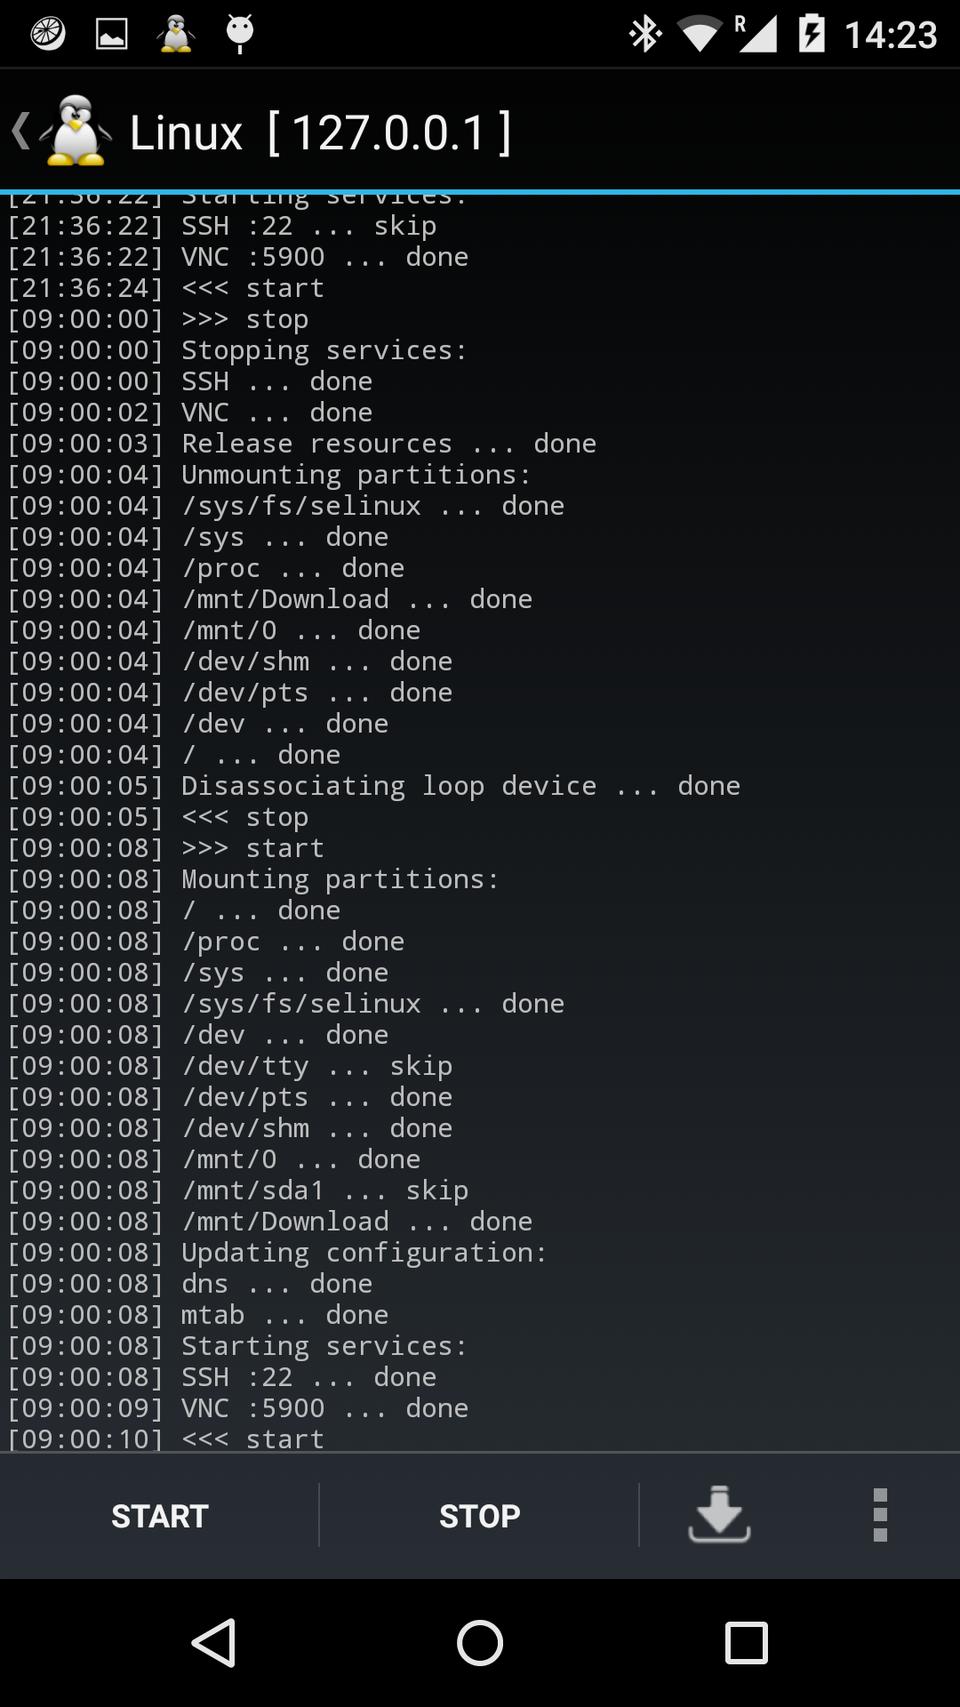
Figure 1. Running Ubuntu 15.04 via Linux Deploy on a Google Nexus 5 Android Smartphone
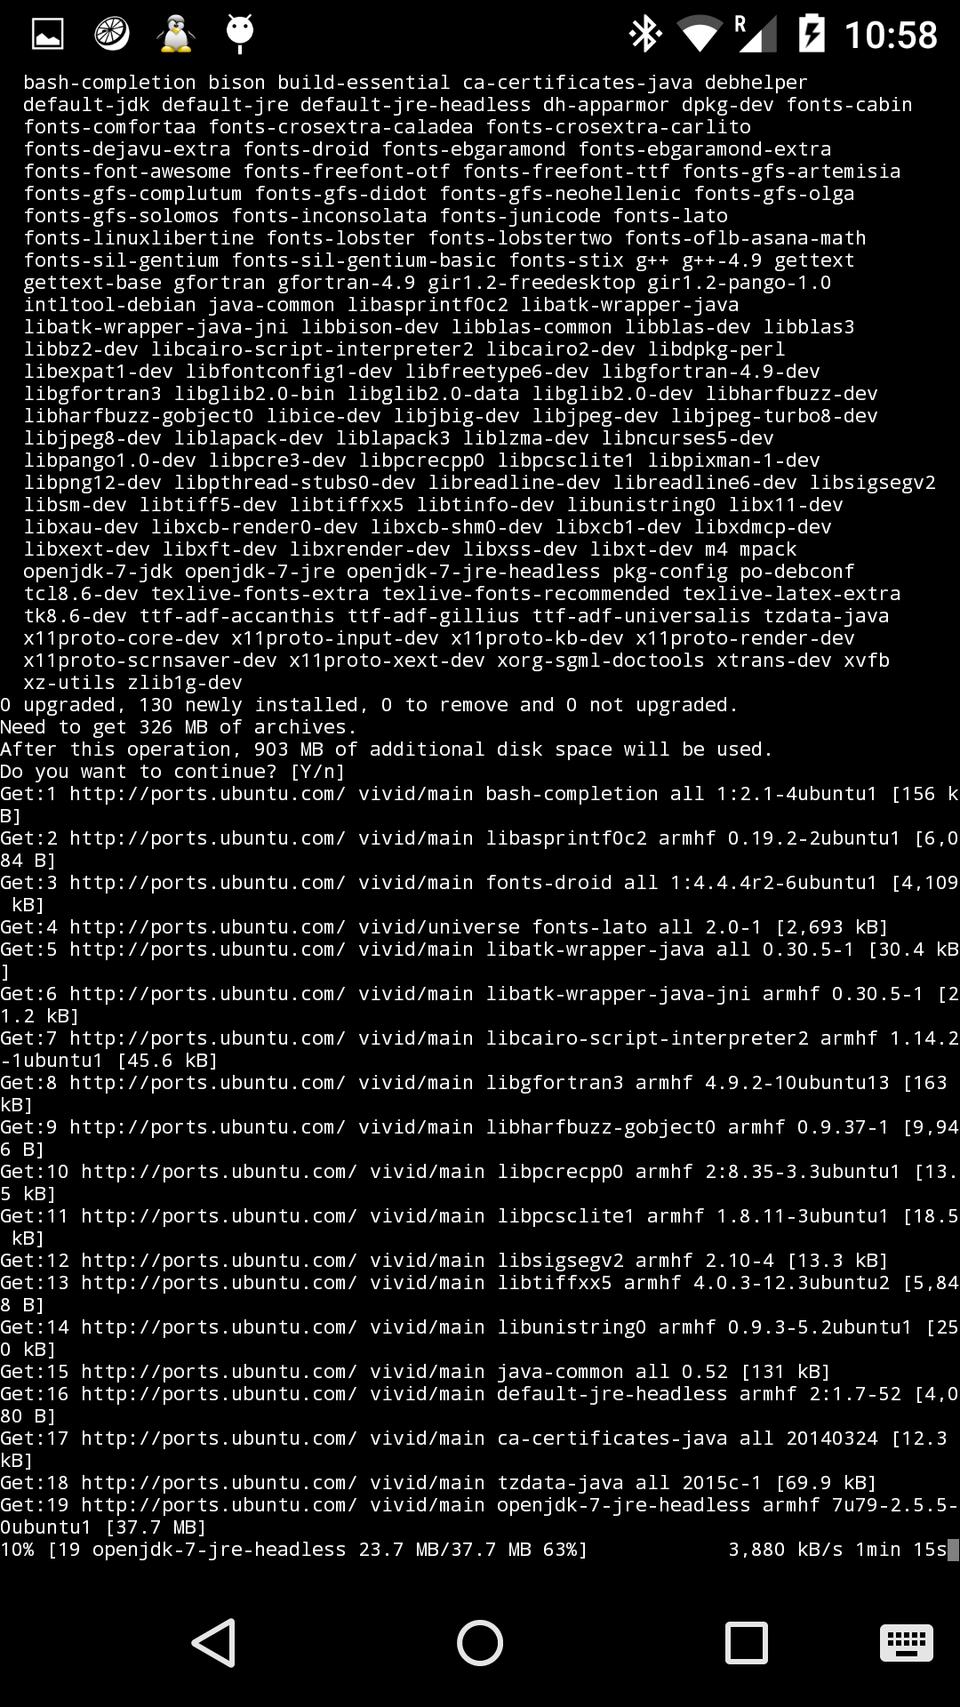
Figure 2. Installing Productivity and Auxiliary Tools via apt-get over SSH with JuiceSSH
Starting the Linux OS starts an SSH server (port 22) and a VNC server (port 5900), which allow you to access the Linux OS from Android via the terminal and a GUI, respectively. The following steps detail how to set up an SSH connection via JuiceSSH and then how to set up a VNC connection via VNC Viewer:
1) Open JuiceSSH, navigate to Settings, and set “Popup keyboard position” to “Disabled”.
2) Go back to the main menu, then to “Connections”, and add a new connection. Choose:
Nickname: Ubuntu.
Address: this is the IP address of the SSH server. You can find it on the top bar in Linux Deploy when the Linux OS starts (Figure 1). This may depend on your device's network (in our case, home or work) and whether the IP addresses are allocated dynamically in this network.
Identity: Choose “New...” and the user name as selected for the Linux OS.
3) Go to the “Connections” main menu and choose “Ubuntu” to start the SSH connection to the running Linux OS. When asked for a password, use “changeme”, which is the default for Linux Deploy. You should now be connected to the Linux OS via SSH. Use the Linux passwd command to change the login password.
As mentioned earlier, to get GUI access, including graphics for R, you need to establish a VNC connection. Using VNC Viewer, follow these steps:
1) Open VNC Viewer, press the + and enter:
Address: <IP address as displayed by Linux Deploy>
Name: Ubuntu
Then press the check mark to save the connection details.
2) In the main menu, press “Ubuntu” and put in the password “changeme”.
Installing Emacs, ESS, LaTeX and R:
Now you can interact with the Linux OS installed under Android and install software on it. First copy the setup files and folders (for example, .emacs, .emacs.d, .gitconfig, .Renviron, .Rprofile and .ssh) from the laptop to the Linux OS as follows. (See also the Tips and Tricks section. Additionally, you can append personal settings from .bashrc to the .bashrc already available in ~ in the Linux OS.)
1) Open “Android File Transfer” and copy the files to the phone's root directory (the folder shown by default when Android File Transfer is opened). They then appear in /storage/emulated/0 on the Android device and under /mnt/0 from within the Linux OS.
2) From the latter folder, copy (via sudo cp -r) all the files to the home directory ~.
Next, install some basic Linux tools in the terminal via JuiceSSH (note: this may take several hours; see Figure 2 for a screenshot during the installation):
sudo apt-get update
sudo apt-get install a2ps auctex chromium-browser cmake curl
 ↪emacs24 git htop
sudo apt-get install make okular pdftk preview-latex subversion
 ↪texinfo unzip wget
Now, you can install ESS, LaTeX and base R via sudo apt-get install ess latex r-base if available on ARM architecture. The drawback is that software like LaTeX typically comes in older versions, so we recommend installing the latest versions from source (see the detailed instructions in the sidebar).
After this installation, restart Linux Deploy (otherwise R is not found from within JuiceSSH or VNC Viewer). Figure 3 shows a screenshot taken during the R installation process (during make), and Figure 4 shows R running over SSH via JuiceSSH.
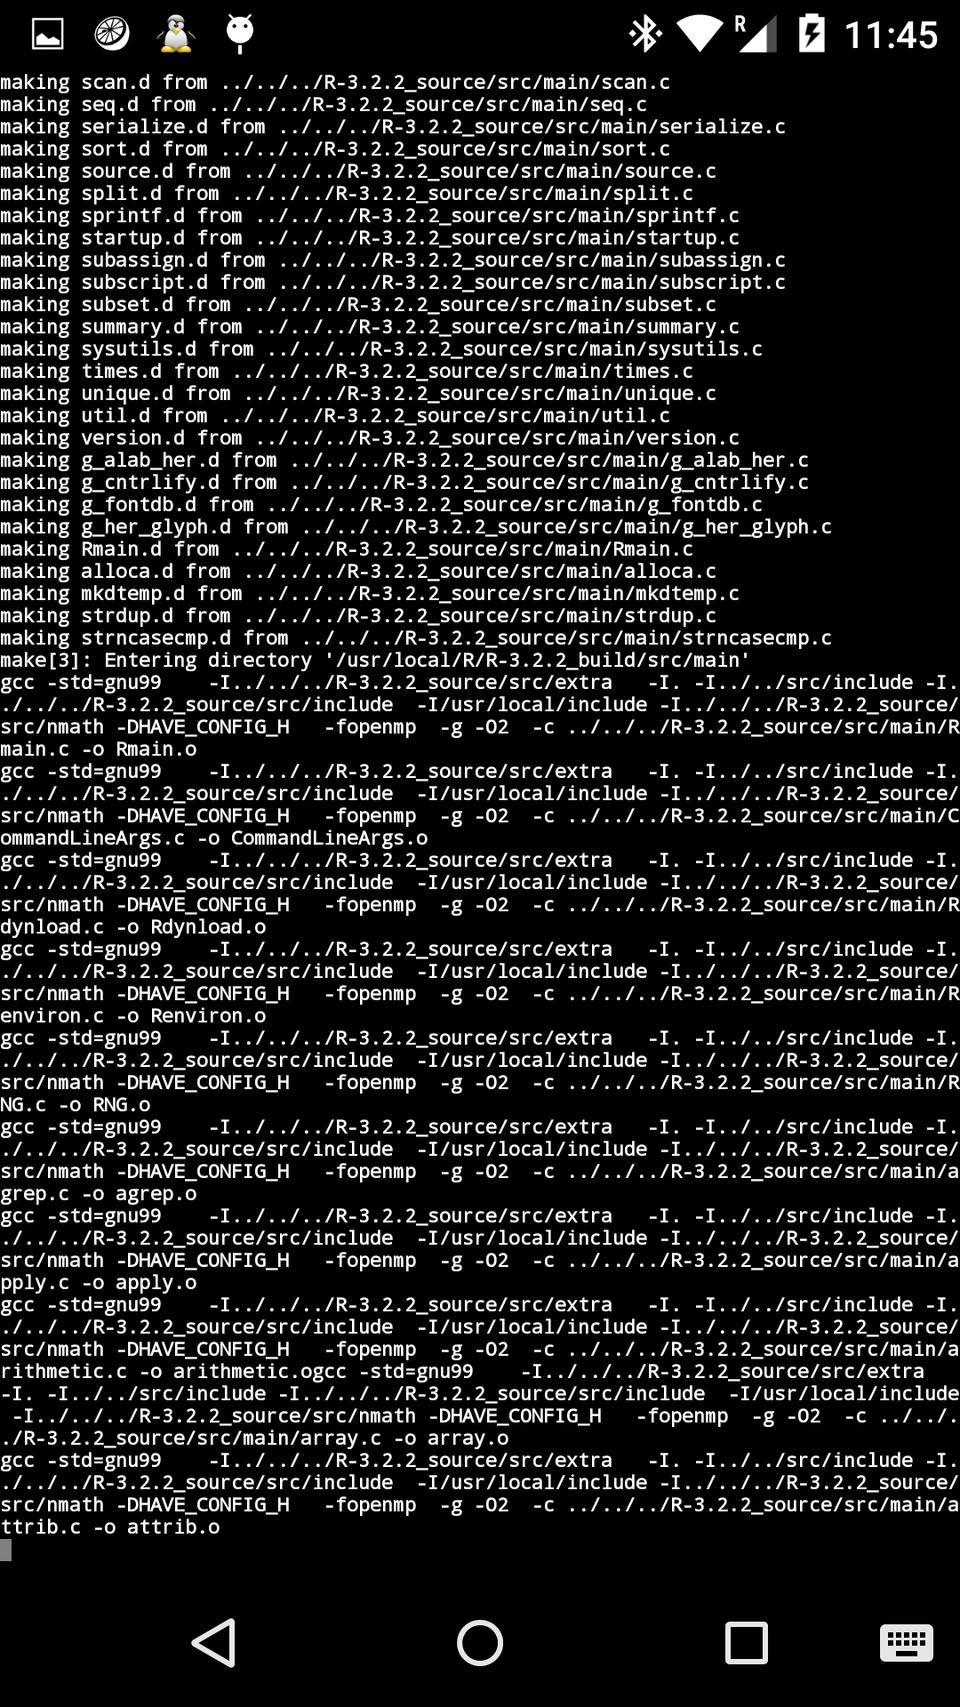
Figure 3. Installation of R during make
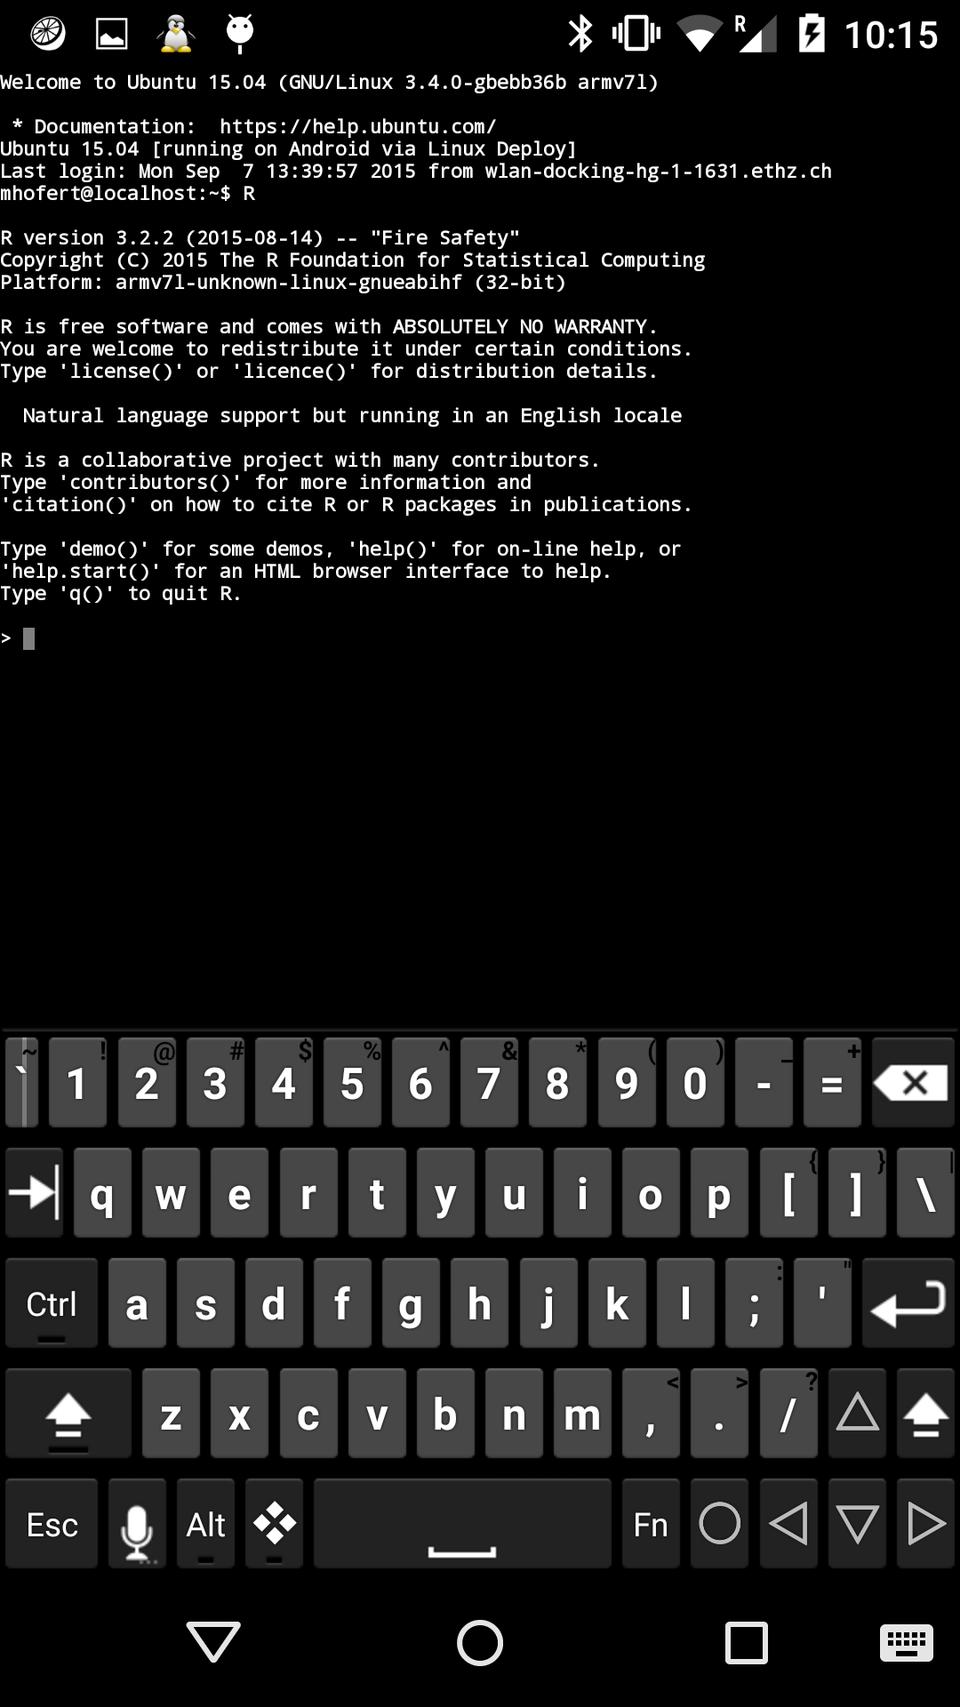
Figure 4. R Running over SSH via JuiceSSH
For installing R packages in a version-independent library, put R_LIBS_SITE=/usr/local/R/library in .Renviron, and make sure the /usr/local/R/library folder exists. You then simply can install most packages via install.packages() or other common methods. We installed a large number of packages (170) on the Linux OS, without problems; see Figures 5 and 6.
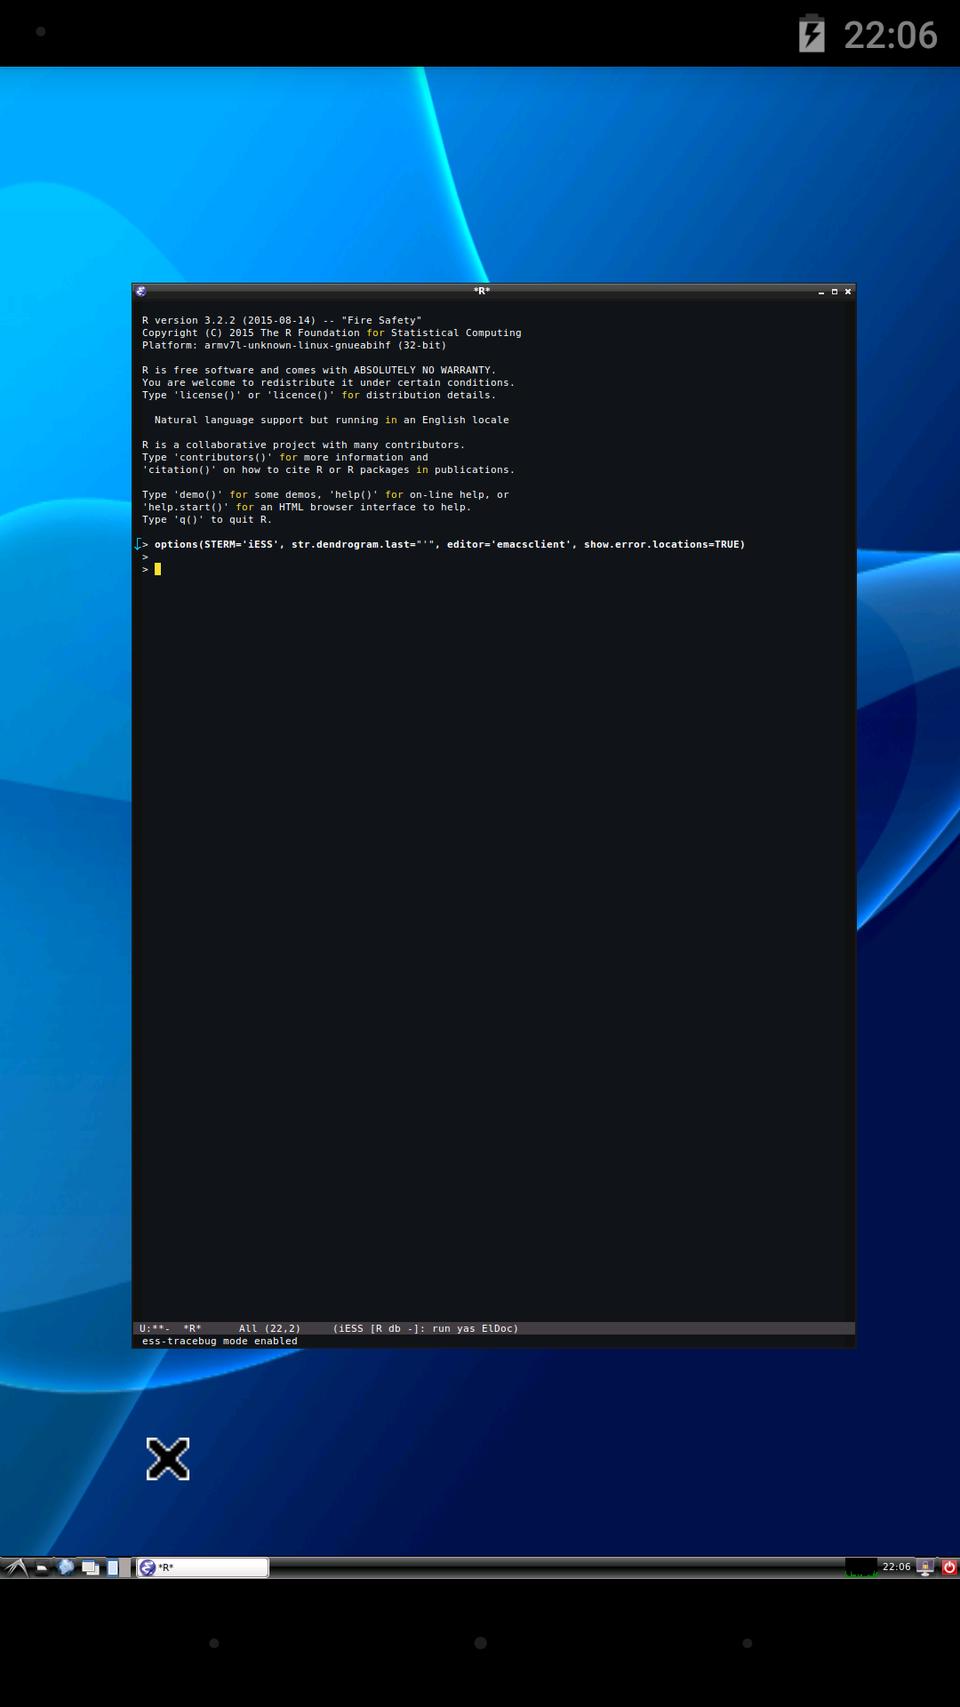
Figure 5. R Running via Emacs (and ESS) over VNC via VNC Viewer

Figure 6. A Snapshot of the Installation Process of Various R Packages
As a proof of concept and for roughly comparing runtimes with the laptop, we briefly ran two R example scripts on the Google Nexus 5 smartphone. The first is a shorter and slightly adapted version from the vignette of the R package “parallel”:
require(parallel)
require(boot)
require(microbenchmark)

## Setup
dat <- cd4
B <- 1000 # bootstrap replications
mle <- list(mean=colMeans(dat), var=var(dat))
dat.rng <- function(data, mle) MASS::mvrnorm(nrow(data), mle$m, mle$v)
bstr <- function(...) boot(dat, statistic=corr, R=B, sim="parametric",
                           ran.gen=dat.rng, mle=mle)

## Non-parallel version
N <- 100 # number of repetitions
set.seed(271)
mc <- 2 # number of cores
(mbm.nonpara <- microbenchmark(res.nonpara <- do.call(c,
 ↪lapply(seq_len(mc), bstr)), times=N))

## Multicore version
set.seed(271)
(mbm.mc <- microbenchmark(res.mc <- do.call(c, mclapply(seq_len(mc),
 ↪bstr)), times=N)) # ms
As a second example, we ran a slightly adapted version of “demo(VaRsuperadd)” from the R package “simsalapar”:
require(simsalapar)
require(copula)

## Setup
n.obs <- 1e4 # sample size
n.alpha <- 128 # number of quantiles
varList <- # list of variables
    varlist(
        n = list(value = n.obs), # sample sizes
        d = list(type="grid", value = c(4, 20, 100)), # dimensions
        family = list(type="grid", expr = quote(C), # copula families
 ↪(t=t_4)
                      value = c("normal", "t", "Clayton", "Gumbel")),
        tau = list(type="grid", value = c(0.2, 0.5, 0.8)),
 ↪# Kendall's tau
        qmargin = list(type="inner", expr = quote(F[j]), # margins
                      value = c(norm = qnorm,
                                t4   = function(p) qt(p, df=4),
                                Par2 = function(p) (1-p)^(-1/2))),
 ↪# Pareto(2)
        alpha = list(type="inner", value = 0:n.alpha/n.alpha))
 ↪# VaR confidence levels

## Function to Compute F_{X_1+..+X_d}(d*F_1^-(\alpha))
doOne <- function(n, d, family, tau, qmargin, alpha)
{
    cop <- switch(family,
                "normal" =
                  ellipCopula("normal",
 ↪param=iTau(ellipCopula("normal"), tau=tau),
                              dim=d),
                "t" =
                  ellipCopula("t", param=iTau(ellipCopula("t"),
 ↪tau=tau), dim=d),
                "Clayton" =
                  onacopulaL("Clayton",
 ↪list(th=iTau(archmCopula("clayton"), tau),
                                             seq_len(d))),
                "Gumbel" =
                  onacopulaL("Gumbel",
 ↪list(th=iTau(archmCopula("gumbel"), tau),
                                            seq_len(d))),
                stop("unsupported 'family'"))
    U <- rCopula(n, copula=cop) # sample from the copula

    ## compute F_{X_1+..+X_d}(d*F_1^-(\alpha)) for all confidence
 ↪levels alpha
    ## => VaR_alpha superadditive <=> F_{X_1+..+X_d}(d*F_1^-(\alpha)) -
 ↪alpha < 0
    t(sapply(qmargin, function(FUN)
 ↪ecdf(rowSums(FUN(U)))(d*FUN(alpha)) - alpha))
}

## Run
(dc <- parallel::detectCores())
(nc <- if(dc <= 2) 1 else 2)
system.time(res <- doMclapply(varList, cores=nc, doOne=doOne))

## Results
val  <- getArray(res) # array of values
err  <- getArray(res, "error") # array of error indicators
warn <- getArray(res, "warning") # array of warning indicators
time <- getArray(res, "time") # array of user times in ms

## Warnings, errors, run time
if(any(err > 0))
ftable(100* err, col.vars="tau") # percentage of errors
if(any(warn > 0))
ftable(100*warn, col.vars="tau") # percentage of warnings
ftable(time, row.vars=c("family", "d"), col.vars="tau") # run time

## Plot of VaR estimates (for t_4 margins)
m <- "t4"
dimnames(val)[["tau"]] <- paste0("tau==", dimnames(val)[["tau"]])
mayplot(val[qmargin=m,,,,], varList, row.vars="family", col.vars="tau",
        xvar="alpha", ylim="local")
The latter example concerns a standard problem in Quantitative Risk Management and involves simulating high-dimensional multivariate random vectors from various distributions, approximating the distribution function of the sum of their components and deciding, for a range of quantiles, whether the risk measure Value-at-Risk is subadditive (see the article by M. Hofert and M. Mächler, “Parallel and other simulations in R made easy: An end-to-end study”, Journal of Statistical Software, 69(4), 2016 for more details).
Figure 7 shows the example while being run on two of the four cores of the smartphone (see the htop output) and the graphical output of the result (Figure 8). This example was run exactly as on the laptop, by opening Emacs and executing the code line by line as one would do with most R scripts; in particular, we did not have to change our workflow to run this code on Android as we essentially run it on a Linux OS.
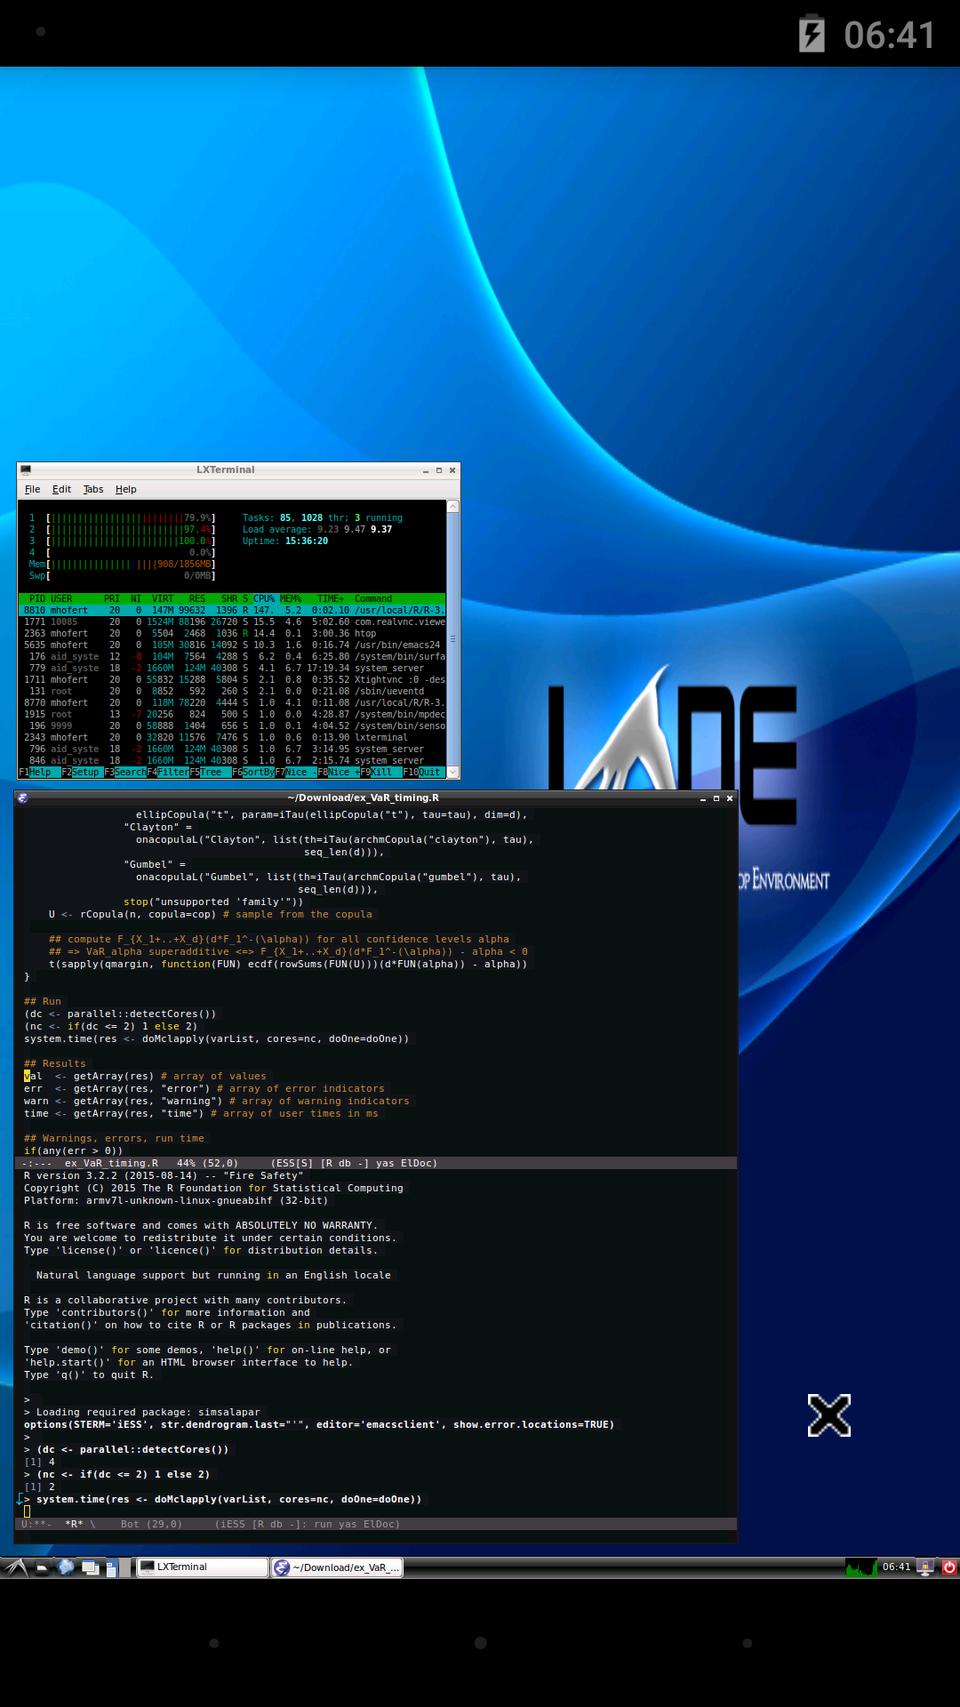
Figure 7. R Code Running on Two Cores of a Google Nexus 5 Android Smartphone over a VNC Connection via VNC Viewer

Figure 8. The Graphical Output of the Result from Figure 7
Table 1. Comparison of the runtimes on the Google Nexus 5 vs. the MacBook Pro (2015)
| Example 1 single core | Example 1 double core | Example 2 single core | Example 2 double core | |
|---|---|---|---|---|
| MacBook Pro (2015) | 156ms | 123ms | (18s, 1.8s, 21s) | (18s, 1.7s, 12s) |
| Google Nexus 5 | 1042ms | 631ms | (141s, 4.5s, 159s) | (167s, 4.2s, 96s) |
Table 1 shows the runtimes of the examples on the Google Nexus 5 smartphone and a MacBook Pro (2015) in a single-core and a multi-core setup. Runtime for Example 1 is measured by microbenchmark. Runtime for Example 2 is by system.time() in the form (user, system, elapsed).
Clearly, this provides only a limited insight as to R's performance on a mobile device, but there are a few things to note:
One major aspect of R is that it provides graphics. With the approach described above, we obtain access to graphics on R without the need to print them to files to be able to access them (as is often done when working without GUI access). Even on the Google Nexus 5 (full HD—that is, 1920 x 1280 pixels), graphs looked sharp; see also Figure 4. With more and more Quad HD devices (2560 x 1440 pixels) on the market, the ability to run R (via GUI) on Android devices might become even more interesting.
To our surprise, even after lengthy installation processes and repetitions of testing and running code on the smartphone, it did not overheat in any way (a 30-minute Skype call or Google Hangout via the smartphone produced much more heat). This might be due to the fact that there is a large gaming market on Android that overall has pushed the hardware development for smartphones quite a bit in recent years; installing and running R and related tools might still be considered rather “light” in contrast to what modern games demand from smartphones.
The runtimes on the smartphone are, of course, larger than on the new MacBook Pro. However, if necessary, one still would be able to do some serious work on a smartphone (for example, to fix bugs, rerun code, prepare plots and slides for talks and so on), including multicore computations. Furthermore, note that the Lenovo X1 Carbon (2013; Ubuntu 14.10) we originally used during our testing phase led to (user, system, elapsed) runtimes of (161s, 7.6s, 94s), which is much closer to the runtimes on the smartphone.
After all, we are using a smartphone from 2013 here. In the fast-developing Android world, this is rather old hardware and a more up-to-date Android flagship (with a faster processor) might be expected to score much better.
The approach described above to run R on Android seems easier than it is. In fact, we had to do the installation procedure described here a couple times to overcome various challenges. Considering some of these issues, here are some tips and tricks:
External SD card: our Google Nexus 5 did not allow for an external SD card. If an Android device allows for that, you can put an ext4 partition directly on the SD card and “more directly” install Linux (see, for example, whiteboard.ping.se/Android/Debian). More and more flagship devices do not provide expandable storage anymore though (such as the Galaxy Note line of Samsung).
Interacting with Linux via VNC: we successfully used the bVNC app for quite a while, but it did not work properly under Android 5.1.1 and was essentially not usable anymore. Also, we originally worked with “Complete Linux Installer” instead of “Linux Deploy”, however, there were other app-related challenges to overcome. As mentioned, you might need to adapt some of the tools discussed here to get the job done. Fortunately, the Android app ecosystem typically provides several apps for the same task, which gives you other options to try.
Upgrade to Android 5.1.1: if your device can be upgraded, upgrade it to Android 5.1.1, as there have been major improvements in energy consumption over Android 4.4. When we conducted the installation process under Android 4.4, although connected via USB to the laptop the whole time (and thus being charged while in use), the battery still was (slowly) draining. Under Android 5.1.1, battery status remained constantly high.
How files can be copied (or moved) to or from the device: for productivity, you need to be able to copy files to and from the device. As mentioned, you conveniently can use “Android File Transfer” to transfer files to the phone's root directory (the folder shown by default when Android File Transfer is opened). They then appear in /storage/emulated/0 on the Android device and under /mnt/0 from within the Linux OS. The latter is a great feature of “Linux Deploy” (and much more complicated with the “Complete Linux Installer” app, for example). A terminal-based method to copy files to the Android device is to use adb push—for example, doing adb push foo.R /sdcard/Download copies foo.R to the respective folder on Android. One limitation of adb push is that unlike cp or mv, it does not allow you to push several files or folders to the device at once. Finally, if you need to access files on a USB stick, many modern Android phones provide USB on-the-go (OTG) adapter cables for this task.
The size of the Linux OS image: during one iteration of the installation procedure described above we ran out of space, although the disk image seemed to be large enough (even when we selected 18GB). It turned out that the image contained too many files (in the folder ~/.emacs.d due to backup files from Emacs being copied to the Linux OS). We then tried to enlarge the Linux OS image, but ran into several problems (including no longer being able to start the VNC server). Overall, we recommend proceeding carefully with the installation, checking disk space (for example, via df -h to keep track of /dev/loop0) and making sure the Linux OS image is large enough. Messing around with the image size after the installation (adjustable from within Linux Deploy) is not recommended.
Screen size: although a smartphone's screen size is nothing you'd want to work on exclusively, the trend seems to be moving toward bigger screen sizes and phablets. Even on the 5" Google Nexus 5, it was possible to work for several hours. Besides tablets, a future alternative might be to use virtual reality goggles, which might be interesting when working on an airplane where space is very limited.
Installing RStudio: RStudio needs to be compiled from source as no ARM binaries are available. During our testing, we tried to install RStudio by downloading https://github.com/rstudio/rstudio/archive/master.zip, copying it to the Linux OS, unzipping it, installing the required dependencies (see the install-dependencies-debian subfolder; this took several hours) and then doing cmake . -DRSTUDIO_TARGET=Desktop -DCMAKE_BUILD_TYPE=Release. The latter command failed though with the message CMake Error at src/cpp/desktop/CMakeLists.txt:69 (get_filename_component): get_filename_component called with incorrect number of arguments. An alternative would be to follow along the lines of https://github.com/dashaub/ARM-RStudio (see https://github.com/dashaub/ARM-RStudio/blob/master/ARM-RStudio.sh for the required steps), but we didn't have the required disk space left on the Google Nexus 5 to try this installation process (and it might take several hours to install).
The input device: although technically possible with the Hacker's Keyboard, it's not practical to interact with the smartphone only over the software keyboard (a large tablet might be a different story). We connected a Bluetooth keyboard to the Google Nexus 5, but had problems allowing features like a more productive remap of the Ctrl key to Caps Lock. The app “External Keyboard Helper Settings” might be a solution here, but we could not get this (and other features) to work. We did not go as far as utilizing xmodmap for that purpose, as ideally, this should be solved on Android. For our proof of concept here, using the Bluetooth keyboard worked well, but the input device used to interact with Android or the Linux OS (and thus R) is still one of the major productivity bottlenecks. Also note, that the behavior was somewhat different when connected via SSH or via VNC. For example, the Emacs key combination C-space for the command M-x set-mark-command did not work when connected via SSH with JuiceSSH, but it worked when connected via VNC with VNC Viewer. Keyboards more specifically designed for Android devices and with more focus on productivity might be interesting here, such as the recently introduced LG's Rolly keyboard (which also would be easy to carry around).
The input device (once again): one more convenient way to interact with the device during the installation process was the following. Install and run TeamViewer on the laptop (see www.teamviewer.com/en/index.aspx) and the “TeamViewer QuickSupport” app on the smartphone. This way you can mirror the smartphone display on the laptop and use the laptop's keyboard as an input device. Two hiccups we encountered here were 1) some Emacs key combinations still were not sent to the device properly (this may be related to the problem mentioned previously), and 2) the laptop shows the smartphone's display with a small but annoying time lag. Nevertheless, using the laptop's keyboard while looking at the smartphone's display worked well and did not require a Bluetooth keyboard.
This article presents an approach for running a full version of R and related productivity software on Android devices within a Linux OS in a chroot environment. SSH or GUI access (via VNC) allow you to connect to the Linux OS and run R and related productivity tools (even on multiple cores).
Some advantages of this approach:
You don't have to make sacrifices on the software side; you can run full-blown versions of Linux, R, LaTeX, Emacs and so on.
You don't have to use the Android device as a thin client, so you don't need to have Internet access.
All software tools used here are freely available at no cost.
Once the installation process is finished, you can access R simply by starting Linux via Linux Deploy→Start and then connecting to the running Linux OS via SSH (with JuiceSSH) or VNC (with VNC Viewer).
With a VNC connection, you have full support of R graphics.
You easily can access and transfer files from a laptop to Android, the Linux OS and back.
The performance for everyday tasks is good. Also, more and more Android devices come with 64-bit (and much faster) processors (such as the Snapdragon 810), which may lead to significant improvement over the performance we experienced.
Although no real show-stoppers, there are some drawbacks we should mention as well:
The installation process is (much) more time-consuming than simply installing more apps, simply because you basically are installing full desktop versions of Linux, R, LaTeX and so on.
Updating the Linux OS via apt-get is straightforward, but updating Android requires a complete re-installation, including rooting. Note that this problem might be circumvented when the Linux OS is installed on an external SD card (if supported by the device).
As mentioned earlier, the device's location affects the IP address of the SSH server. As this is not propagated to JuiceSSH automatically, this is a bit inconvenient (and a typical source of error when the connection to the Linux OS fails).
As pointed out previously, the main bottleneck is not the weaker processing power of the Android device, but rather the interaction with device itself. On the one hand, you could try harder to make a full keyboard work more easily with Android (including, for example, a faster key repeat rate or more key combinations for productive work). On the other hand, you might raise the question as to why you wouldn't just work with a laptop if a full keyboard is required. More portable input solutions can be expected in the future, but the classical keyboard hasn't changed very much since its introduction. Two interesting mobile approaches for the future seem to be: 1) a keyboard developed by Tactus Technology (tactustechnology.com), which can appear/disappear dynamically and, thus, enhance software keyboards (this might be especially interesting on tablets where you can type with ten fingers); and 2) a glove keyboard (https://www.youtube.com/watch?v=vij420qVqCY), although it's far from the production stage. With more and more mobile computing devices being used, we hope to see more development on mobile input devices in the future, especially for productivity purposes. For example, software keyboards, such as SwiftKey, Swype, Google Keyboard or Fleksy (offering different enhancements for speed-typing text), are widely used on wearable devices, but are practically of no use for productivity purposes, as certain keys or key combinations (for coding, for example) are simply not available.
Overall, we were pleasantly surprised by how “far” mobile productivity (including R) already is, and we hope that the quirks will be solved in the near future. Projects like Remix Mini (https://www.kickstarter.com/projects/1123481999/remix-mini-the-worlds-first-true-android-pc) even aim at bringing this experience (and the related “less is more” paradigm) to the desktop (still in a portable way). For future research, a glance toward Mac OS/iOS certainly would be interesting. Besides available thin clients, the current state of the art on mobile iDevices is unclear to us. A rather old post (www.r-bloggers.com/running-r-on-an-iphoneipad-with-rstudio) briefly addresses some issues (such as jailbreaking and performance), but that might not apply to newer Apple devices anymore.
