
Automate a monotonous routine with a setup powered by Linux to solve a real-world problem.
Linux Journal previously has published articles that provide insight on the applications of udev, ddrescue and Raspberry Pi home automation employing the use of relays. This article combines the unique features of each of those tools to solve the issue of failing hard disks.
My Uncle Tee has a knack for relegating most of his computer-related problems to me. During our last visit, I was confronted with a task of transferring the files on an old 750GB USB hard disk to a newer one. My knee-jerk reaction was to plug the device in to my Linux box, mount it and use cp or rsync to replicate all the files to the new disk.
And, that's exactly what I did. With the old and new disk drives plugged in to USB ports and mounted at /media/usb0 and /media/usb1, respectively, I proceeded to invoke the rsync command. (Use your distro's package manager to install rsync if it is not already present.) I must mention, however, that it took a considerable amount of time for the old drive device to register itself, and the mounting time also was noticeably protracted. All of this indicated a failing hard disk drive:
$ rsync -av --progress --inplace \
/media/usb0/* /media/usb1/
Everything seemed okay, and I continued nursing my warm cup of favorite black tea—at least, until it started to look otherwise. I could not fail to notice the input/output error messages that started to appear in rsync's verbose output. Then, rsync itself exited abruptly with error code 23. This translates to “partial transfer” from the errcode.h header file in rsync's sources. Immediately re-running the same command confirmed the source no longer existed.
The old hard disk device that was mounted at /dev/usb0 was not present in the output of lsusb and blkid. It was suspended after the first 13GB was transferred, and I had to power-cycle the hard disk for it to show up again in the list of detected devices. rsync exited prematurely again in another attempt, this time after a few megabytes.
In fact, a few more attempts followed, each one adding a decreasing amount to the transferred files. I obviously was making little progress with this laborious process, which also required a lot of attention. That was when it occurred to me as to why my Uncle Tee wanted to relegate this task to me. Apparently, the hard disk had not registered on his Windows machine for some time now, and with no available backup, he was in need of a miracle.
I needed a solution that would just continue where it left off after a previous unsuccessful attempt. A solution that skipped the mounting step also could improve the overall process in rescuing the contents of the disk. Replicating the files always could be done at a later stage when an image was available. ddrescue came in handy here. It maintains a log file that is used to resume the rescue process. A good review of ddrescue is available at www.linuxjournal.com/magazine/hack-and-when-disaster-strikes-hard-drive-crashes. (Again, use your Linux distro's package manager to install ddrescue.) I basically ran the following command with root privileges:
# ddrescue -dv /dev/sdb1 ./freeagent.img \
./freeagent.log
The /dev/sdb1 device corresponds to the source partition I wanted to recover. I ensured that there was enough space on the destination partition for the freeagent.img image file to be generated. The last argument is a log file maintained by ddrescue to make resumption possible. Although this is optional, it will be very much needed in this case, as the ddrescue process will be resumed a number of times.
It is also possible to run ddrescue with a retry option, in which case it retries bad blocks a specified number of times before proceeding. However, it's not advisable to use this option in this situation, as it could wind the failing hard disk down to a halt at a faster rate. With the log file in place, it is always possible to rerun ddrescue after a first complete scan to retry the bad blocks. The generated image file will be updated accordingly.
Armed with the above knowledge, I planned the recovery process:
Run the ddrescue command as above.
Power-cycle the hard disk when it suspends.
Wait until the device is detected by the machine and get the new device name.
Go to step 1, updating the source device with the name from step 3.
After looping through the above sequence a few times and also considering the sometimes tiny progress being made on each iteration, one thing was clear: I was going to spend a great part of the rest of my life staring at a console screen waiting for the return of an error message, manually power-cycling the hard disk, restarting the rescue process and start staring again. I needed to upgrade my solution to free me from this torture. This solution should require as little human intervention as possible from the beginning until the full image is generated. This was when I started to explore the possibility of employing a Raspberry Pi for the task. (The reasoning that led to this choice will become clear as the solution takes shape.)
I happened to own a Raspberry Pi 2 model B. I dumped the latest version of the Raspbian image onto a MicroSD card, and this is how the solution started. (Note: you can find a good how-to on how to get this running at https://www.raspberrypi.org/documentation/raspbian.) You can use any of the available Raspberry Pi models, although you might need to adapt the steps that follow slightly (I'll try to point it out if your mileage will differ as a result of using a different model).
Step 1 is the one-liner as already shown above. But, what happens after a power cycle? A udev rule could be added to resume the ddrescue recovery when the device is detected after being powered on. udev is currently the default device manager for the Linux kernel, and it comes pre-installed in almost all modern distributions, including the Raspbian image of the Raspberry Pi.
To create a rule, you need to know the device information of the hard disk. Once you have the device name and the partition to be recovered, you can call up the rest of the information with the following:
$ udevadm info --query=property --name /dev/sdb1
You also can monitor the flow of information during device detection by running the following command before plugging in the USB hard disk and powering it up:
$ udevadm monitor --environment
A stripped-down version of the section I am looking for looks like the following:
UDEV [6899.460576] add /devices/platform/soc/...
ACTION=add
DEVNAME=/dev/sdb1
DEVTYPE=partition
ID_SERIAL=ST3750640AS_5QD463QL
ID_SERIAL_SHORT=5QD463QL
ID_TYPE=disk
SUBSYSTEM=block
TAGS=:systemd:
You will use this information to prepare the udev rule that will be saved in the /etc/udev/rules.d directory. It is a good idea not to add your rule directly to any of the existing default files. Create a new file following the naming conventions for your new rule. I named my file 90-freeagent.rules, and it contains a rule to match the USB hard disk using the information from above:
ACTION=="add", KERNEL=="sd?1", \
ENV{SUBSYSTEM}=="block", \
ENV{ID_SERIAL}=="ST3750640AS_5QD463QL", \
ENV{DEVTYPE}=="partition", \
RUN+="/opt/bin/freeagent.sh '%E{DEVNAME}'"
With the exception of the last section, notice that the rule basically is made up of a string matching the attributes obtained above. The last section specifies the path to a script to be run when a match is made. Notice also that the syntax allows me to pass the name of the device detected as an argument to the script. Now you safely can check steps 3 and 4 as done.
There is one more fact about udev worth mentioning: RUN can be used only for very short-running foreground tasks. Scripts with a protracted duration will be terminated prematurely and unconditionally after the event handling has finished. udev enforces this to prevent blocking all further events for the device or a dependent one. There are a number of ways to circumvent this; some obviously are more elegant than others. I relocated the main job to another script and delegated this to the atd dæmon. Install the “at” package if you are following along.
Now you can roll out the contents of the script that is referenced by the RUN section of the udev rule:
#!/bin/bash
export HDDEVNAME=$1
at -f "/opt/bin/ddfreeagent.sh" now
The worker script, named ddfreeagent.sh, for now, will contain the following:
#!/bin/bash

IMG=/media/usb0/freeagent/freeagent.img
LOG=/media/usb0/freeagent/freeagent.log

/usr/bin/ddrescue -dv ${HDDEVNAME} ${IMG} ${LOG}
Ensure that both scripts have the execute permissions set.
Step 2 currently is the only one outstanding. You need a way to power-cycle the hard disk when it suspends. This sounds like a task for a relay. The Raspberry Pi makes interfacing a relay to a PC even easier, which adds more weight to this choice of target device or platform on which to implement the solution. It already comes equipped with a set of easy-to-use GPIO pins that could be used to perform the power-cycle procedure through a relay.
The eventual solution employs a solid-state relay whose control signals come from the GPIO pins of a Raspberry Pi unit. The relay controls the power to the hard disk. The rescue process starts by triggering the relay to turn on the hard disk. The Raspberry Pi senses the device, and the udev rule implemented above spawns a script that starts the ddrescue process. This comes to an abrupt end when the hard disk suspends and returns with an error code, which is caught and processed accordingly. The relay then fires a reset sequence to the hard disk power supply in case of an error return from ddrescue, and the whole process starts again. The log file maintained by ddrescue means the rescue operation resumes from where it left off on the previous attempt. A success return from ddrescue ends the rescue process.
As you may have gathered from the above summary, this step involves playing with naked wires that will carry dangerous voltage levels. It is very important to observe safety precautions. Make sure you do all the work when the devices are off and can worked on safely. I recommend that you proceed with the implementation only when you are sure of what you are doing.
I managed to find a solid-state relay at a local store to use to control a load running on AC power. This is essential, as relays that control DC-powered loads also are available, and they are by no means interchangeable. Working with these little boxes is very convenient, as they also respond to voltages as little as 3.3V. As this also happens to be the voltage level of the Raspberry Pi output pins, this means they can be connected directly. Other relay types (mostly coil-based conventional relays) require a separate circuit to bridge them to the Raspberry Pi unit. This is necessary to raise the 3.3V to levels that can trigger the relay. These circuits isolate the load and provide added protection to the unit. Solid-state relays typically come with built-in isolation circuits.
Having all the needed tools at hand, I proceeded to work on step 2. I identified one of the general-purpose pins on the board for use as an output pin. This pin, together with the ground pin, will be connected to the input side of the relay. The relay is clearly labeled: the ground pin goes to the negative terminal, and the chosen output pin goes to the positive.
Next, I found an old extension cord, striped off the insulation at a section along its length and severed the live cable. Both ends were then fed into the output or load terminals of the relay. This extension cord will be used to power only the failing hard disk. Figure 1 shows a picture of the setup.
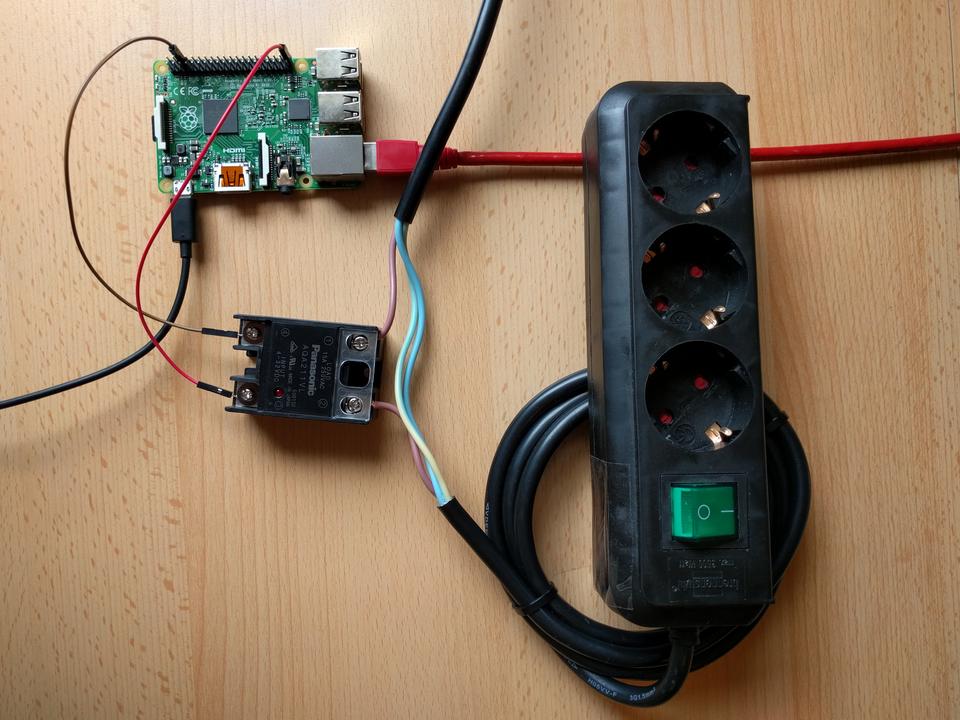
Figure 1. Hardware Setup
Two steps are needed to prepare the selected GPIO pin for output on the console. First, export the pin for the operating system to prepare the direction files. There are two different ways to refer to pins, and this can be a source of great confusion. Physical numbering is the natural way to refer to the pins, and it counts across and down from pin 1 at the top left (nearest to the SD card). GPIO numbering, on the other hand, refers to how the computer sees the pins and does not follow any particular order. You need to check the particular model of Raspberry Pi you are using and identify the correct way to refer to the pins. I use the GPIO numbers in the script here.
I used pin 40 (GPIO 21) on the Raspberry Pi 2 model B as my output pin. Run the following to export the pin:
$ echo "21" > /sys/class/gpio/export
Next, specify the direction of use—an output pin in this case:
$ echo "out" > /sys/class/gpio/gpio21/direction
With this done, and the above setup in place, the following command switches on the hard disk:
$ echo "1" > /sys/class/gpio/gpio21/value
Switch it off with this:
$ echo "0" > /sys/class/gpio/gpio21/value
At the end of everything, you need to clean up by un-exporting the pin:
$ echo "21" > /sys/class/gpio/unexport
Putting it all together, now you can update the contents of the ddfreeagent.sh worker script (Listing 1).
I also have included some logs to give me an idea of how long the whole process took and how many times I otherwise would have had to power-cycle the hard drive manually. Kickstart the chain process by triggering the relay to turn on the hard disk.
After about 27 hours and some 130 hard disk power cycles, ddrescue finally exited with success. (Your mileage will, of course, vary depending on the size and state of the hard disk and also on the Raspberry Pi model you're using.) This meant a mountable image of the failing hard disk was ready. I then mounted the image with a simple mount command:
$ mount /media/usb0/freeagent/freeagent.img /media/usb3/
And finally, I copied them to a backup directory:
$ rsync -av --progress --inplace /media/usb3/* /media/usb0/backup
Remember to disable the process when you're done to avoid unwanted runs of the cycle. You can remove the execute permissions from the udev target scripts and/or comment out the line containing the udev rule.
And, this concludes the story of how I managed to get Uncle Tee the miracle he so badly needed. All the files he couldn't do without were recovered successfully. I kept smiling as I sat there watching the hard disk being power-cycled, having to do nothing myself. There were no interruptions this time, as I sipped my favorite black tea.
