
Learn how to turn the Banana Pi into a great low-cost, low-power local network backup server.
In the September 2016 issue, I wrote an article called “Papa's Got a Brand New NAS” where I described how I replaced my rackmounted gear with a small, low-powered ARM device—the Odroid XU4. Before I settled on that solution, I tried out a few others including a pair of Banana Pi computers—small single-board computers like Raspberry Pis only with gigabit networking and SATA2 controllers on board. In the end, I decided to go with a single higher-powered board and use a USB3 disk enclosure with RAID instead of building a cluster of Banana Pis that each had a single disk attached. Since I had two Banana Pis left over after this experiment, I decided to put them to use, so in this article, I describe how I turned one into a nice little backup server.
Although Raspberry Pis are incredibly popular and useful if you want a small, low-powered, cheap computer, they have their downsides as network backup servers. One of the main downsides is low-performance disk and network speeds. A Raspberry Pi maxes out at 100Mbit on the network and offers only USB2 ports if you want to add a hard drive. Those limitations are what drove me to look for other solutions for my home NAS in the first place, and it's one area where a Banana Pi has an edge. Even though the modern Raspberry Pi 3 has a faster CPU, the old Banana Pi still beats it on network and disk I/O. This makes it pretty ideal as a standalone system for home network backups, depending on your needs.
In my case, I'm not backing up terabytes of media; I just wanted bare-metal backups of my servers and workstations along with backups of important documents. The size of your backups is important, because the Banana Pi is limited to a single SATA2 port, and the board itself can power only a 2.5" laptop drive. So if you want to stick with local power, you are limited to 2.5" hard drive sizes. That said, if you were willing to splurge on an externally powered SATA2 enclosure, you could use a 3.5" drive instead. In my case, I happened to have an old 2.5" 500Gb laptop drive lying around that I had since replaced with an SSD. Note that you probably will need to order the appropriate SATA2 cable to connect your hard drive with your Banana Pi—it doesn't typically come with the board.
Although I imagine you could just have the board and a laptop drive sitting on a shelf, I wanted to protect it a bit more than that. Since I have a 3D printer, naturally I went to Thingiverse to see if it had any cases for a Banana Pi. It turns out someone made just the thing I needed—a Banana Pi case that also had mounting points for a 2.5" hard drive. I printed out the case (in yellow, naturally) and was able to mount the board and the laptop drive without any issues.
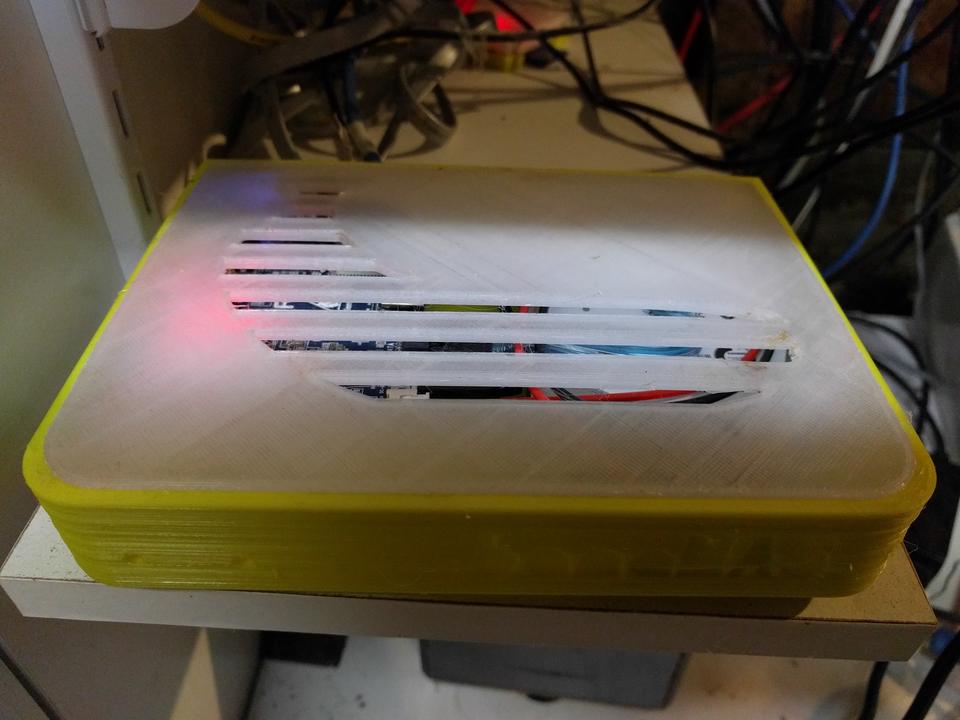
Figure 1. The Banana Pi NAS Case with Lid
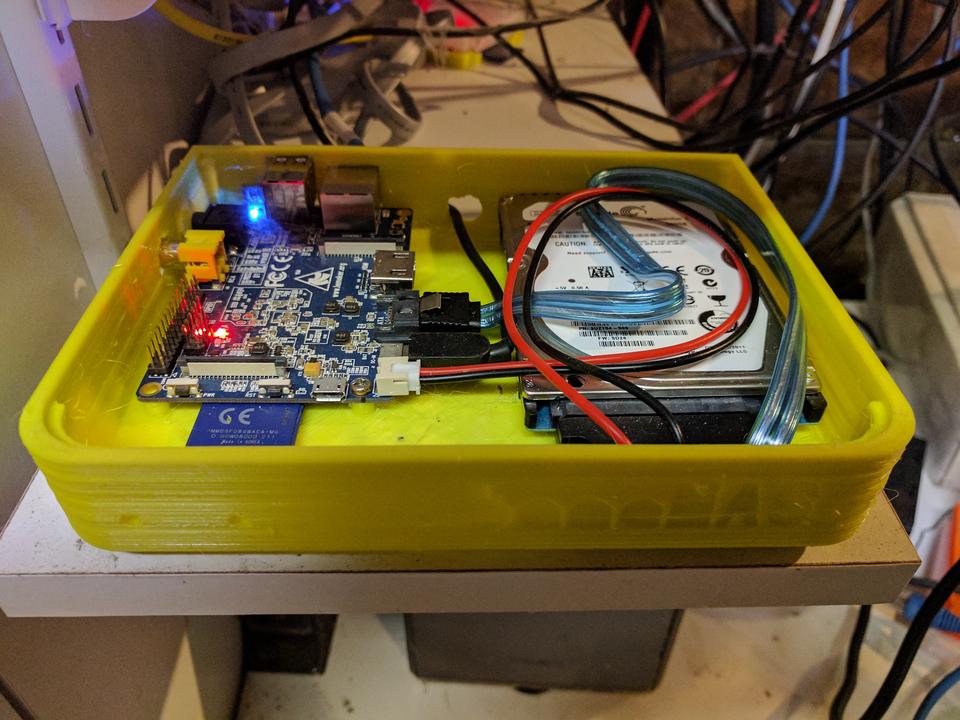
Figure 2. The Banana Pi NAS Case without Lid
I've been a fan of BackupPC as a backup solution for many years. It's available for just about any Linux distribution, supports SMB and rsync-based backups, and it provides a nice web interface to make it easy for users to navigate to their own backups and perform their own restores without having to involve an administrator. What's more, it's smart about combining full and incremental backups, and it takes advantage of hard links and compression so that it's very efficient with disk space. You can end up storing weeks of backups without taking much more space than one full backup might consume.
BackupPC already was packaged for the Debian-based distribution made for the Banana Pi, so it was easy to install. In my case, I already had been using BackupPC on my previous server, so I was able to copy over my configuration and backup archive to this new server, and I was ready to go. Obviously, in your case, you will want to follow BackupPC's documentation to add your own user accounts and backup jobs. It's pretty straightforward, and you can configure it both purely on the command line with configuration files or through the web UI.
I did make one tweak to my previous BackupPC configuration file for the Banana Pi. It turns out that the Banana Pi has a green LED on the board that you can control from Linux. The LED is bright enough that I was able to see it through the translucent plastic lid I printed for my case, so I thought it would be handy to turn it on whenever a backup was in progress. I ended up creating two basic scripts to control the LED. First, I created /usr/local/bin/led_on:
#!/bin/bash

echo 1 > /sys/class/leds/bananapi\:green\:usr/brightness
Then I created a corresponding /usr/local/bin/led_off script:
#!/bin/bash

echo 0 > /sys/class/leds/bananapi\:green\:usr/brightness
I then used chmod +x to add execute permissions to both of these scripts and tested them out with sudo (you need root privileges to write to that device), and sure enough, the LED turned off and on.
To make BackupPC use these scripts, first I had to make sure the local backuppc user could execute them as root, so I added the following line to my /etc/sudoers file:
backuppc ALL=(root) NOPASSWD: /usr/local/bin/led_on,
 ↪/usr/local/bin/led_off
Finally, I modified my /etc/backuppc/config.pl file to set the led_on script as a command BackupPC would run before it started a backup and led_off to be run after a backup completed. To turn the LED on, I changed the following BackupPC configuration settings:
$Conf{DumpPreUserCmd}     = 'sudo /usr/local/bin/led_on';
$Conf{DumpPreShareCmd}    = 'sudo /usr/local/bin/led_on';
$Conf{RestorePreUserCmd}  = 'sudo /usr/local/bin/led_on';
$Conf{ArchivePreUserCmd}  = 'sudo /usr/local/bin/led_on';
And to turn the LED back off, I updated the corresponding post-backup settings:
$Conf{DumpPostUserCmd}    = 'sudo /usr/local/bin/led_off';
$Conf{DumpPostShareCmd}   = 'sudo /usr/local/bin/led_off';
$Conf{RestorePostUserCmd} = 'sudo /usr/local/bin/led_off';
$Conf{ArchivePostUserCmd} = 'sudo /usr/local/bin/led_off';
Once I reloaded the BackupPC service, the LEDs worked great, and I could tell at a glance whether a backup was in progress. The nice thing about this setup for local backups is that it draws very little power and is silent apart from the noise from the hard drive.
