 | Designing Web Audio |  |

Basic sound editing
Digital effects
Web mastering: optimizing sound files for Internet broadcasting
Summary
When you have captured your audio source material, there are three critical steps to take before you integrate audio into your web site:
Perform basic sound editing to remove undesirable recording takes and unwanted artifacts, such as coughs or sneezes.
Add digital effects enhancements, such as reverb, delay, and pitch-shifting to amplify your soundtrack.
Apply web mastering techniques to optimize your sound files for web compression and delivery.
You can perform basic sound editing with any digital audio application that has routine cut, paste, and fade features. The sound-editing application we will refer to in this chapter is Macromedia's SoundEdit 16 (Macintosh and Windows). However, the concepts we discuss are the same for any basic sound editor, including CoolEdit (Windows), Sound Forge by Sonic Foundry (Windows), and Pro Tools by Avid (Macintosh and Windows NT).
Applying digital effects to your sound files is the most creative editing step, but it can also be the most confusing and troublesome. You can, for example, add too many effects and quickly lose track of what you've done to a file or how to backtrack to an earlier state. You can also add subtle effects such as reverb, delay, and equalization, or apply more drastic, sound-altering effects such as pitch-shifting, time expansion, and reverse. Learning which digital effects to use, and how and when to use them, takes practice and experimentation. In this chapter, you'll find guidelines to help fine-tune your application of digital effects.
Web mastering is the final optimization process before you encode your sound files into a web format. Audio files need to be custom-tailored for their respective output mediums: radio, film, television, home stereos, and of course the Internet. In this chapter, we will also discuss the techniques used to prepare sound files for digital delivery, drawing from traditional CD mastering techniques such as normalization and equalization.
By removing unwanted artifacts and glitches, applying the appropriate effects, and properly mastering your sound files, you greatly enhance your web soundtrack or voice-over. This chapter familiarizes you with all three of these techniques which will help bring the overall quality of your sound files up to professional broadcast standards.
After capturing your raw source material, you'll probably have to remove unavoidable, extraneous noises such as pops or clicks, system noise, 60 Hz electrical hum, or throat-clearing noises and coughs.
Properly cleaning up a sound file can be a time-consuming process. To capture the cleanest signal possible, you should start with a recording that has good dynamic range, optimized levels, and little system noise. Remember, the higher the quality of the original recording, the better the final edited version will sound when compressed for web delivery. A few extra minutes of planning in the recording studio can save you hours later in the editing studio.
SoundEdit 16
Macromedia SoundEdit 16 is a common digital audio application used in the multimedia industry. It is often bundled with software packages such as Director Studio. SoundEdit 16 is a stereo two-track editor featuring standard audio effects such as normalization, EQ, reverb, and delay as well as cut and paste features. It also provides support for all major web audio formats. For the latest updates and plug-ins, visit http://www.macromedia.com. Note that audio applications such as SoundForge and CoolEdit perform the same functions as SoundEdit 16.
Recording multiple takes of the same sound passage isn't neurotic, it's wise. Once in the editing suite, select the take that sounds best, then edit or delete artifacts that may have occurred before, during, or after recording. For example, remove the throat-clearing and breathing sounds that occur before someone begins speaking and the miscellaneous studio noises, such as a microphone stand being adjusted, that occur right before a recording session.
You can do this easily by watching the waveform as you listen to the sound, highlighting the section where the noise occurs and then clicking the delete or silence command in your audio editor.
After you cut out the major artifacts and reassemble the best takes into a contiguous sound file or audio region, smooth out the silences or pauses, keeping a consistent room tone in between phrases and passages of music. Room tone is the natural ambient sound in any given environment, such as a subtle background wind outdoors or the distant hum of an indoor generator or fan.
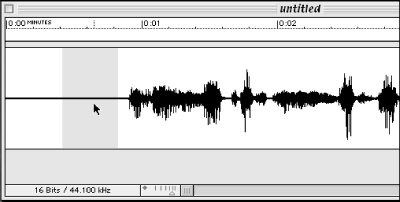
Even the vibration of "silence" varies from room to room. All sound files also have an inherent noise floor or a certain amount of system noise. It is nearly impossible to capture an absolutely silent signal. Thus, if you simply delete an artifact, there will be a small gap of perceptible dead space with low-level system noise in between the "silent" passages. (This gap is especially noticeable with headphones or a high-fidelity sound system.) To compensate for this effect, record about 20 to 30 seconds of room tone or low-level system noise and paste this over any artifacts. This process eliminates the dead-air syndrome. A sound file that starts with a room tone recording is shown in Figure 4-1.
The final and most difficult step at this stage is to remove unwanted artifacts embedded within passages of music or voice-over phrases. Such artifacts must be carefully removed or reduced in volume without affecting the desired sound. In some cases, if the unwanted artifact occupies only a few milliseconds of time, you can simply delete that portion without detecting any major difference in the playback of the sound file. In most cases, however, you will have to settle for reducing the amplitude or volume of the spike or unwanted region to avoid a perceptible gap or glitch.
For longer playing artifacts, here are a few other techniques.
Beware of degradation
Removing embedded artifacts requires a delicate trade-off between allowing for some form of file degradation to fix the error and keeping the original, louder, more noticeable glitch. Regardless, be aware that the process of using volume and EQ to remove unwanted noises overlaying a mix of other sounds causes some form of degradation to your sound file.
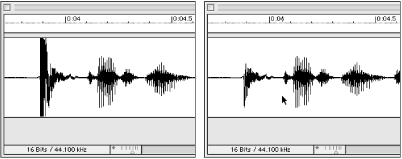
To remove a large spike from an audio waveform, use the zoom-in command until you locate and select the offending waveform. Audition the selection first to make certain that you have identified only the portion of sound you want to remove. Next, simply hit the delete key to remove the section. Figure 4-2 shows a sound file with a spike at the beginning and the same file with the spike removed.
Cutting out an entire portion of audio often results in an unacceptable glitch when the two ends are spliced back together. If you have a loud waveform spike that cannot simply be removed from the middle of an important section, you will have to settle for volume, or amplitude, reduction. The idea is simply to reduce the volume of the specific selection in order to minimize the noise in relation to the rest of the sound clip.
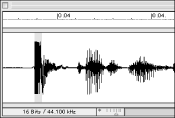
First, select the artifact and try reducing its volume by -3dB to -9dB so that it stays just under the volume of your room tone. Select the section of noise from your waveform and choose the Amplify command. Enter a very low value like 5% or 10%. This reduces the selected waveform by a substantial amount. Compare the reduced spike in Figure 4-3 to the one in Figure 4-2. Avoid reducing the volume below the inherent room noise, however, as this will produce a noticeable gap or change in volume when the sound file is played back.
The best way to determine the right volume level is to watch the contour of the waveform in your editing window. Locate the spike in the waveform, then reduce it to the level of the surrounding room tone. Although this technique does not remove the glitch entirely, it makes it is less noticeable and in some cases almost imperceptible.
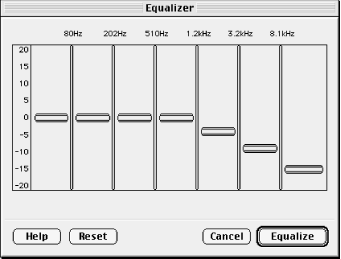
Another commonly used method for removing artifacts while preserving the underlying sound file is equalization. Equalization is a more precise method for altering the gain or "volume" of a limited set of frequencies within an audio region. It is used as an alternative to globally reducing the volume of all the frequencies. For example, certain artifacts, such as wind noise or the sound of bumping a microphone stand, are diminished by reducing the frequencies below 60 Hz and 80 Hz. Reducing certain high frequencies is also useful for "de-essing," or removing over-pronounced "sss" sounds during a voice-over recording.
To boost or cut the frequency range of an unwanted artifact, audition the sound file in loop playback mode. Adjust the frequency slider that corresponds to the type of sound you are trying to alter (boost or cut), as shown in Figure 4-4.
|  | |
| 3.3. Summary |  | 4.2. Digital effects |

Copyright © 2002 O'Reilly & Associates. All rights reserved.