 | Cascading Style Sheets: The Definitive Guide |  |

Generated content is a new way of adding things to existing content without having to alter the content itself. It's done by using the pseudo-elements :before and :after and the property content. Here's a basic example of how it works:
P:before, P:after {content: "\""; color: gray;}

<P>This is a quote.</P>
The browser will display what's shown in Figure 10-15.

Note that the double-quote mark was escaped out -- that is, preceded by a backslash. This is necessary, since text values for content must be enclosed in double quotes. You could also place images before (or after) content, using something like P:before {content: url(para.gif);} to put a paragraph symbol at the beginning of each paragraph. You can even string multiple values together like this (shown in Figure 10-16):
P:before {content: url(para.gif) " -- ";}
This would cause each paragraph to be started with a paragraph symbol, a blank space, two dashes, and then another blank space. Note that all of this is considered part of the paragraph and is inlined within it. The spaces appear before and after the double dash because they're included in the string value. If these spaces were omitted, then space would not appear to either side of the dashes.
Let's say, though, that you want to do some real quoting, using real quotation marks -- you know, the curly double quotes that are so hard to specify in HTML and which often don't show up even if you do try to specify them. CSS2 has ways to handle this.
content has some other values you can use:
open-quote, which inserts an opening quotation mark
close-quote, which inserts a closing quotation mark
no-open-quote, which prevent the insertion of an opening quotation mark
no-close-quote, which prevent the insertion of an closing quotation mark
So if you wanted your quotations to begin and end with quotation marks, instead of typing in a literal quotation mark, you could let the browser insert "smart quotes" for you.
BLOCKQUOTE:before {content: open-quote;}
BLOCKQUOTE:after {content: close-quote;}In the same vein, CSS2 also includes properties for automatic numbering. First, you can specify a counter as a value of content. This can be a bit tricky, and it would take too long to run through all the possibilities, but here's an example. Say you wanted the chapters and sections of a document numbered 1, 1.1, 1.2, 1.3, and so on. In addition, you're using H1 for your chapters and H2 for your sections. Here are the declarations you would use:
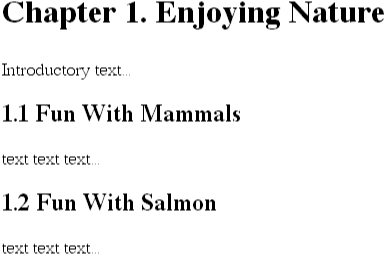
H1:before {
   content: "Chapter " counter(chapter) ". ";
   counter-increment: chapter;   /* Add 1 to chapter */
   counter-reset: section;       /* Set section to 0 */
 }
 H2:before {
   content: counter(chapter) "." counter(section) " ";
   counter-increment: section;
 }
As we can see from Figure 10-17, the user agent will add the word "Chapter" and a number at the beginning of H1 text. This number is automatically incremented with each H1, due to the declaration counter-increment: chapter;. It also sets the section counter back to zero through counter-reset: section;. Then, for each section heading (H2), the browser uses the chapter number, followed by a period (.) followed by the current section number, which is also automatically incremented.

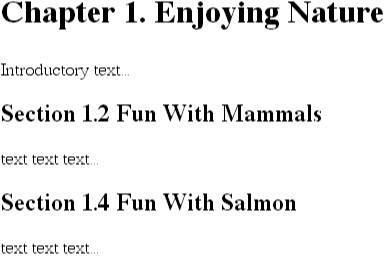
You don't have to increment by one every time, either. You can define any integer as the increment value, including zero and negative numbers. If you want each section to have an even number, as we see in Figure 10-18, then you can declare the following:
H2:before {
   content: "Section " counter(section) ". ";
   counter-increment: section 2; /* Add 2 to chapter */
}
You can also keep an element from incrementing a counter by setting its display to none. Of course, that will cause the element to disappear altogether.
You can do even more by using the value marker for the property display, which enables you to define your own marker styles for any element at all. You're already familiar with markers, as it happens -- the bullets and numbers at the beginning of list items are markers.
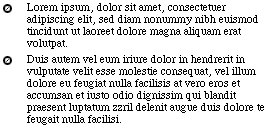
Let's say we want to recreate the way unordered lists behave. For the purposes of this example, we'll use the image disc.gif to stand in for the normal bullets. Using marker properties, we would declare:
LI:before {display: marker;
   content: url(disc.gif);
   marker-offset: 1em;
}
This will insert the disc image before each list item, and set it to be offset from the left edge of the LI content by 1em, as shown in Figure 10-19.

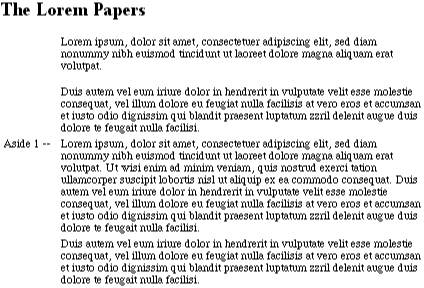
Marker properties are not restricted to list items, however. Let's say that, throughout a document, there are a few paragraphs with a class of aside. We wish to call attention to these paragraphs by inserting a small note to the side of each one. Here's one way to do it:
BODY {counter-reset: aside-ctr;}
P {margin-left: 10em;}
P.aside:before {display: marker;
   content: "Aside " counter(aside-ctr) " --";
   counter-increment: aside-ctr;
   text-align: right;
   marker-offset: 1em;
   width: 9.5em;
}
The effect will be something like that seen in Figure 10-20.

This is yet another aspect of CSS2 that, once it's been properly implemented, will allow authors to do quite a bit with their documents.

Copyright © 2002 O'Reilly & Associates. All rights reserved.